How to Fill Cheque in India – Format, Example & Tips
 AuthorMehul Jagwani
 Reviewed ByCA Ajay Savani


- What Exactly is a Cheque?
- Step-by-Step Process to Fill a Cheque
- How to Fill a Cheque for Self
- How to Fill an SBI Cheque
- How to Fill a Cheque Deposit Slip
- What Does a Cheque Deposit Slip Look Like?
- Common Mistakes to Avoid While Filling a Cheque
- Conclusion: A Small Piece of Paper, a Big Responsibility
- Frequently Asked Questions About Filling a Cheque
Filling a cheque may look simple, but even a small mistake can create problems. If you write the wrong date, miss your signature, overwrite the amount, or enter incorrect details, the cheque may get rejected or bounce. In India, a cheque bounce can also lead to legal trouble under Section 138 of the Negotiable Instruments Act, 1881.
That is why it is important to know how to fill a cheque correctly. In this guide, you will learn the right format, examples, and simple tips to fill a cheque without mistakes.
What Exactly is a Cheque?
A cheque is a written instruction from an account holder to their bank, directing it to pay a specific amount to a specific person or entity. Think of it as a formal payment order — you are telling the bank: “Pay this much money to this person, on my behalf, from my account.”
Every cheque has certain standard fields:
- Date
- Payee name (who is getting paid)
- Amount in figures
- Amount in words
- Signature
- MICR code (printed at the bottom — it is a machine-readable code used for automated clearing)
Each field matters. Miss one, and the bank will reject the cheque. Let us walk through each of them now.
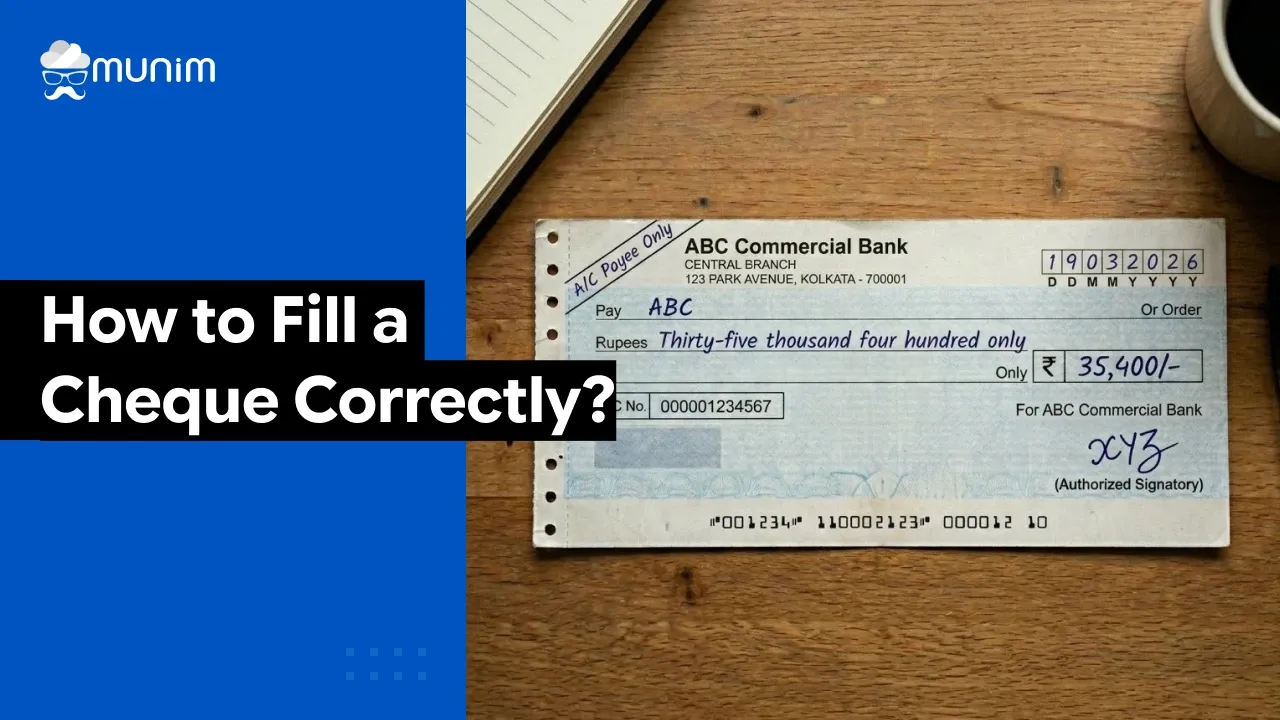
Step-by-Step Process to Fill a Cheque
Step 1: Write the Date
The date always goes in the top right corner of the cheque. This seems simple, but there are a few things to keep in mind.
Write the date in DD/MM/YYYY format. So if it is March 19, 2026, write 16/03/2026.
Post-dated cheques are cheques where a future date is written on purpose. These are common in EMI payments or rent agreements. A post-dated cheque cannot be encashed before the date written on it.
Stale cheques are the opposite, cheques that are too old to use. In India, a cheque is valid for 3 months from the date of issue. After that, it becomes a stale cheque and the bank will not honour it. Always check the date before submitting any cheque.
Step 2: Write the Payee’s Name
The payee is the person or entity who will receive the money. Write the full name clearly in the space that says “Pay” or “Pay to”.
A few important rules here:
- Do not leave blank space before or after the name. This can allow someone to alter the payee name.
- Use a slash or draw a line after the name to fill the remaining space.
- If the payment is to a company, write the full official company name.
- Cross out “or bearer” if it is printed on the cheque. This ensures only the named payee can encash it.
For example, if someone is paying rent to Ramesh Sharma, the cheque should read: “Pay Ramesh Sharma/”
That slash after the name fills the blank and prevents tampering.
Step 3: Write the Amount in Figures
This goes in the box marked ₹ or Rs. on the right side of the cheque. Write the exact amount, no rounding, no approximations.
For example, for a payment of Rs. 25,750, write: 25750.00 or 25,750.00
Always start writing from the left edge of the box. This prevents any extra digits from being added before the number. Some people even draw a line before and after the number for extra safety. That is a smart practice.
Step 4: Write the Amount in Words
This is just below the payee name section, in the line that begins with “Rupees”.
Write the full amount in words. Using the same example: “Twenty Five Thousand Seven Hundred and Fifty Only”
The word “Only” at the end is important. It signals that the amount is complete and nothing more should follow. Never leave this field incomplete or with trailing space.
Make sure the amount in words matches the amount in figures exactly. If they differ, banks are trained to reject the cheque or go by the amount in words. That mismatch can cause serious confusion.
Step 5: Sign the Cheque
The signature goes in the bottom right corner. This is called the drawer’s signature.
The signature must match the specimen signature the account holder submitted to the bank when opening the account. Banks compare these carefully. A mismatched or shaky signature can lead to the cheque being rejected.
A few things to remember:
- Never sign a blank cheque. Ever.
- If there are two account holders and both signatures are required, both must sign.
- Do not sign outside the signature box.
This is one of those small things that people often get lazy about. But it matters more than almost anything else on the cheque.
Step 6: Cross the Cheque (For Safety)
Crossing a cheque means drawing two parallel lines on the top left corner. This makes the cheque an account payee only cheque, meaning the money can only be deposited into the payee’s bank account, it cannot be encashed over the counter.
Many people also write “A/C Payee Only” between the two lines. This is a best practice for any large payment. It adds a layer of security.
How to Fill a Cheque for Self
This is one of the most common questions and honestly, it confuses a lot of people. When someone wants to withdraw cash from their own account using a cheque, they have to fill a self-cheque.
Here is how to fill a cheque for self:
- Date: Write today’s date as usual.
- Payee Name: Instead of writing someone else’s name, write “Self” or “Cash” in the Pay field. Both are accepted at most banks.
- Amount in figures and words: Write the amount to be withdrawn.
- Signature: Sign as usual on the back of the cheque as well, since the cheque will be presented over the counter.
Important: A self-cheque is a bearer cheque by nature. This means anyone physically holding the cheque can technically encash it. So be very careful. Never hand over a self-cheque to someone else. Keep it on your person until you reach the bank.
Also, do not cross a self-cheque. Crossing it would make it an account payee cheque, which means it cannot be cashed over the counter defeating the entire purpose.
How to Fill an SBI Cheque
State Bank of India is the largest public sector bank in India, with over 500 million account holders as of 2025. It is safe to say that a huge portion of the country banks with SBI. So naturally, learning how to fill an SBI cheque is relevant for a massive audience.
The good news: the format of an SBI cheque is almost identical to cheques from other banks. The fields are the same. But there are a few things specific to SBI cheques worth knowing.
The Layout of an SBI Cheque
An SBI cheque typically has:
- The SBI logo and branch name at the top.
- The cheque number (6 digits) at the bottom left.
- The MICR code (9 digits) at the bottom centre.
- The account number at the bottom right.
All three of these are machine-printed and should never be written over or tampered with.
Filling the SBI Cheque: Step by Step
Step 1: Date Write the date in the top right corner in DD/MM/YYYY format. SBI cheques have small boxes or dashes to separate the date, month, and year. Fill each clearly.
Step 2: Payee Name Write the receiver’s name clearly. If it is a company like “Tata Motors Limited” or a government entity, write the full name without abbreviation.
Step 3: Amount in Figures Fill the box on the right with the exact rupee amount, starting from the leftmost edge.
Step 4: Amount in Words Write the amount in words on the line marked “Rupees” and add “Only” at the end.
Step 5: Signature Sign in the bottom right corner using the registered signature. SBI is particularly strict about signature verification, especially for high-value cheques above Rs. 5 lakh. Some branches may even call the account holder to confirm.
Step 6: Crossing For any non-cash transfer, draw two parallel lines at the top left and write “A/C Payee Only” between them.
A Quick SBI Example: Imagine Suresh Kumar, an SBI account holder in Surat, needs to pay Rs. 1,20,000 to his supplier, M/s Patel Traders. Here is what his filled cheque would look like:
| Field | What Suresh Writes |
| Date | 19/03/2026 |
| Payee | M/s Patel Traders/ |
| Amount (Figures) | 1,20,000.00 |
| Amount (Words) | One Lakh Twenty Thousand Only |
| Crossed | Yes — A/C Payee Only |
| Signature | Suresh Kumar (as registered) |
Clear, complete, and ready to go.
How to Fill a Cheque Deposit Slip
Now, once someone has a cheque to deposit maybe they have received a payment from a client and need to put it into their account they need a cheque deposit slip. This is a separate form available at bank counters or at the deposit box kiosks.
Learning how to fill a cheque deposit slip properly ensures the cheque is credited to the right account without any delay.
What Does a Cheque Deposit Slip Look Like?
Most Indian banks follow a similar format. The deposit slip has two parts — the main slip that the bank keeps, and a counterfoil or acknowledgement slip that is returned to the depositor as proof.
Fields in a Cheque Deposit Slip
1. Date: Write today’s date — the date on which the deposit is being made.
2. Branch Name: Write the name of the branch where the cheque is being deposited.
3. Account Number: Write the account number into which the cheque amount should be credited. Double-check this. An error here can send someone else’s payment into the wrong account — and recovering it can be a long process.
4. Account Holder Name: Write the full name of the account holder whose account will receive the funds.
5. Cheque Number: This is the 6-digit number printed at the bottom left of the cheque being deposited. Write it exactly.
6. Cheque Date: Write the date that is printed on the cheque itself — not today’s date, but the date on the cheque.
7. Name of the Bank and Branch (of the Cheque Issuer): Write the bank name and branch name from which the cheque has been issued. For example, “SBI, Navrangpura Branch, Ahmedabad.”
8. Amount: Write the cheque amount in both figures and words.
9. Total: If depositing multiple cheques in one slip, add up all amounts. If it is just one cheque, this will be the same as the cheque amount.
10. Signature: Some banks require the depositor to sign the deposit slip. Check the instructions at the counter.
After Filling the Slip
Attach the cheque behind the deposit slip and submit it at the counter or place it in the cheque drop box. The bank will give back the counterfoil with a stamp and possibly a token number. This is proof of deposit. Keep it safe until the amount is credited to the account. Cheque clearing in India typically takes 1 to 2 working days for local cheques under the Cheque Truncation System (CTS), and up to 3 working days for outstation cheques.
Common Mistakes to Avoid While Filling a Cheque
Here is a quick list of things that regularly cause cheques to get rejected or delayed:
- Overwriting or cutting: Do not try to correct an error by scratching or overwriting. If a mistake is made, cancel the cheque and use a fresh one.
- Mismatch between words and figures: Always double-check that the amount in words and figures match exactly.
- Leaving spaces unfilled: Blank spaces in the payee or amount fields are risky. Fill them completely or draw a line in the empty space.
- Wrong or missing date: Always write a valid, current date unless the cheque is intentionally post-dated.
- Forgetting to sign: It sounds basic, but it happens. An unsigned cheque is worthless.
- Signing a blank cheque: Never do this. If it falls into wrong hands, the damage can be irreversible.
- Using pencil: Always use a pen — preferably blue or black ink — when filling a cheque.
Conclusion: A Small Piece of Paper, a Big Responsibility
Filling a cheque might seem like the simplest thing in the world. Just fill in a few boxes and sign, right? But as this guide shows, there is a right way and a wrong way. Each field has a purpose. Each step protects the sender and the receiver.
Whether someone is learning how to fill a cheque for self, understanding how to fill an SBI cheque for a vendor payment, or figuring out how to fill a cheque deposit slip at the bank the process is the same in principle: be accurate, be complete, and be careful.
A little attention now saves a lot of trouble later. The bank will appreciate it. And so will the person receiving the payment.
Frequently Asked Questions About Filling a Cheque
1. What happens if the amount in words and figures on a cheque do not match?
If there is a mismatch between the amount written in words and the amount written in figures, most banks in India go by the amount written in words. That is the standard rule under the Negotiable Instruments Act. However, many banks will simply reject the cheque altogether to avoid any dispute. Either way, it causes unnecessary delay. Always double-check both fields before signing.
2. Can a cheque be filled in pencil?
No. A cheque filled in pencil is not valid and will not be accepted by any bank in India.
3. What is the validity period of a cheque in India?
A cheque is valid for 3 months from the date written on it. After that, it becomes a stale cheque and the bank will refuse to process it.
4. Is it safe to drop a cheque in a drop box without filling a deposit slip?
No. The cheque deposit slip is a necessary part of the process. It tells the bank which account the cheque amount should go into. Without a deposit slip, the bank cannot process the deposit correctly.
Disclaimer: "This blog post is for informational purposes only. For specific tax advice related to your business, please consult a qualified Chartered Accountant or GST practitioner."
About the author
Related Articles
Explore the latest market news, useful resources for business, and Munim updates.