How to use IMS (Invoice Management System) feature?
2130 views
This guide explains how to navigate to and use the Invoice Management System to manage and match invoices for GSTR-2B filing.
This section allows you to manage your purchase invoices, compare with GST portal data, and compute GSTR-2B.
🔹 Step 1: Navigate to IMS – Compute GSTR-2B
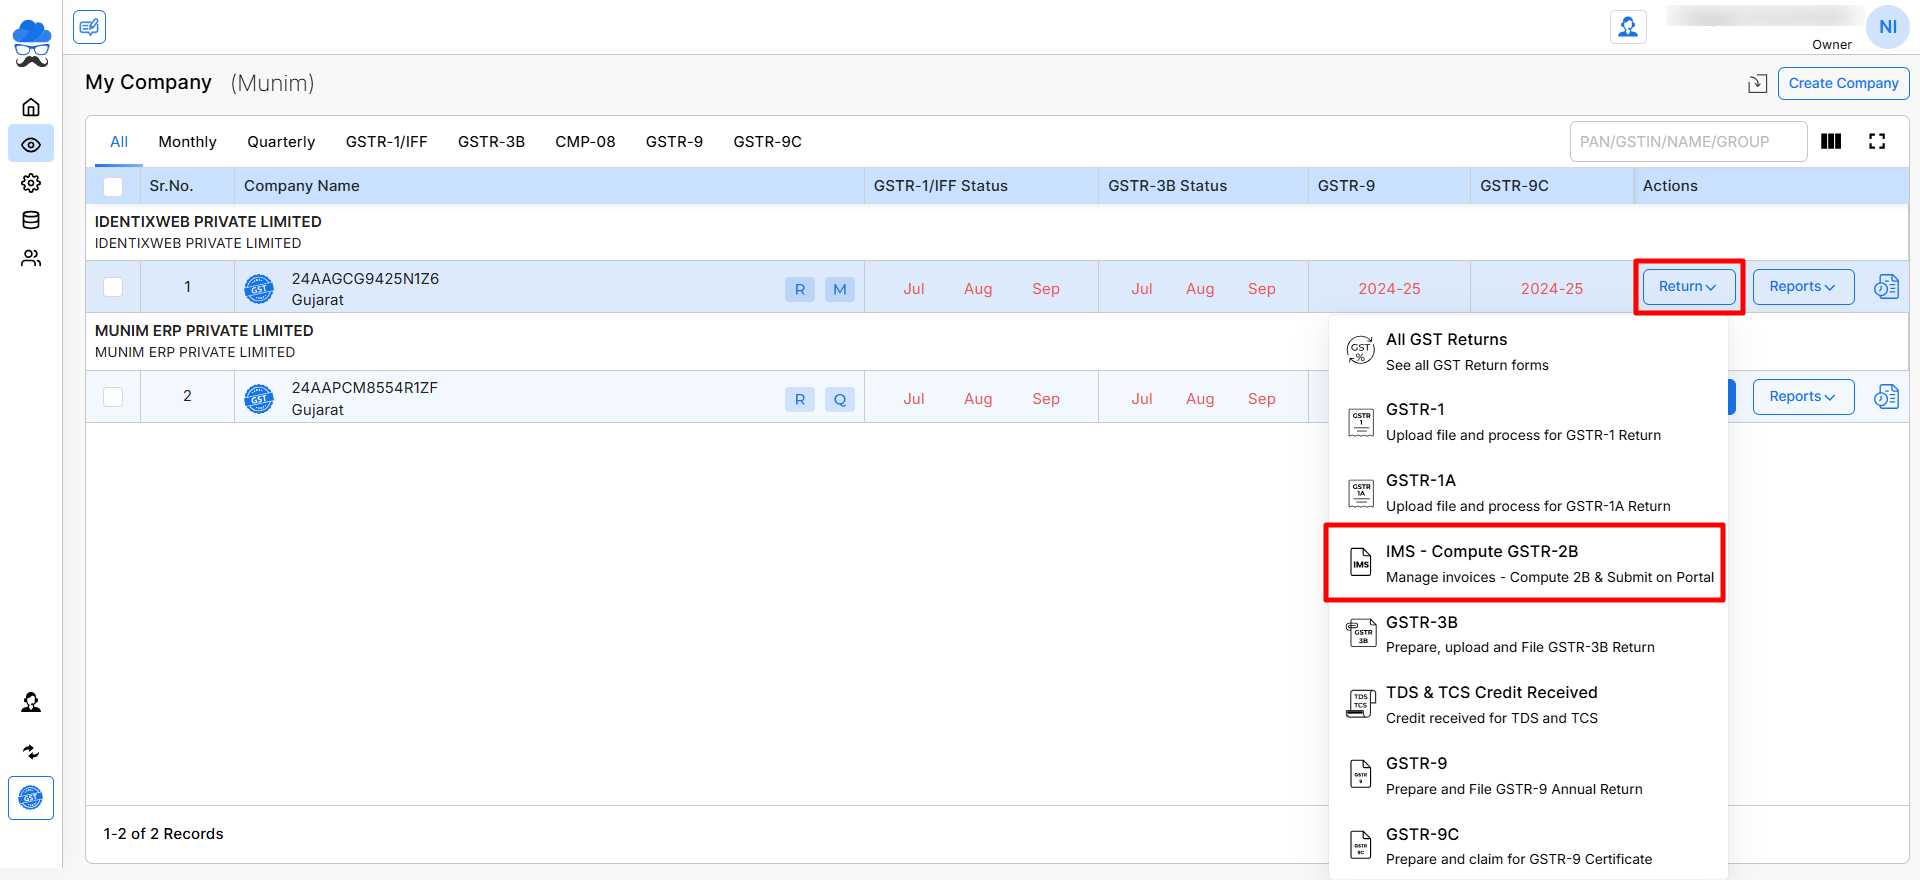
Go to the “My Clients” section.
In the client company row, click on the “Return” dropdown.
From the dropdown, select “IMS – Compute GSTR-2B”.
+−⟲
My Clients page
🔹 Step 2: Download and Upload Data
Once inside the Invoice Management System (Download Data) screen:
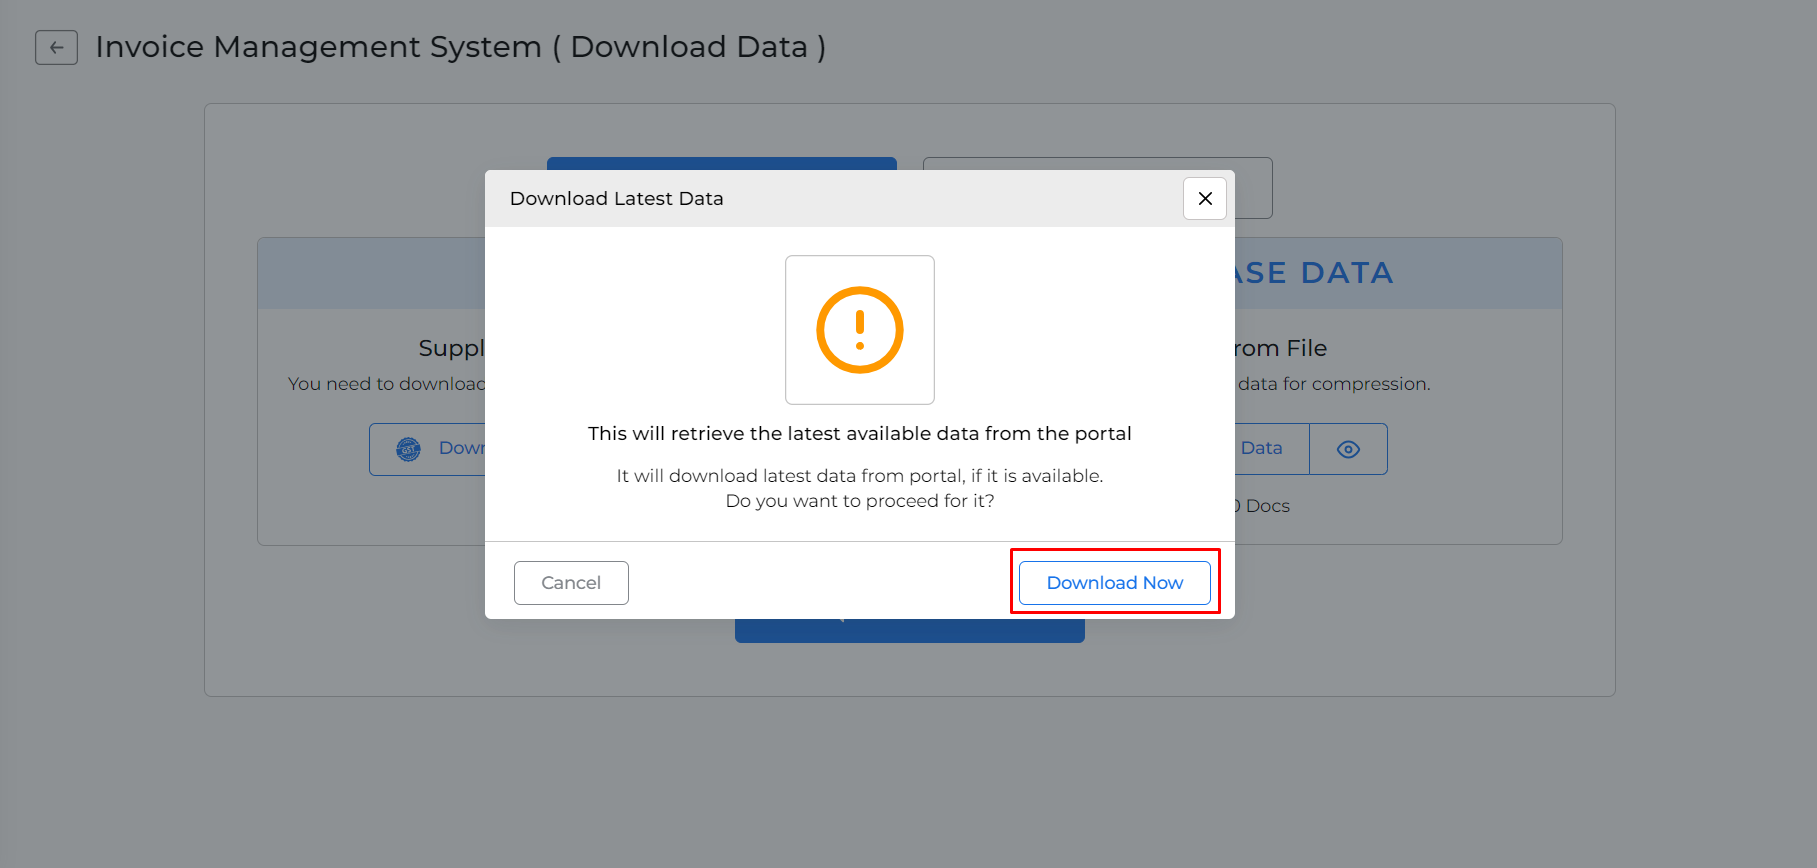
Data Update Pop-up:
On the IMS data page, a Pop-up will appear every two days to remind you for data updation.
It will download the latest data from portal if available.
+−⟲
Download Latest data Pop-up
Invoice Management System (Download Data):
Here on this page, you have two options to begin the process: Compare and Claim and Claim without Compare.
Compare and Claim: You can compare Portal data with your Purchase Data.
Claim without compare: You can proceed for the claim without comparing data.
+−⟲
Invoice Management System page
IMS DATA – Supplier’s Data from Portal
When you select the Compare and Claim option, the Download data from GSTN and Purchase Data section will be shown.
Click “Download data from GSTN”.
This will fetch the supplier’s invoices directly from the GST portal.
These invoices are required for comparison and claim.
PURCHASE DATA – Your Purchase Data with you
Click “Upload Data” to upload your purchase invoices through the Government Excel format.
This data will be used for matching with the supplier’s data.
+−⟲
Invoice Mangement System page
🔹 Step 3: Match and Claim
Once both sets of data are available:
You can select “Compare and Claim” to identify matched/unmatched invoices. Click “Let’s Match” to proceed with the comparison and further actions.
Alternatively, you can choose “Claim Without Compare” and then click “Prepare & Claim” if you want to proceed for claim without matching with Purchase Data.
🔹 Step 4:Mathing Status, View Data and IMS Dashboard sections
When you have selected the Compare and Claim option and click on Let’s Match button, A pop-up will appear to add the difference value that you want to ignore while matching data.
After that, you’ll see a comprehensive Matching Status Dashboard that summarises the comparison between your IMS data (from GSTN) and Purchase data (uploaded manually).
+−⟲
Matching Data summary page
Matching Categories Explained:
Each card represents a different type of match or discrepancy:
Category
Description
ALL
Shows a high-level summary with percentages of each category (Exact Match, Suggested Match, Mismatched, etc.).
Exact Match
Invoices that match perfectly in all key fields (e.g., GSTIN, invoice number, date, amount).
Suggested Match
Invoices that closely match but may have minor differences (e.g., invoice date, minor value mismatch).
Mismatched
Invoices found in both sets, but with major differences (e.g., GSTIN mismatch, incorrect invoice value).
Missing in PR (Purchase)
These invoices are present in GSTN data but missing from your uploaded Purchase documents.
Missing in IMS
These invoices are in your Purchase data but not found in the GSTN-sourced IMS data.
Type of document: You can filter the data based on the Type of Document
Invoices
CDN (Credit/Debit Notes)
Ecom (E-commerce documents)
Simply click the appropriate radio button to view relevant matching results.
Download Report:
Click the “Download Reports” button at the top right to generate a detailed report for documentation or sharing with your accountant.
View Results in Detail:
Click the “View” link on any card to see the detailed list of invoices under that category.
Click “View Result in Details” (bottom right) or click the “View Details” section (Next to matching Status section) to explore all matches and mismatches comprehensively.
Once you click on it, both options will redirect you to the next section named View Details.
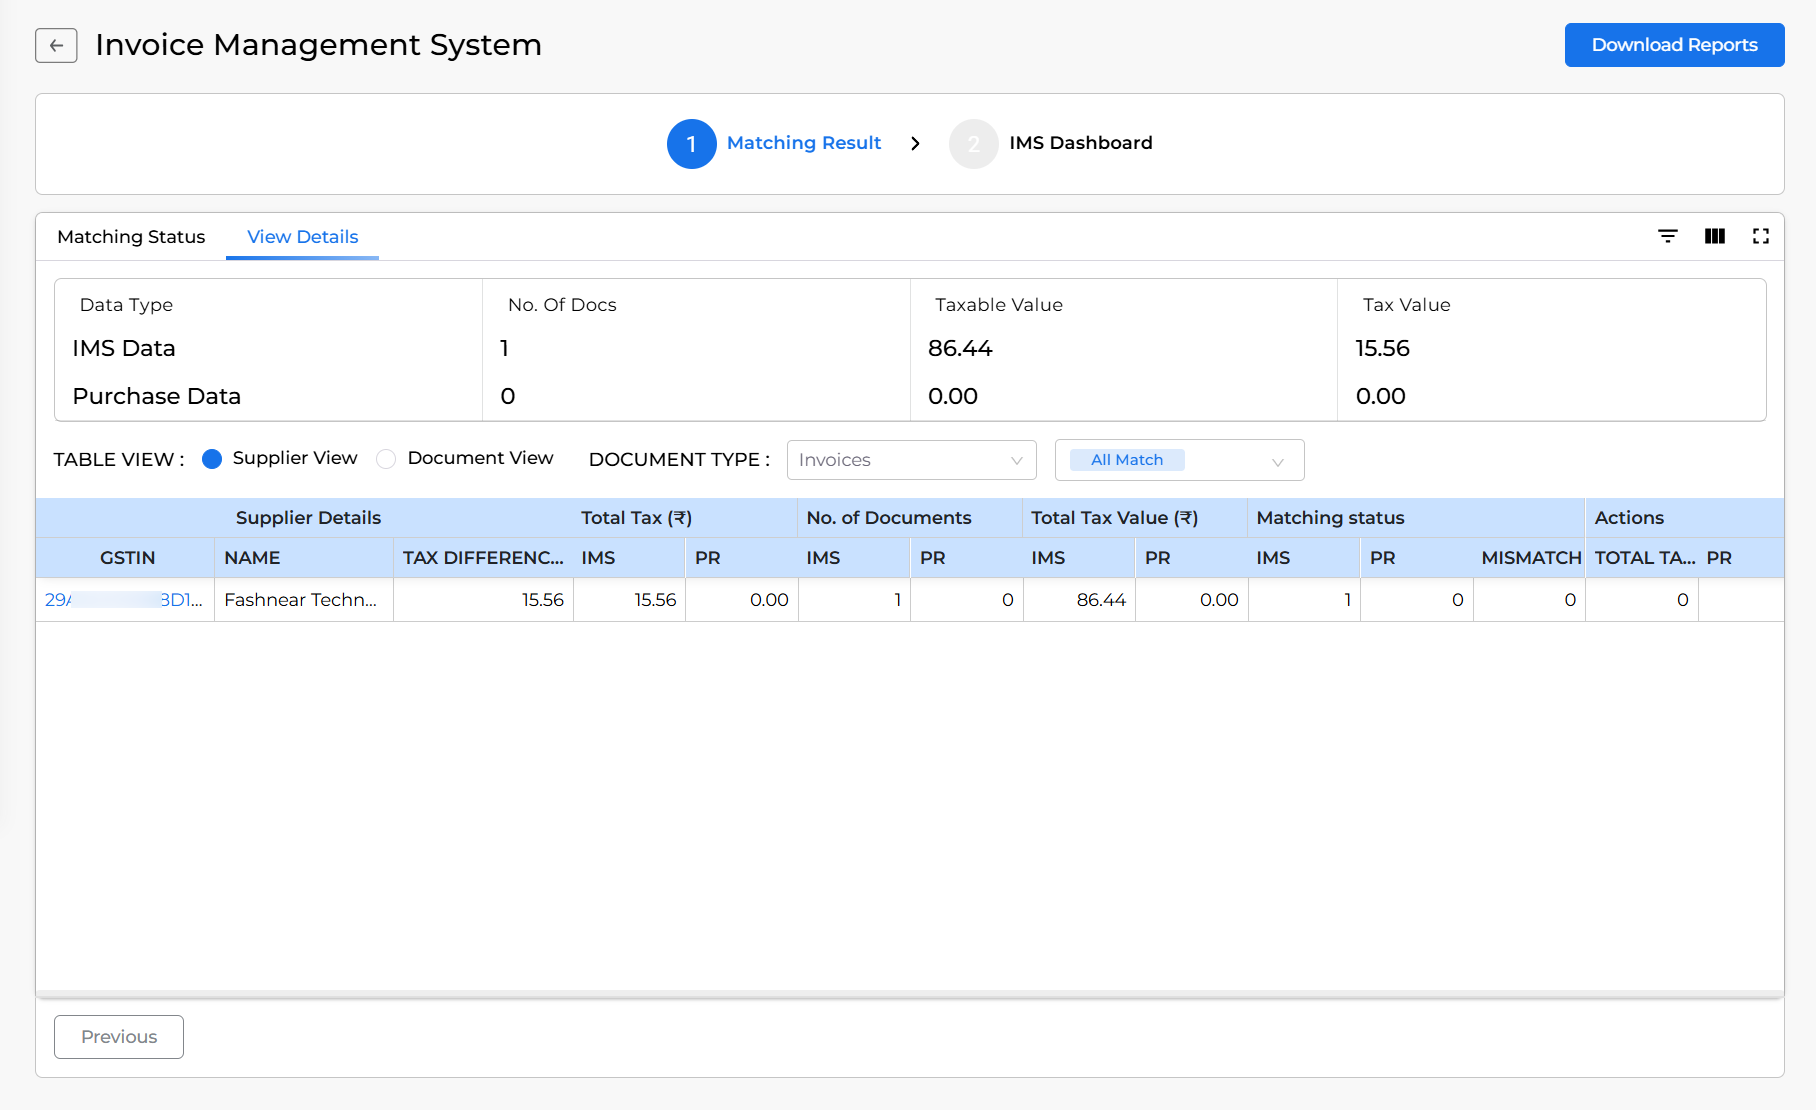
After coming to the “View Details” tab, inspect the data supplier-wise or invoice-wise and compare between IMS Data (from GSTN) and your Purchase Data.
+−⟲
View Details Section
Top Summary Section:
At the top, you’ll see a summary of the documents found:
Data Types, No. of Docs, Taxable Value and Tax Value
Table View Options:
You can switch between:
Supplier View (Default): Shows a summary grouped by supplier GSTIN.
Document View: Lists each invoice individually.
Document Type Filter:
Use the dropdown to choose the document type you want to analyze:
Invoices
CDN (Credit/Debit Notes)
Ecom (if available)
Also, you can click “All Match” to filter records with the Status of Exact Match, Suggested Match, Mismatched, Missing in PR and Missing in IMS (or leave it to view all).
Column Breakdown:
Column
Explanation
GSTIN
GST number of the supplier.
Name
Name of the supplier (e.g., Fashnear Technologies Pvt. Ltd).
Tax Difference
Difference between tax values of IMS and Purchase records.
Total Tax (₹)
Tax amount from both sources (IMS and PR).
No. of Documents
Count of invoices in both IMS and PR.
Total Taxable Value (₹)
Sum of taxable values found under each source.
Matching Status
Whether the document is found in IMS, PR, or both.
Actions
May include buttons (in future versions) to manually review or resolve mismatches.
🔹Step 6: IMS Dashboard
From the Top centre section, click on the IMS Dashboard option.
The IMS Dashboard gives you a summarized overview of your GSTN data (IMS Data), allowing you to take action on the invoices by either accepting, rejecting, or marking them as pending.
When you have selected the ClaimWithout Compare option and click on the Let’s Match button, the IMS Dashboard page will open directly.
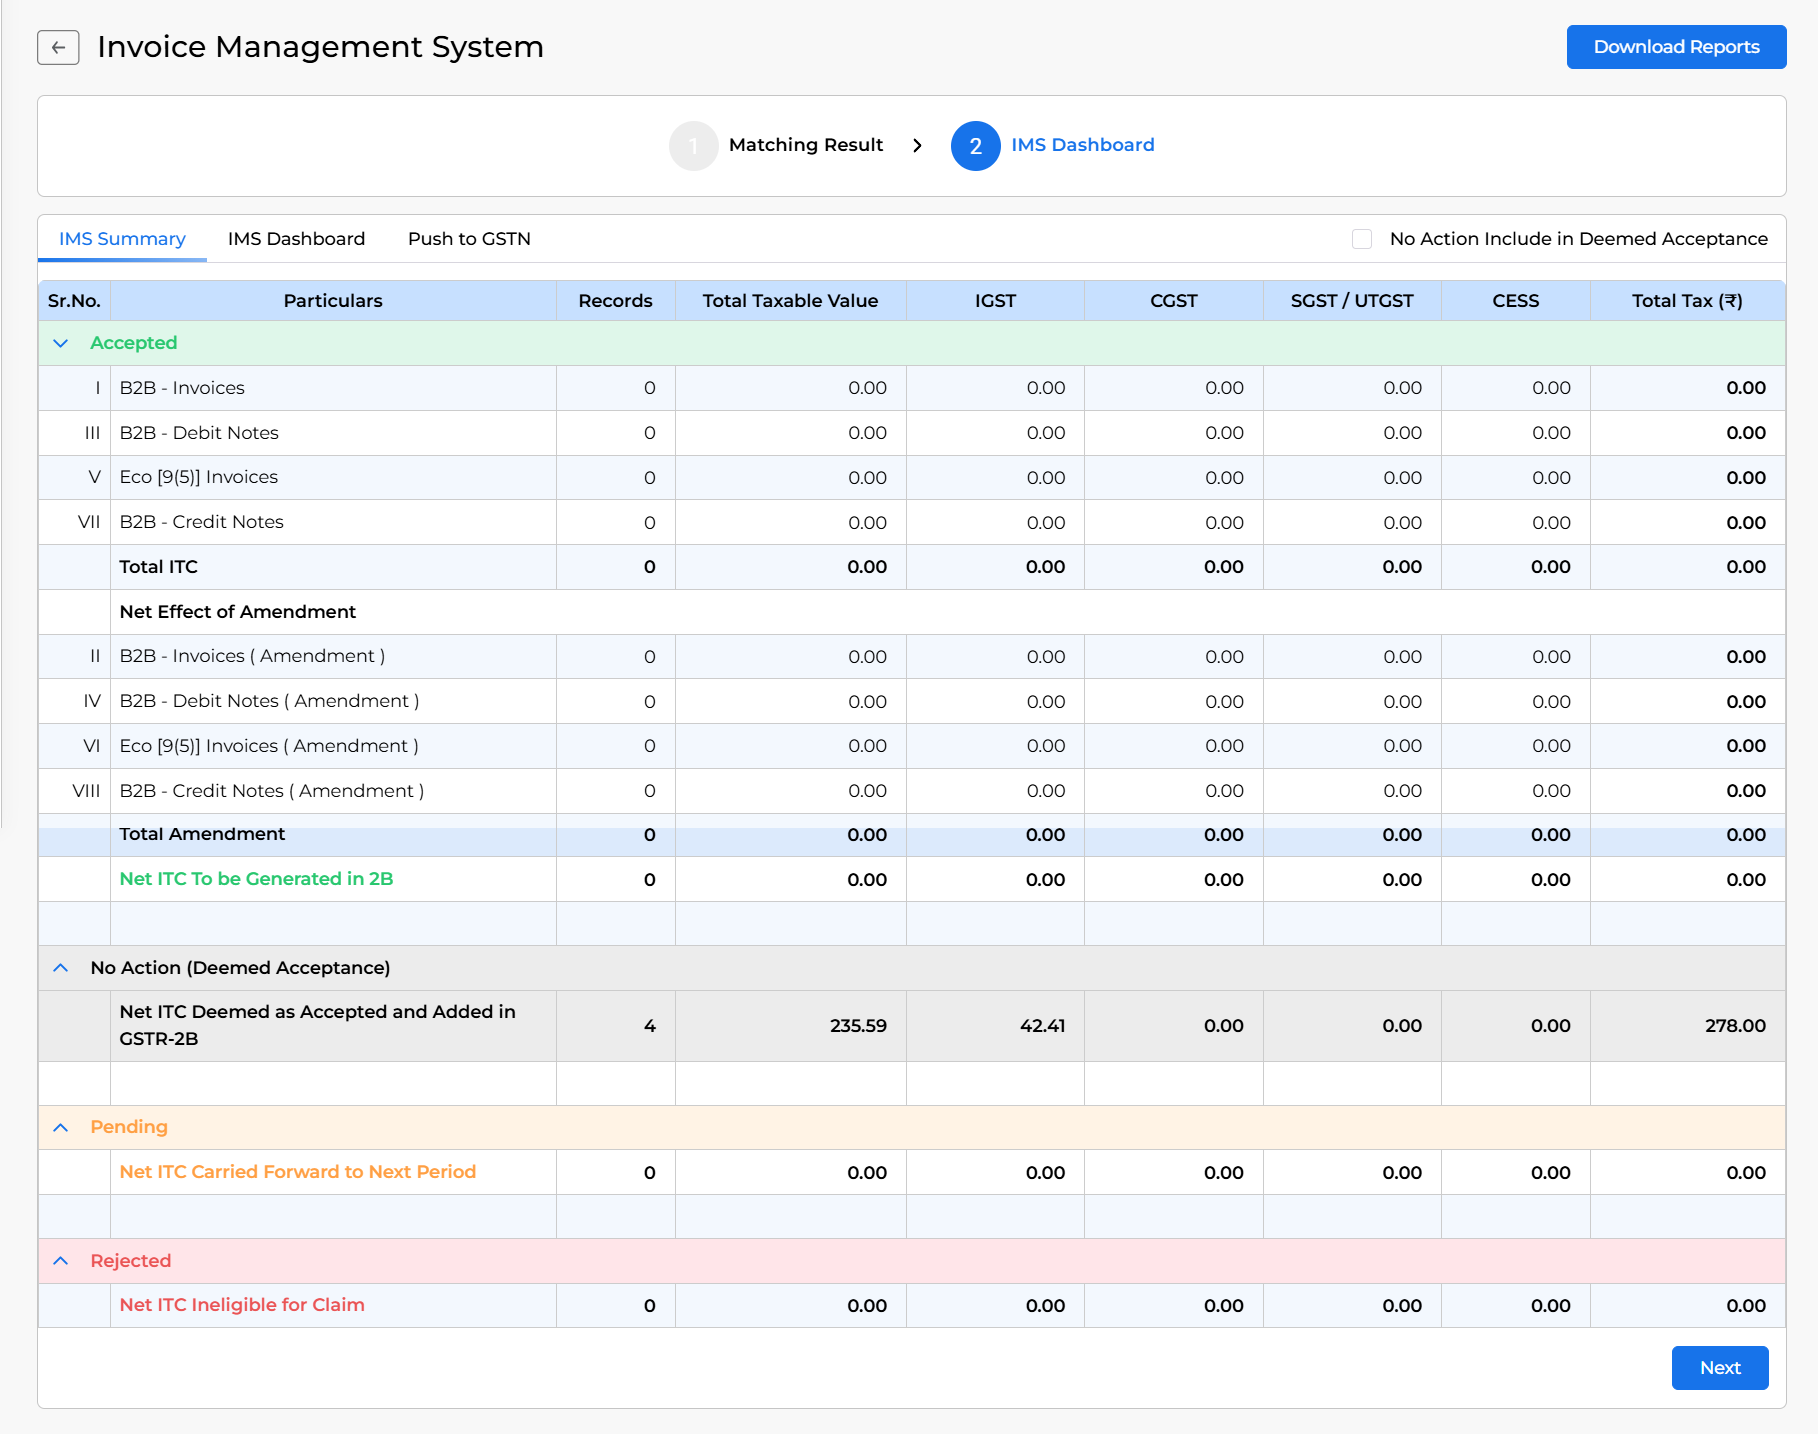
IMS Summary:
Here you will find the first section of the IMS Summary of all statuses: Accepted, No Action, Pending and Rejected.
You can expand all statuses to check the detailed summary of all statuses.
For invoices that have an exact match in reconciliation, their status will be automatically updated to “Accepted“.
+−⟲
IMS Summary page
Once checked, you can click on the Next button at the bottom right corner to go to the IMS Dashboard section.
+−⟲
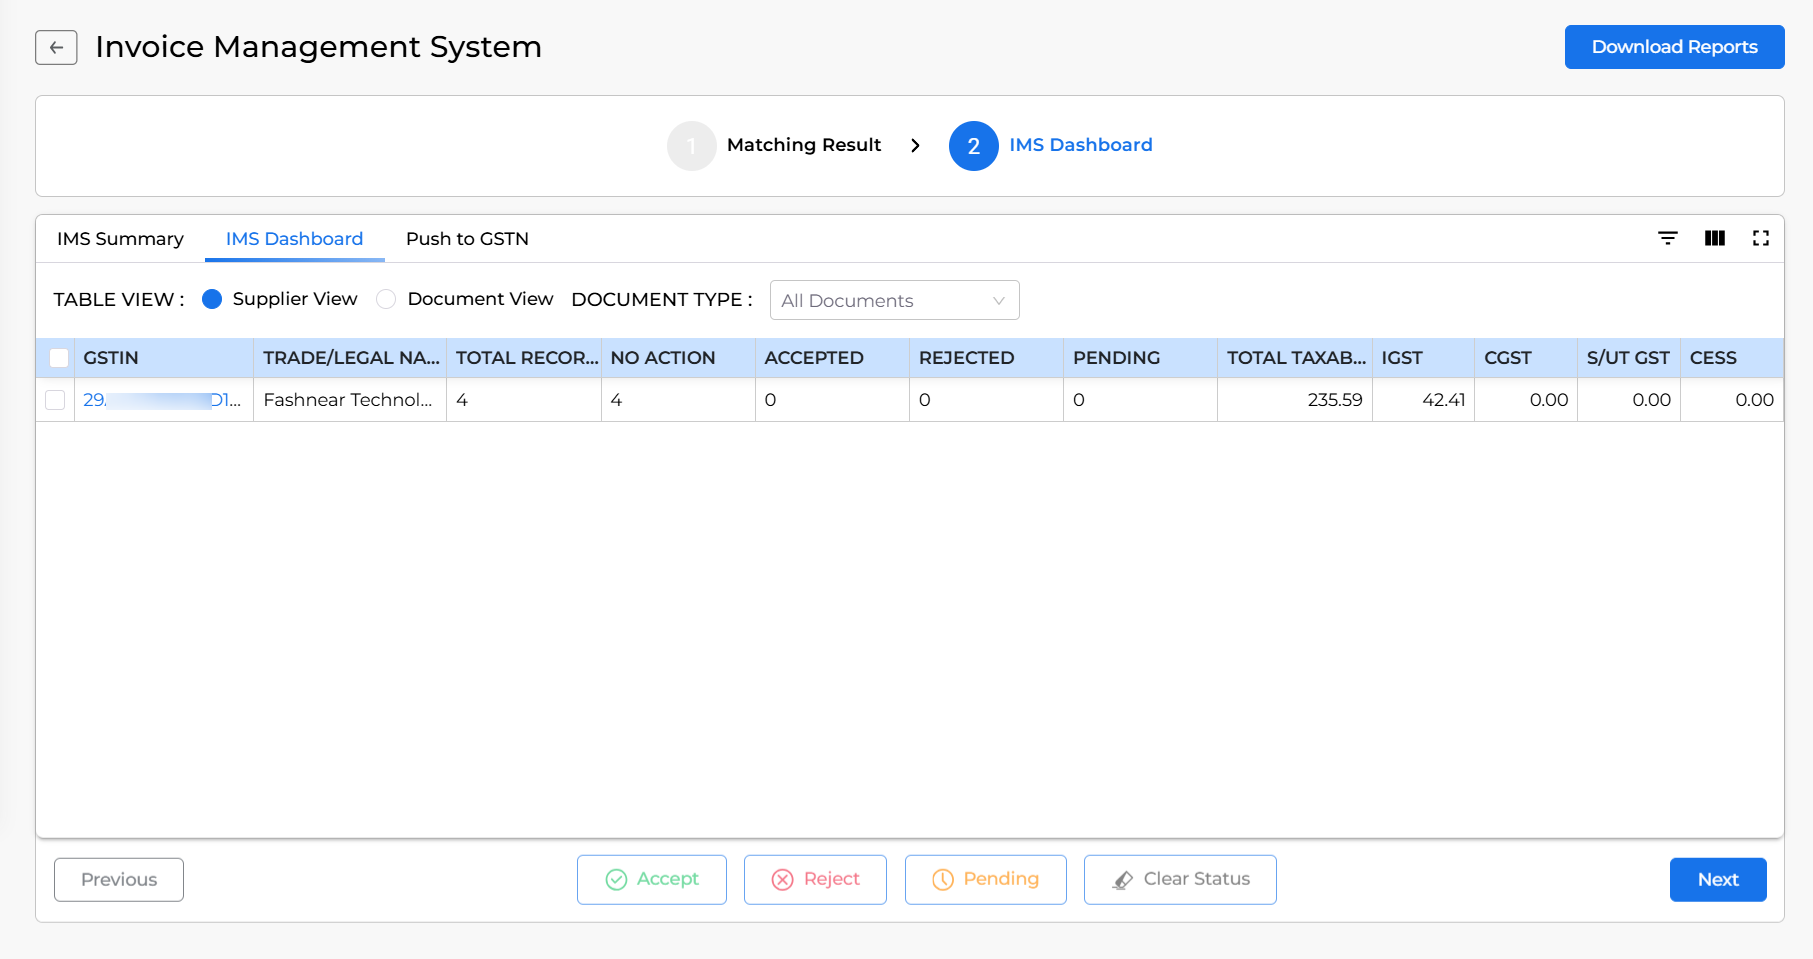
IMS Dashboard section
Table View & Filters:
Supplier View (default): Aggregates data supplier-wise (by GSTIN).
Document Type Filter: Allows filtering by invoice types such as:
Invoices
Credit/Debit Notes
E-commerce, etc.
Column Explanation:
Column
Description
GSTIN
GST number of the supplier. Clickable to view invoice-level details.
Trade/Legal Name
Supplier’s business name.
Total Records
Total number of invoices retrieved from IMS (GST portal).
No Action
Number of invoices where no action (accept/reject/pending) has been taken yet.
Accepted
Count of invoices marked as accepted.
Rejected
Count of invoices rejected.
Pending
Invoices marked for review but not finalized.
Total Taxable Value
Sum of taxable amounts from all listed IMS invoices.
IGST, CGST, S/UT GST, CESS
Individual breakup of tax components recorded in the invoices.
Action Buttons (Bottom Section):
Use the following buttons to take action on selected records:
🟢 Accept – Confirms the IMS invoice is valid and acceptable.
❌ Reject – Marks the invoice as incorrect or invalid.
🕒 Pending – Sets it aside for review later.
🧽 Clear Status – Removes any previously set status (restores to “No Action”).
💡 Tip: You must select the checkbox next to a supplier or invoice row before taking any action.
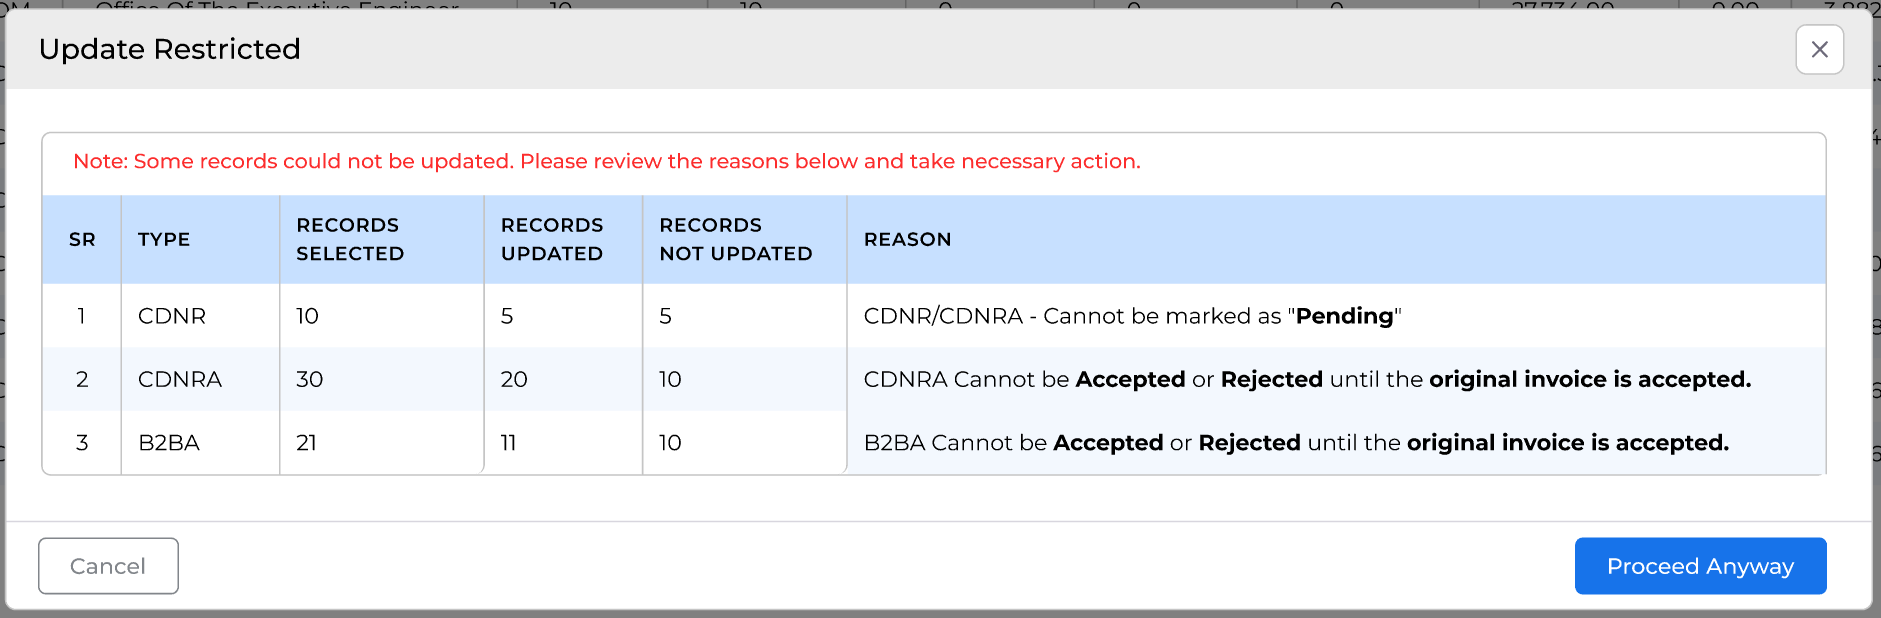
Restriction Reasons:
Some records’ statuses could not be updated for various reasons, as shown in the screenshot below.
This pop-up will appear while updating some of the entries’ statuses. Check the reasons and take the necessary action to proceed.
+−⟲
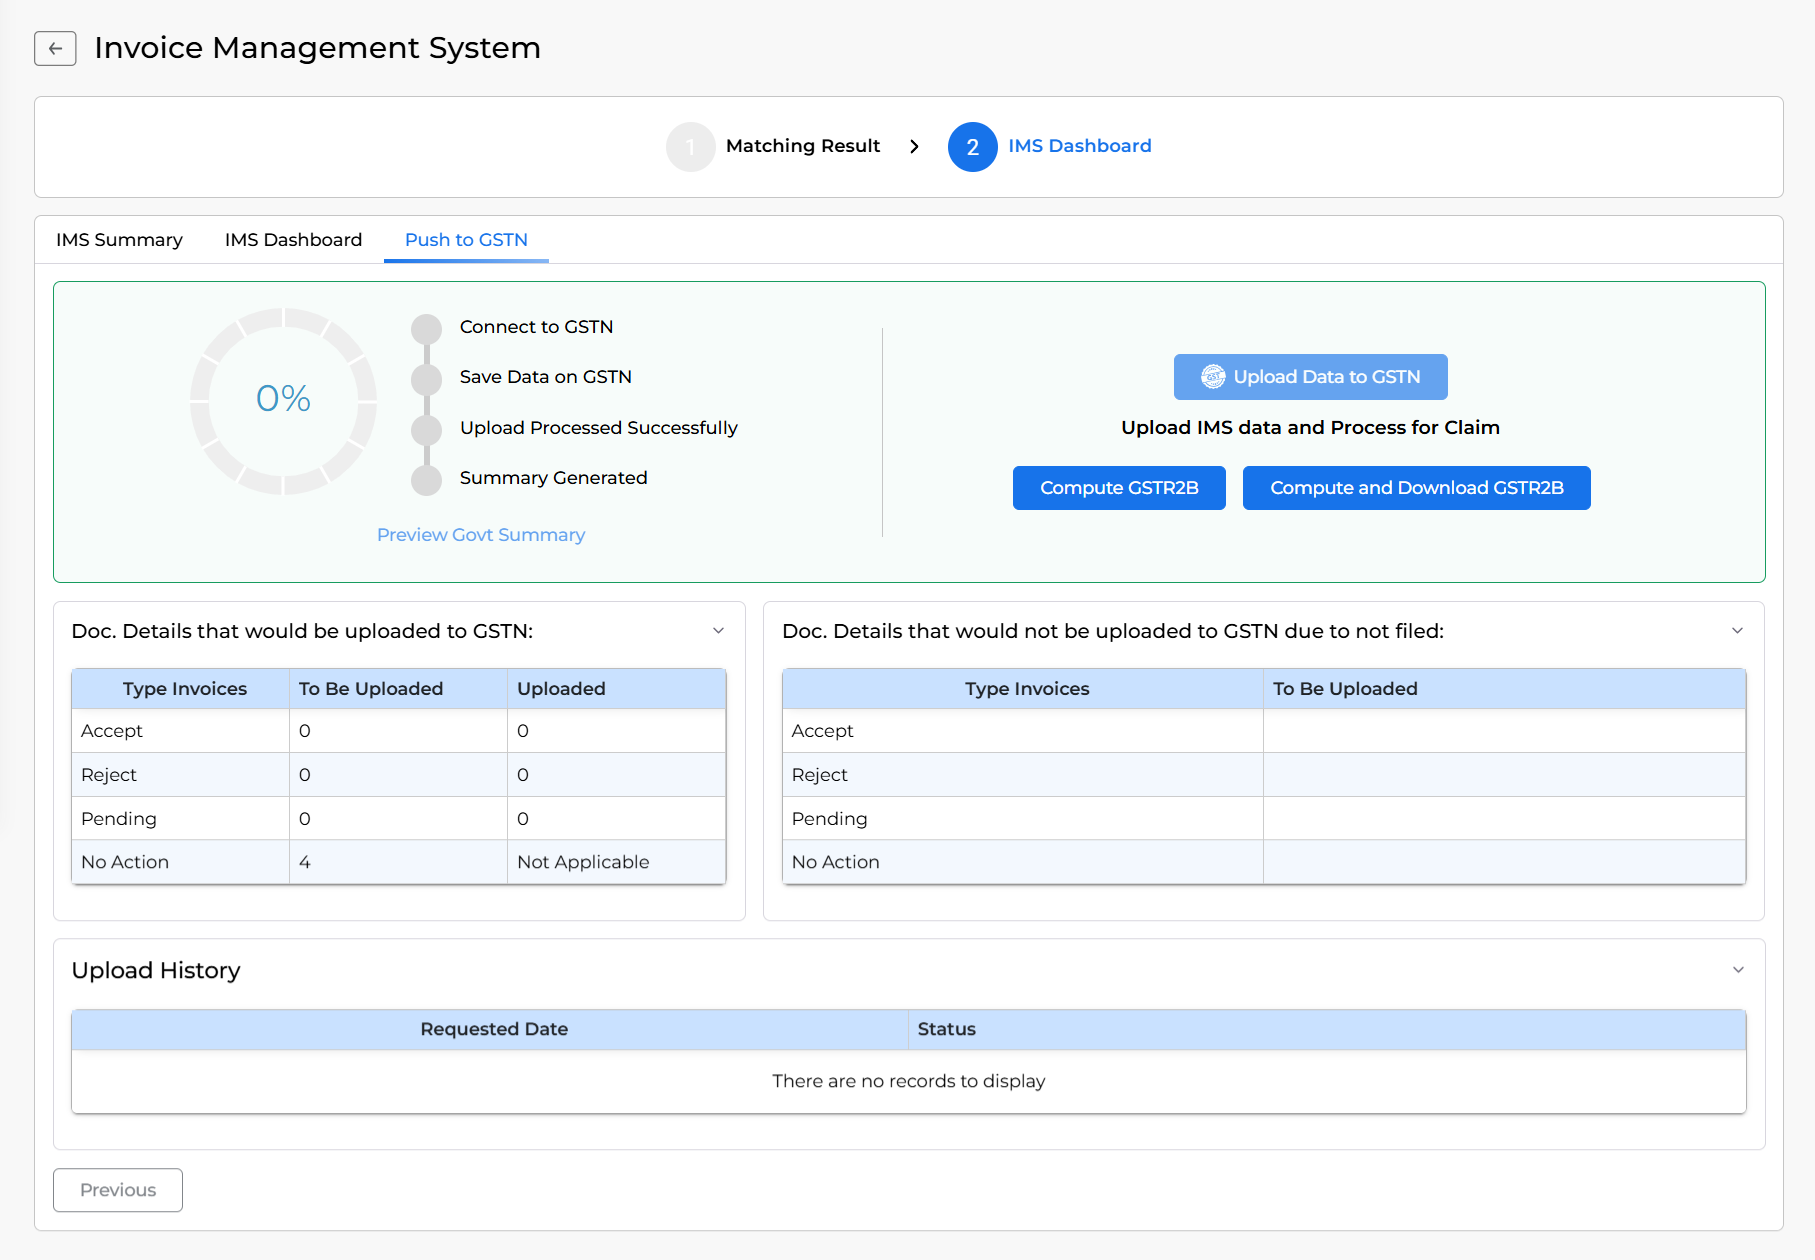
🔹Step 7: Push to GSTN
The Push to GSTN section is used to upload accepted IMS invoices to the GST portal for the Input Tax Credit (ITC) claim. It gives you control over what gets uploaded and shows progress in real-time.
+−⟲
Push To GSTN section
Upload Process Overview
On the left side of the screen, you’ll see a progress tracker with these 4 steps: Connect to GSTN, Save Data on GSTN, Upload Processed Successfully and Summary Generated
You can also check the Preview Govt Summary after uploading successfully completed.
Document Classification:
Doc. Details that would be uploaded to GSTN:
Here in this Table, you will find the Document upload status with the filter of To be Uploaded and Uploded:
Accept: Here you can see a number of Accepted Invoices
Reject: Here you can see a number of Rejected Invoices
Pending: Here you can see a number of Pending Invoices
No Action: Here you can see a number of Invoices that are not been set a status yet.
Only invoices marked as Accepted are eligible for upload. Invoices with “No Action” must be handled first from the IMS Dashboard.
Doc. Details that would not be uploaded to GSTN due to missing action:
Here in this Table, you will find the Document upload status with the number of invoices that are To be Uploaded.
The same statuses are shown as provided above, like Accept, Reject, Pending, and No Action.
This table is a reminder of what still needs user input before upload is allowed.
Upload History:
This section logs past upload attempts, showing:
Requested Date – When the upload was initiated.
Status – Whether the upload succeeded or failed.
Upload Actions
Once everything is done, you can proceed by clicking the Upload Data to GSTN button and then adding GST credentials for uploading.
After the Upload process is done, you can start the process of Compute GSTR2B.
Upload Data to GSTN Use this to begin uploading accepted/rejected invoices to the GST portal.
Compute GSTR2B Click this to update your uploaded invoices in GSTR-2B based on uploaded invoices.
Compute and Download GSTR2B Click this to update your GSTR-2B return based on uploaded invoices and download it.
Need Help?
If you’re facing any issues with data upload, download, or matching, please contact our support.
Our website uses cookies to enhance your browsing experience and offer personalized services. For more information about the cookies we use, please refer to our Privacy Policy.
 2130 views