
 4767 views
 This module facilitates the creation of expense entries, enabling the management of additional expenses. There are two types of expenses that can be managed: direct and indirect.
Create expense entry:
- Go to the Expense module in the Transactions section from left sidebar.
- Click on the Create expense button or press the Alt+N key.
+−⟲

- Upon clicking the “Create Expense” button, the expense creation page will appear, allowing you to select a vendor and then an expense details.
+−⟲
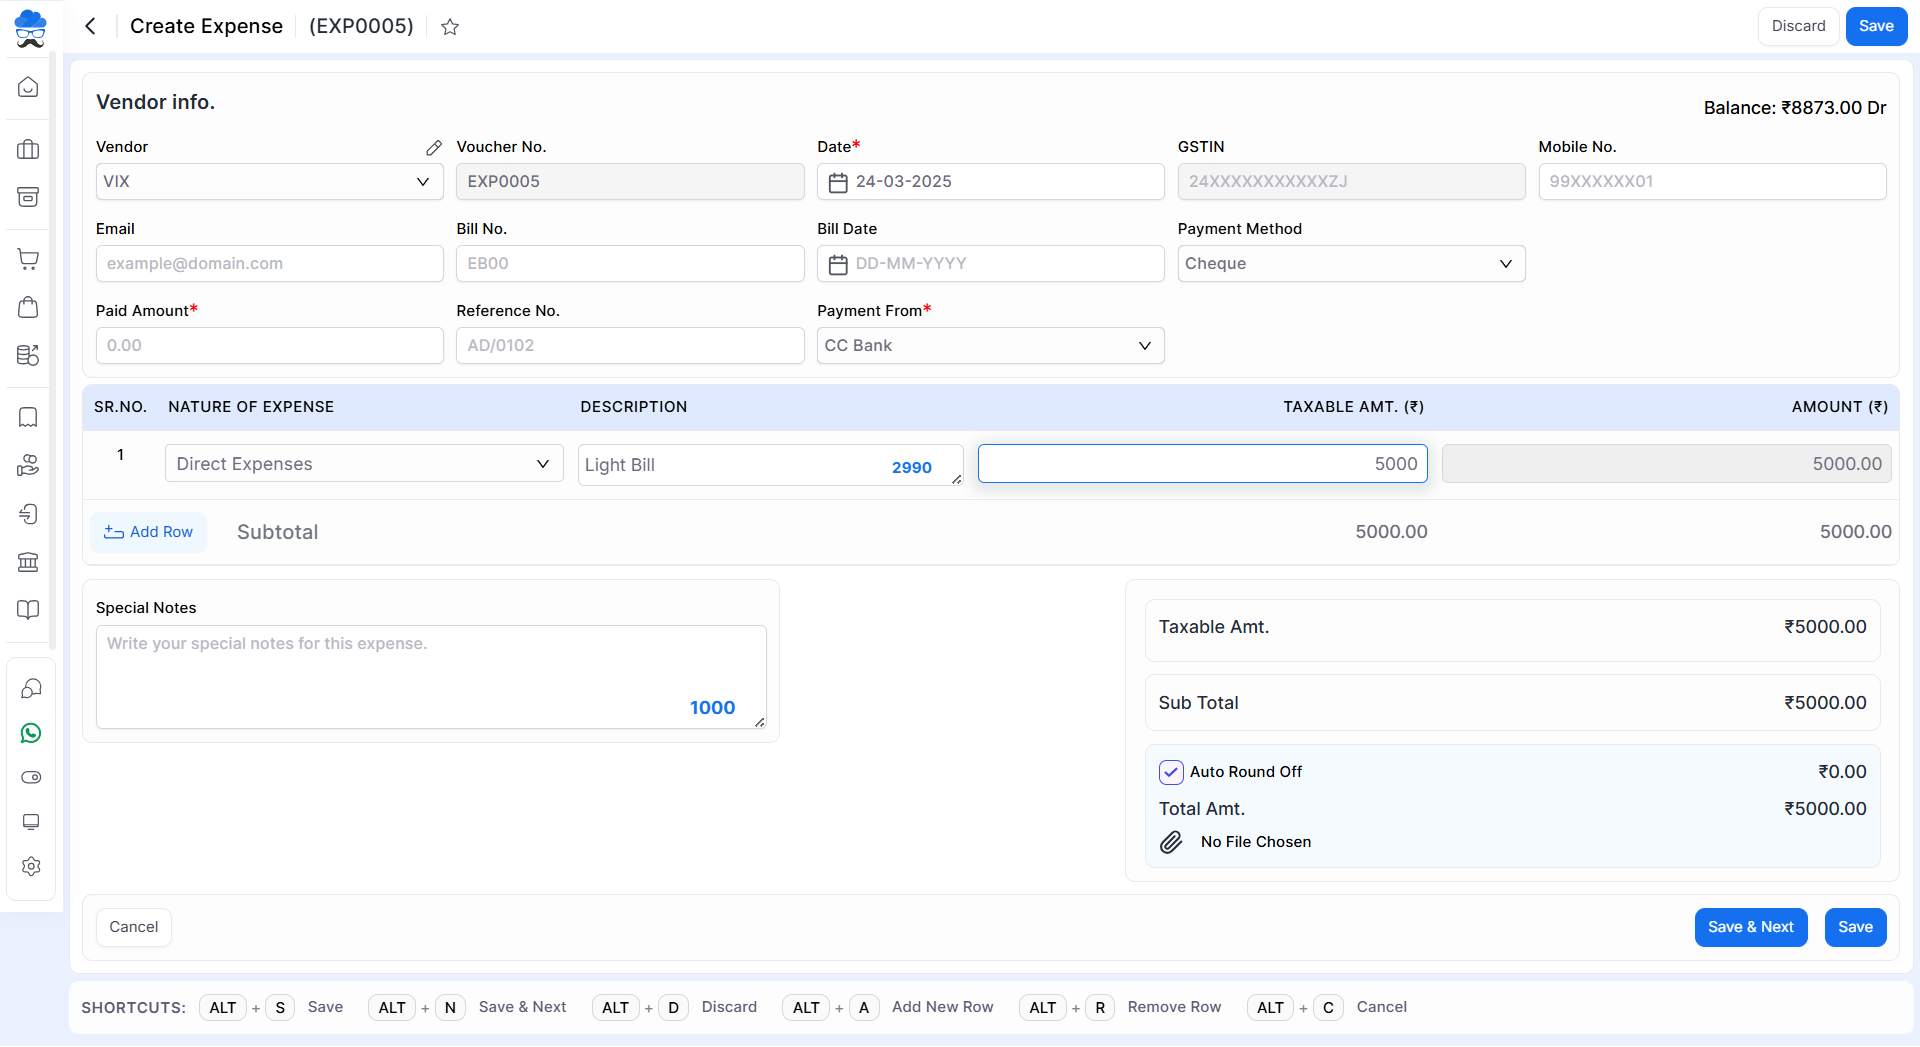
| Field | Description | Note |
| Vendor | Here, select vendor for creating expense entry. here you are able to create a new vendor. | Mandatory field |
| Voucher no. | Voucher no. is auto-generated and will be in sequence. | |
| Date | Here, write the expense voucher entry date. | Mandatory field |
| GST IN | As you select a vendor, the GSTIN will automatically come here if its a GST registered company. | This field is disabled. |
| Mobile no. | Here write the mobile number. Or it will fetch from Account master | |
| Here write the Email address. | ||
| Payment method | Select the payment method for this expense voucher here. | Mandatory field |
| Paid amount | Here, write paid amount for this expense voucher. | Mandatory field |
| Reference no. | Here write the reference number. | |
| Payment from | Here, select which account to pay expenses. here also you are able to create a new bank ledger and cash ledger. | Mandatory field |
| Nature of expense | Here, select the nature of the expense. Here you are also able to add a new expense ledger. | Mandatory field |
| Description | Here write the description of this expense. | |
| Taxable amount (₹) | Here write the taxable amount. | Mandatory field |
| Amount(₹) | Here, calculate the total amount. (Taxable amount + GST amount) | |
| Special notes | Here, write the special notes on this expense voucher. | |
| Auto round off | This checkbox is used to round off the total amount. | |
| Save | This button is used to save expense vouchers. |
| Shortcut | Description |
| Alt+S | Save & Next- This shortcut is used to save the expense voucher and page redirect to the same page. |
| Alt+D | Discard- This shortcut is used to discard the expense entry. |
| Alt+N | Add new row- This shortcut is used to add a new row. |
| Alt+R | Remove row- This shortcut is used to delete rows. |
| Alt+C | Cancel- This shortcut is used to cancel the expense entry. ( work as Back button) |
Create a New Expense Account
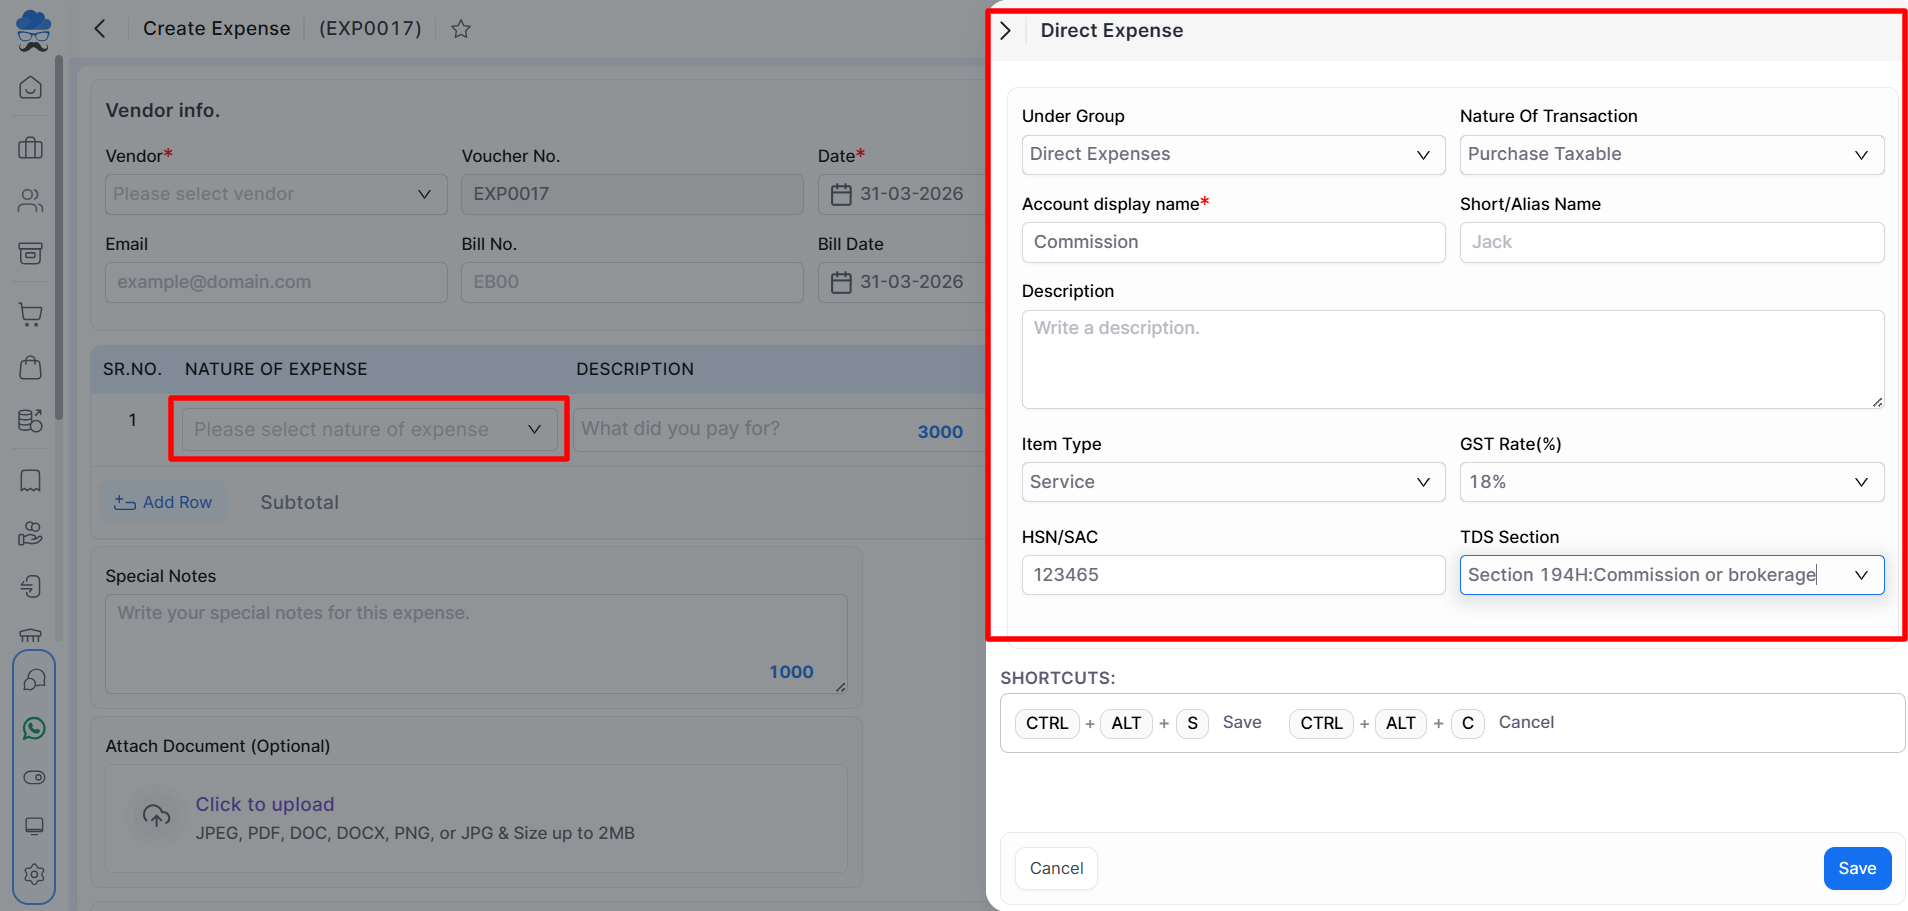
You can find a Add New Expense option in the Expense selection field to create a new expense by adding required details.
You can fill in data like,
- Under Group: You may categorize the expense by selecting either “Direct Expense” or “Indirect Expense” from the available options.
- Nature of Transaction: Select the appropriate transaction type from the provided list.
- Account Display Name/Short Name: Enter the full name of the expense along with its designated short name, if applicable.
- Description: Provide a detailed summary or purpose for this specific expense to ensure accurate record-keeping.
- Item Type: Select the appropriate category from Goods, Services, or Additional Services.
- GST Rate (%): Specify the applicable Goods and Services Tax percentage for the expense item.
- HSN: Enter the relevant Harmonized System of Nomenclature (HSN) code for the expense item.
- TDS Section: Select the applicable Tax Deducted at Source (TDS) section for the specific expense type to ensure accurate tax compliance.
+−⟲
Expense List
- All saved Expenses will be seen here with their current statuses and other details.
+−⟲
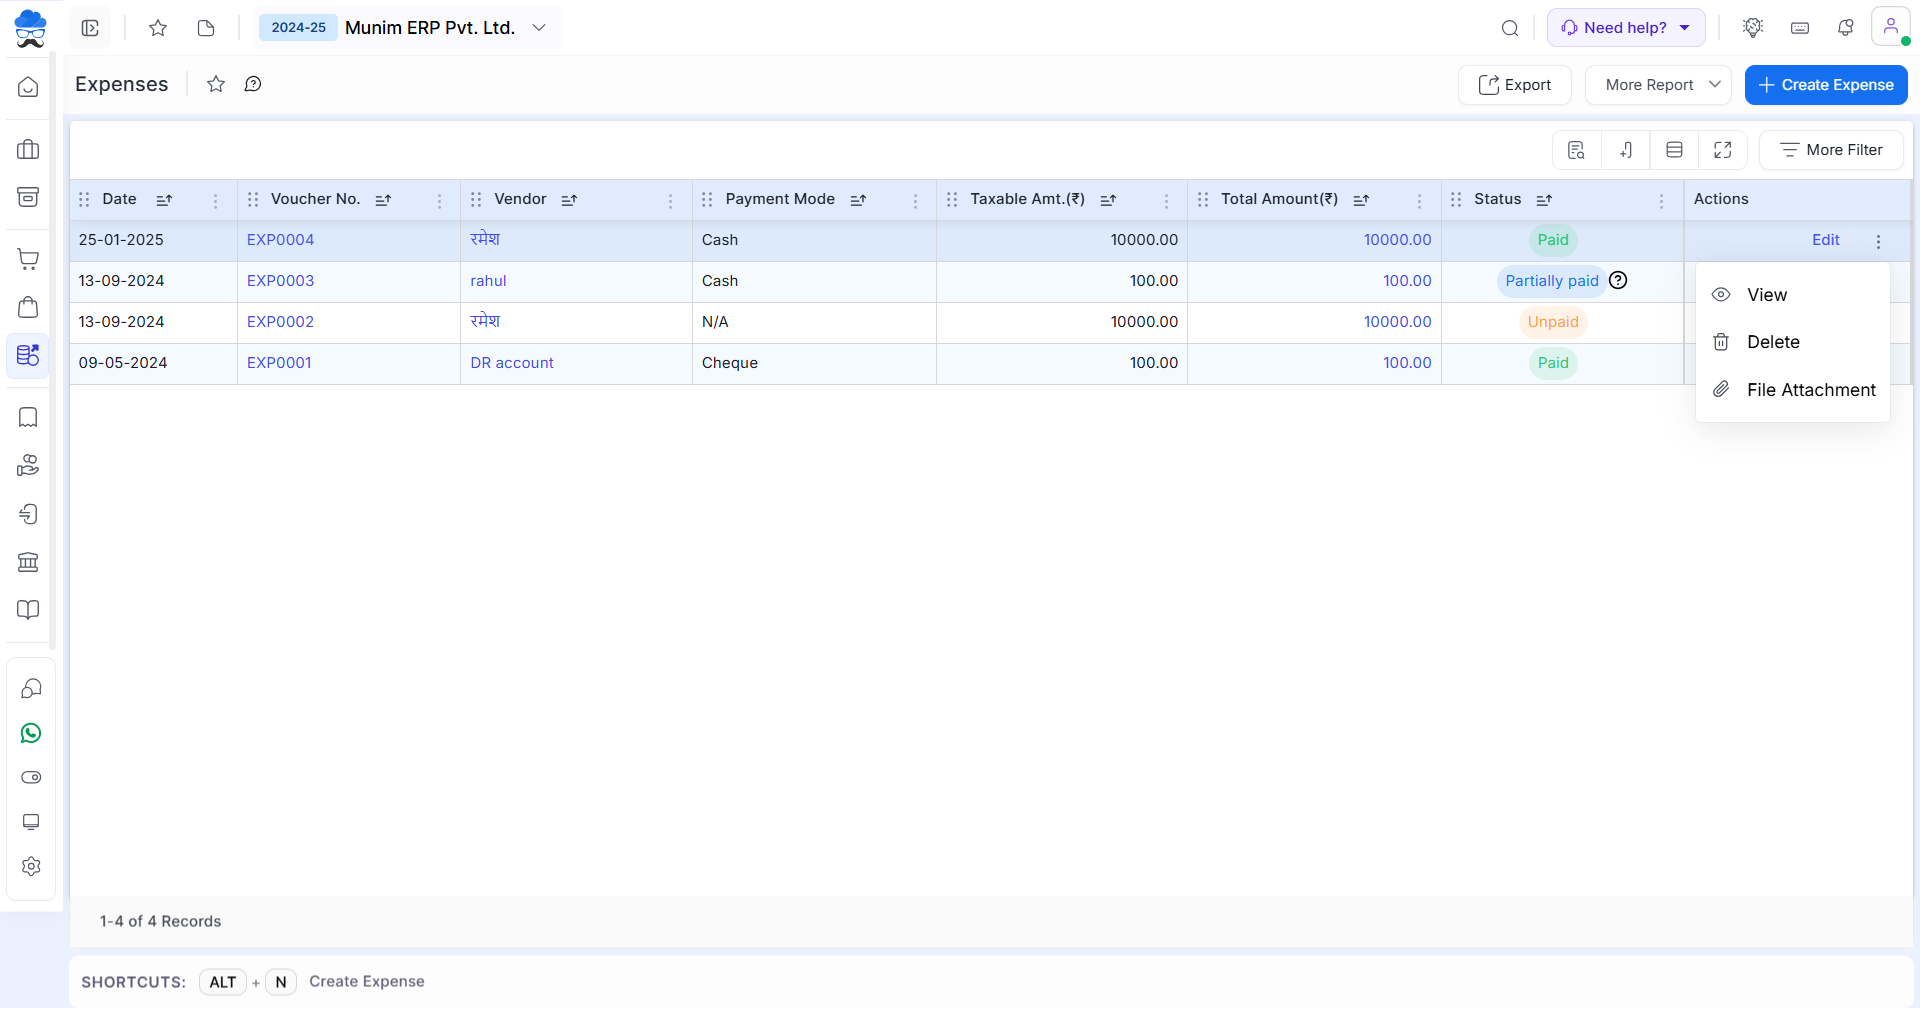
| Field | Description |
|---|---|
| Export | This option is used to Export all your data in Excel format |
| More Reports | Here you will find preset filters to see transactions better. |
| Create Expense | To create a new expense click on this button |
| Actions | Here multiple types of actions are available, Edit, View, Delete. |
| Edit | This action is used to edit expense vouchers. |
| View | This action is used to view expense vouchers. |
| Delete | This action is used to Delete expense vouchers. |
| File attachment | This feature is used to add attachment file. |
| Status | Details |
|---|---|
| Paid | This status will identify the entry as paid, As Payment of this Expense is done. |
| Unpaid | This status will identify the entry as unpaid, As Payment of this Expense is not done. |
| Partially Paid | This status will identify the entry as partially done, As Payment of this Expense is half or partially paid. |


