
 4486 views
 Items are the Goods or Services that you deal with in your business.
Whenever you create transactions for your customers or vendors, you can add these items and their details will be auto-populated.
On this page, you are able to import the item. we are providing the sample Excel file which you can download, add the details and import the data.
Access Item Module:
Go to the Masters section in the left main menu and select the Item option from the Item Master module.

To create the Item in Munim:
Go to the left sidebar and select the Item option in the Item Master module.
Click on the Create item button or press the Alt+N key.
Now, the New Item creation sidebar will open, logically grouped into expandable/collapsible accordion sections, such as:
- Basic Information: This section contains the core and mandatory details required to define a new item in the system.
- Inventory & Pricing: This section shows the stock tracking method, pricing structures, and total valuation of the items.
- Product Classification & Identification: Set up units of measurement and identification details for your items.
- Tax & Availability Settings: Configure item preferences and tax-related parameters.
- Custom Fields: This section allows you to include additional information for business-specific details.
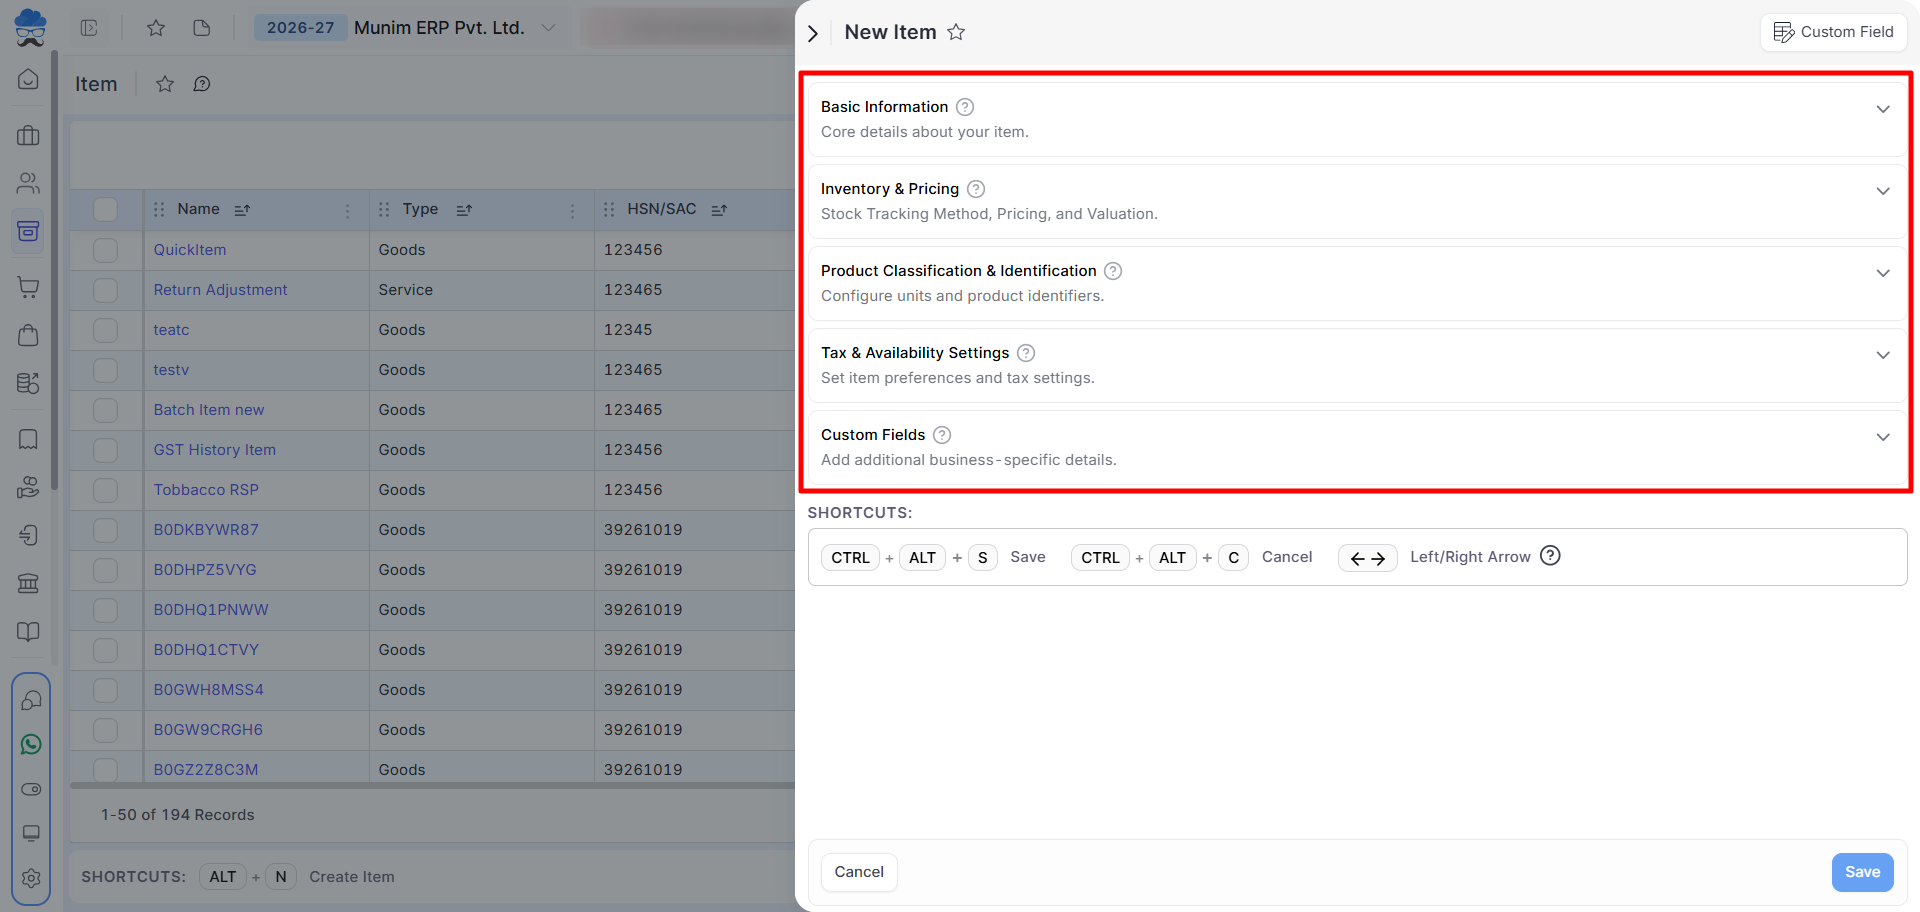
- Input the item Type, Name, and other mandatory details within their respective sections.
- To save the item, please click the Save button or press the Ctrl+Alt+S keyboard shortcut.
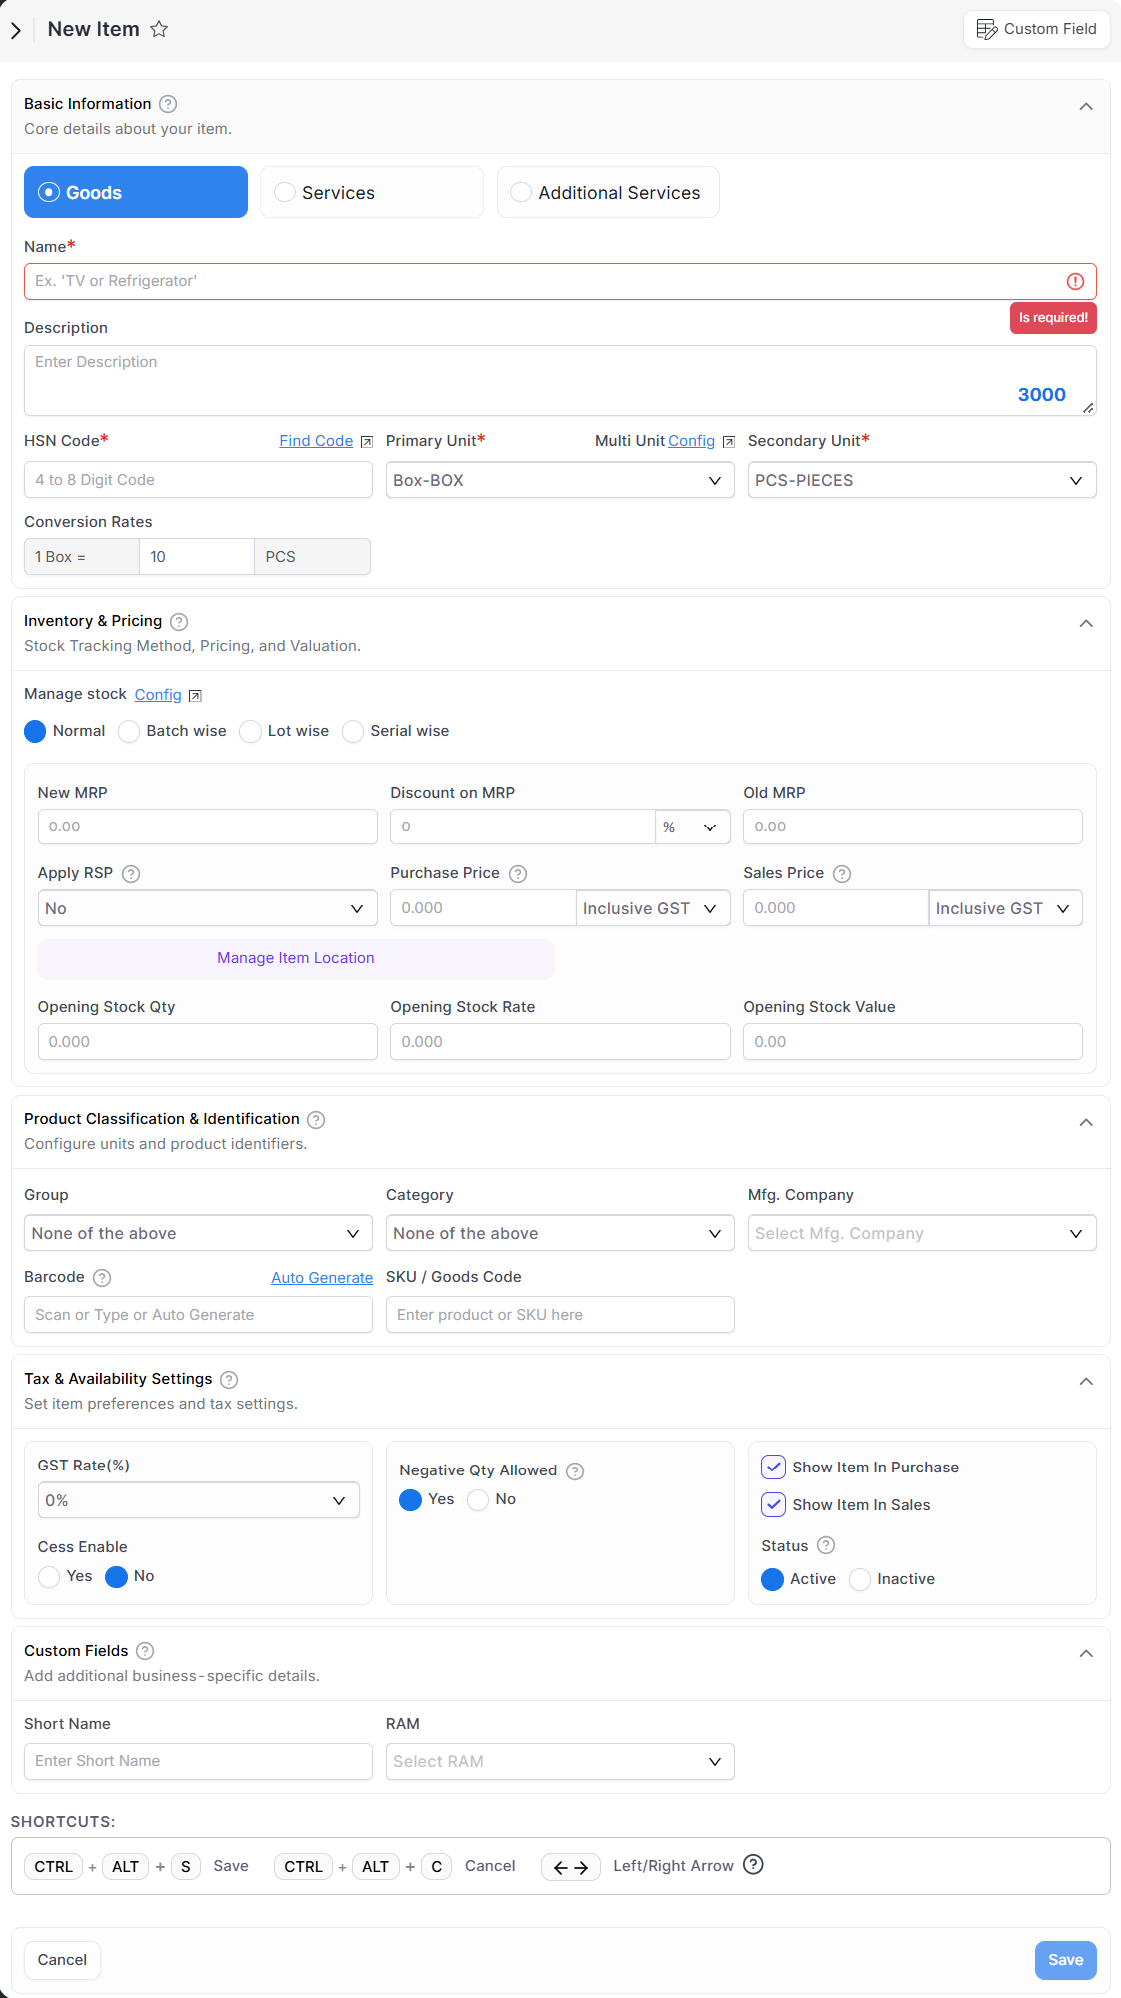
Field Information for Items:
| Field | Description |
|---|---|
| Basic Information | |
| Type | Here you can select the type of items from: Goods, Service or Additional Service. |
| Name | Enter the name of your product or service here. It’s a Mandatory field |
| Description | You can add the full description of your Item, which will be fetched in transactions and printouts. It’s an Optional field. |
| HSN code | Write the HSN code for your product or service. Use Find Code option to search and get HSN code. HSN is Mandatory if your Company is GST registered. |
| Primary Unit | Specify the unit of measurement for your product or service here. It’s a Mandatory field |
| Secondary Unit | You have to define a secondary unit for the item if the secondary unit feature has been enabled. |
| Conversion Rates | Here you have to set the conversion rate of the Primary Unit and Secondary Unit. |
| Inventory & Pricing | |
| Manage stock | Manage your inventory using Normal, Batch-wise, Lot-wise, or Serial-wise stock tracking, with Normal set as the default method. |
| New MRP | Add the current or updated Maximum Retail Price (MRP) for your item in this field. |
| Discount on MRP | Specify the discount to be applied to the MRP to determine the final Sale rate and update automatically in the Sales Price field. |
| Old MRP | This field allows you to view or update the previous MRP associated with this item. |
| Apply RSP | Toggle to enable tax calculations based on the MRP in accordance with Retail Sale Price (RSP) regulations. |
| Purchase Price | Set price at which you buy the item from your vendors. This value is autopopulated in purchase transactions. You can set this rates nature as inclusive or exclusive tax using dropdown at the end of field |
| Sales Price | Set price at which you sell the item to your customers. This value is autopopulated in sales transactions. You can set this rates nature as inclusive or exclusive tax using dropdown at the end of field |
| Manage Item Location | Specify the item’s location by selecting the appropriate warehouse and its location. |
| Opening stock Qty | Enter the opening stock quantity of Item. If batch-wise, lot-wise or Serial wise tracking is used, an option will appear to input opening inventory number wise details details. |
| Opening stock rate | Enter the per-unit rate of the item here, system will automatically calculate the total opening stock value based on the quantity provided. |
| Opening stock value | The opening stock value is calculated automatically based on the stock quantity and rate provided, using the following formula: Opening Stock Qty × Item Rate = Opening Stock Value. |
| Product Classification & Identification | |
| Group | This field allows you to assign a group to the item, enabling efficient filtering and categorisation within your generated reports. |
| Category | This field allows you to assign a category to the item, enabling efficient filtering and categorisation within your generated reports. |
| Mfg.Compnay | Select the manufacturing company for your item here; you may also create a new manufacturing company if needed. Useful for filtering and categorisation within your generated reports. |
| Barcode | This field allows you to configure a barcode for the item through scanning, manual entry, or the auto-generate option feature. |
| SKU/Goods Code | Set an SKU or Goods Code for easy searching during invoice creation or to show in Printouts. |
| Tax & Availability Settings | |
| GST Rate(%) | Select the applicable GST tax rate for your product or service from the dropdown in this field. |
| Cess Enable | This field allows you to enable and then specify the Cess Rate(%) applicable to the item. |
| Negative Qty Allowed | Set “Yes” to sell items without recorded stock, or set to “No” and configure Low Stock Warning and Qty for inventory warnings. |
| Low Stock Warning | Enable this to trigger a low inventory warning when stock levels fall below the specified quantity. This option appears if Negative Qty is disabled |
| Low Stock Qty | Set the quantity for low stock alerts to receive notifications when inventory drops below this level. |
| Show item in Purchase | Selecting this checkbox enables the item to be visible and selectable within the purchase module. |
| Show item in Sales | Selecting this checkbox enables the item to be visible and selectable within the Sales module. |
| Status | If you select “Active,” the item will be available and visible across all modules. If you select “Inactive,” the item will be hidden and excluded from all modules. |
| Custom Fields | |
| Custom fields | Set default values for custom fields already created in Settings to apply them to this item during transactions. Access the Custom Field settings directly from the top-right corner of the sidebar. |
How to update GST rate of items in bulk:
- We are providing a feature to update item rates in bulk on the item list page.
- Here, you can select multiple items at once and update their GST rates simultaneously. For more details, check this link: Item GST rate and MRP update option
Stock Management Batch/Lot wise and Serial wise operation:
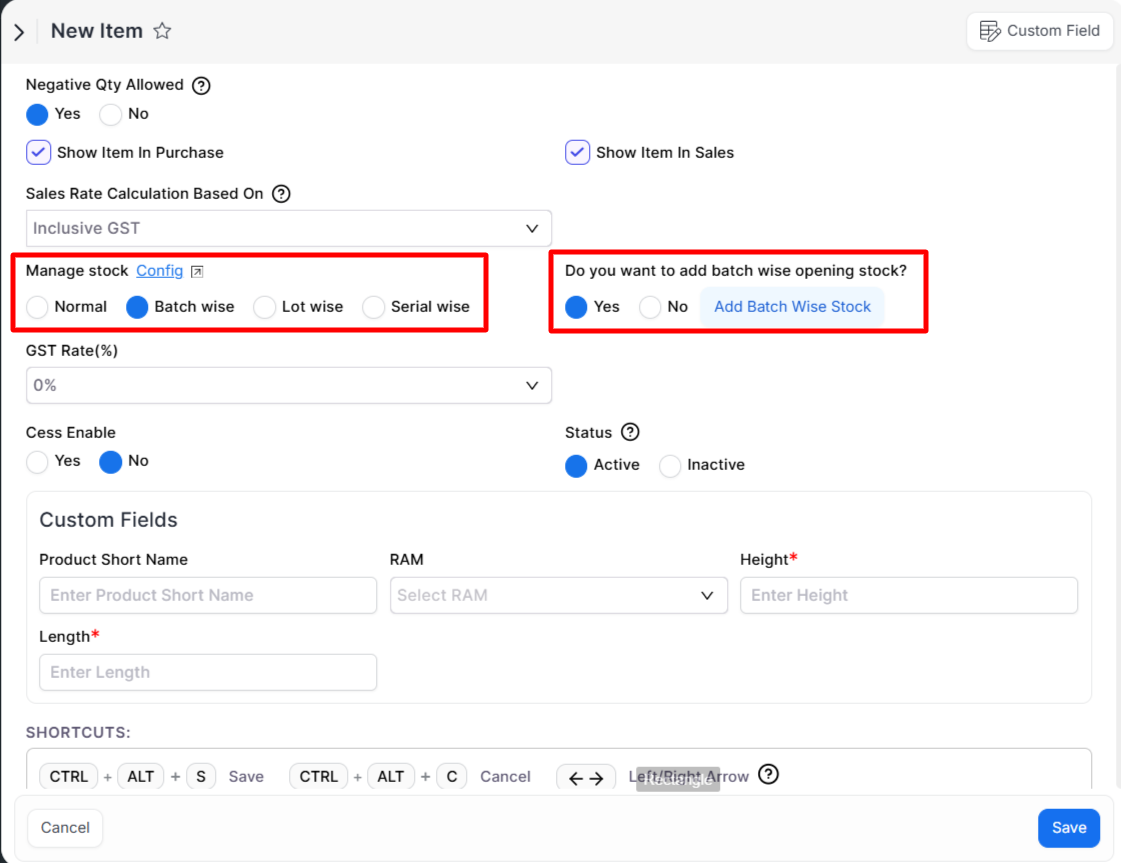
Within the Manage Stock section, you can define how your inventory will be tracked and managed. Munim provides multiple stock management methods based on business needs.
You can select from the following options like Normal, Batch Wise, Lot Wise and Serial Wise.
Normal Stock Management
Normal stock management is the simplest method, where items are tracked only by quantity.
Batch / Lot Wise Management
Batch or Lot wise management is used when items are grouped and tracked together based on a common batch or lot number.
- Items are managed in groups (batches/lots), Useful for products with expiry dates or manufacturing batches
- Helps in tracking stock movement batch-wise, Ideal for industries like pharma, FMCG, and food products
- Following the selection of either the Batch Wise or Lot Wise option, the prompt “Do you want to add Batch/Lot wise Opening Stock?” will appear.
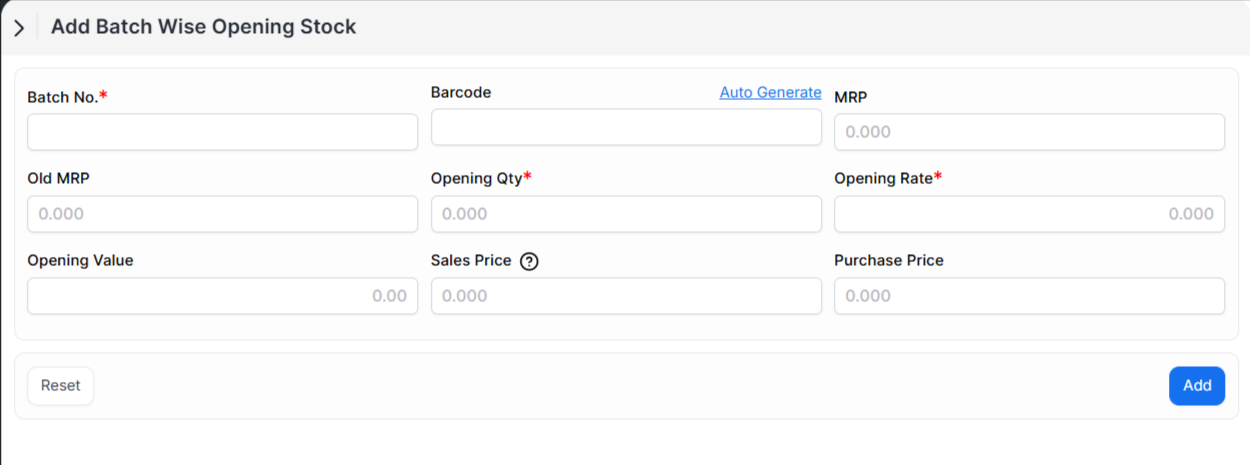
- If this option is set to yes, click on “Add Batch/Lot wise stock” in the sidebar to input the opening batch stock detail.
- Add details like No., Barcode, MRP, Old MRP, Opening Qty/Rate and Value, Sales Price and Purchase price specific for this batch number.
- Existing available batch number’s details, including MRP and pricing, etc., can be modified by navigating to the Item Master page and selecting the Edit Batch option from the Action menu.
Serial Wise Management
Serial wise management is used when each item needs to be tracked individually. For more details, please check this helpdesk: Serial Number Feature
- Each item is assigned a unique serial number and Stock is tracked item-by-item instead of quantity.
- Useful for products like electronics, machinery, or high-value goods. Helps in warranty tracking and item-level identification.
How to import items:
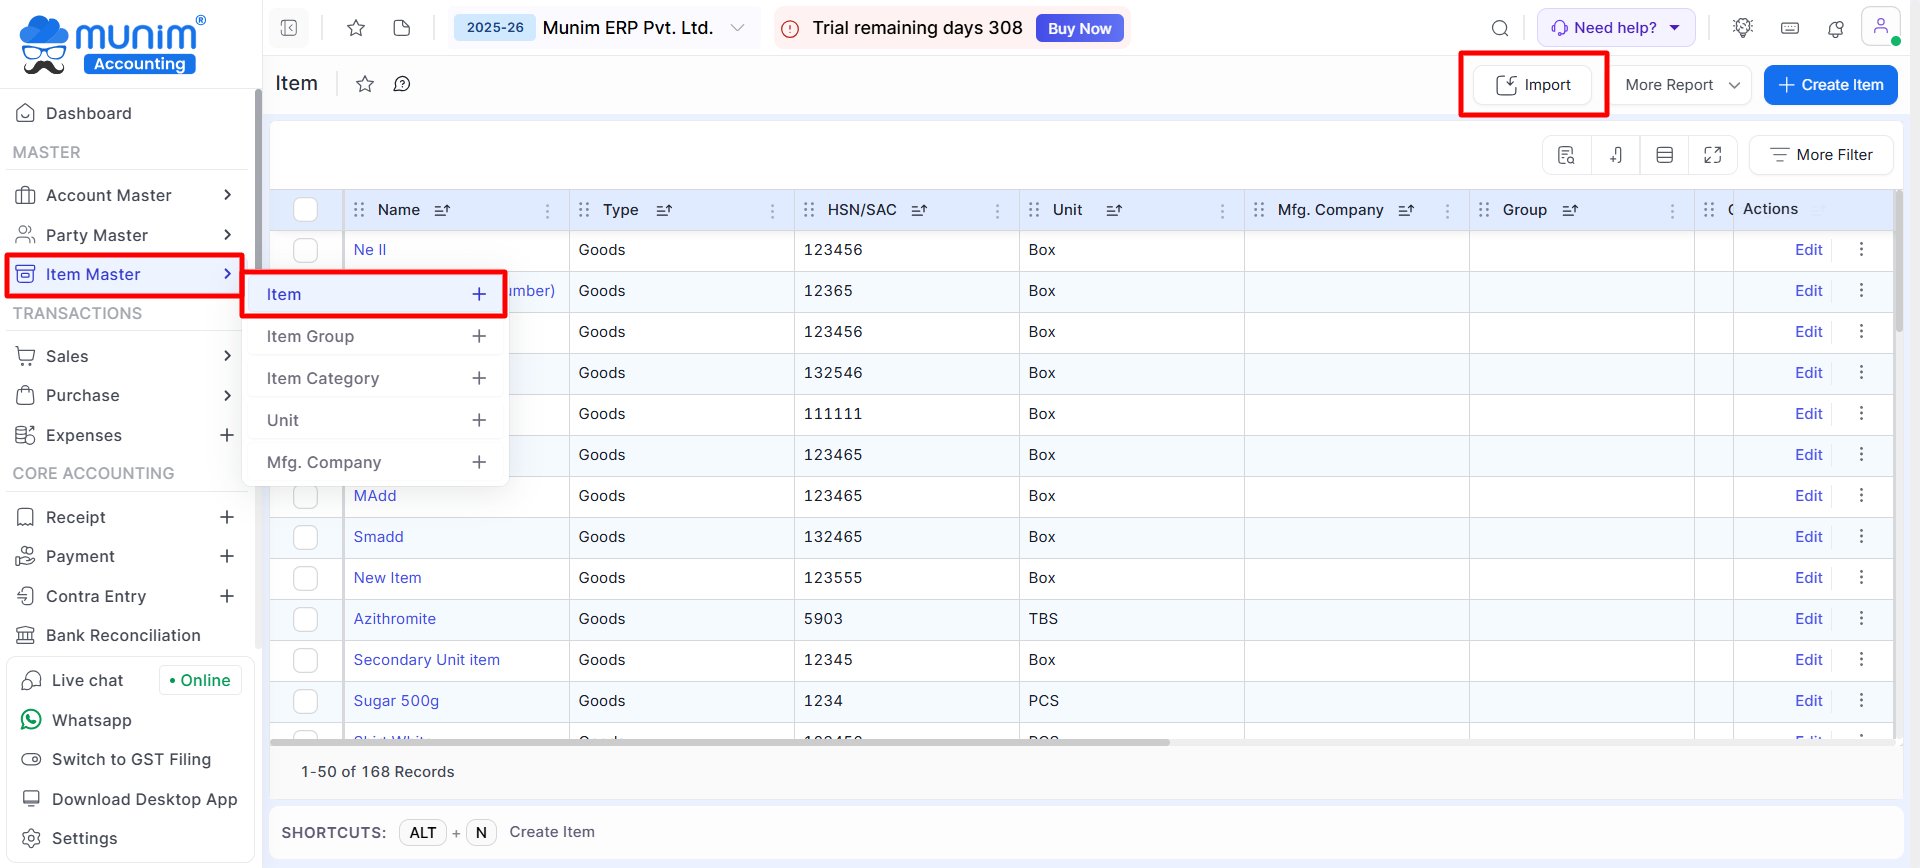
- Go to the master module from the left sidebar and then select the Item.
- Now on this page, click on the Import item button from the top right corner.
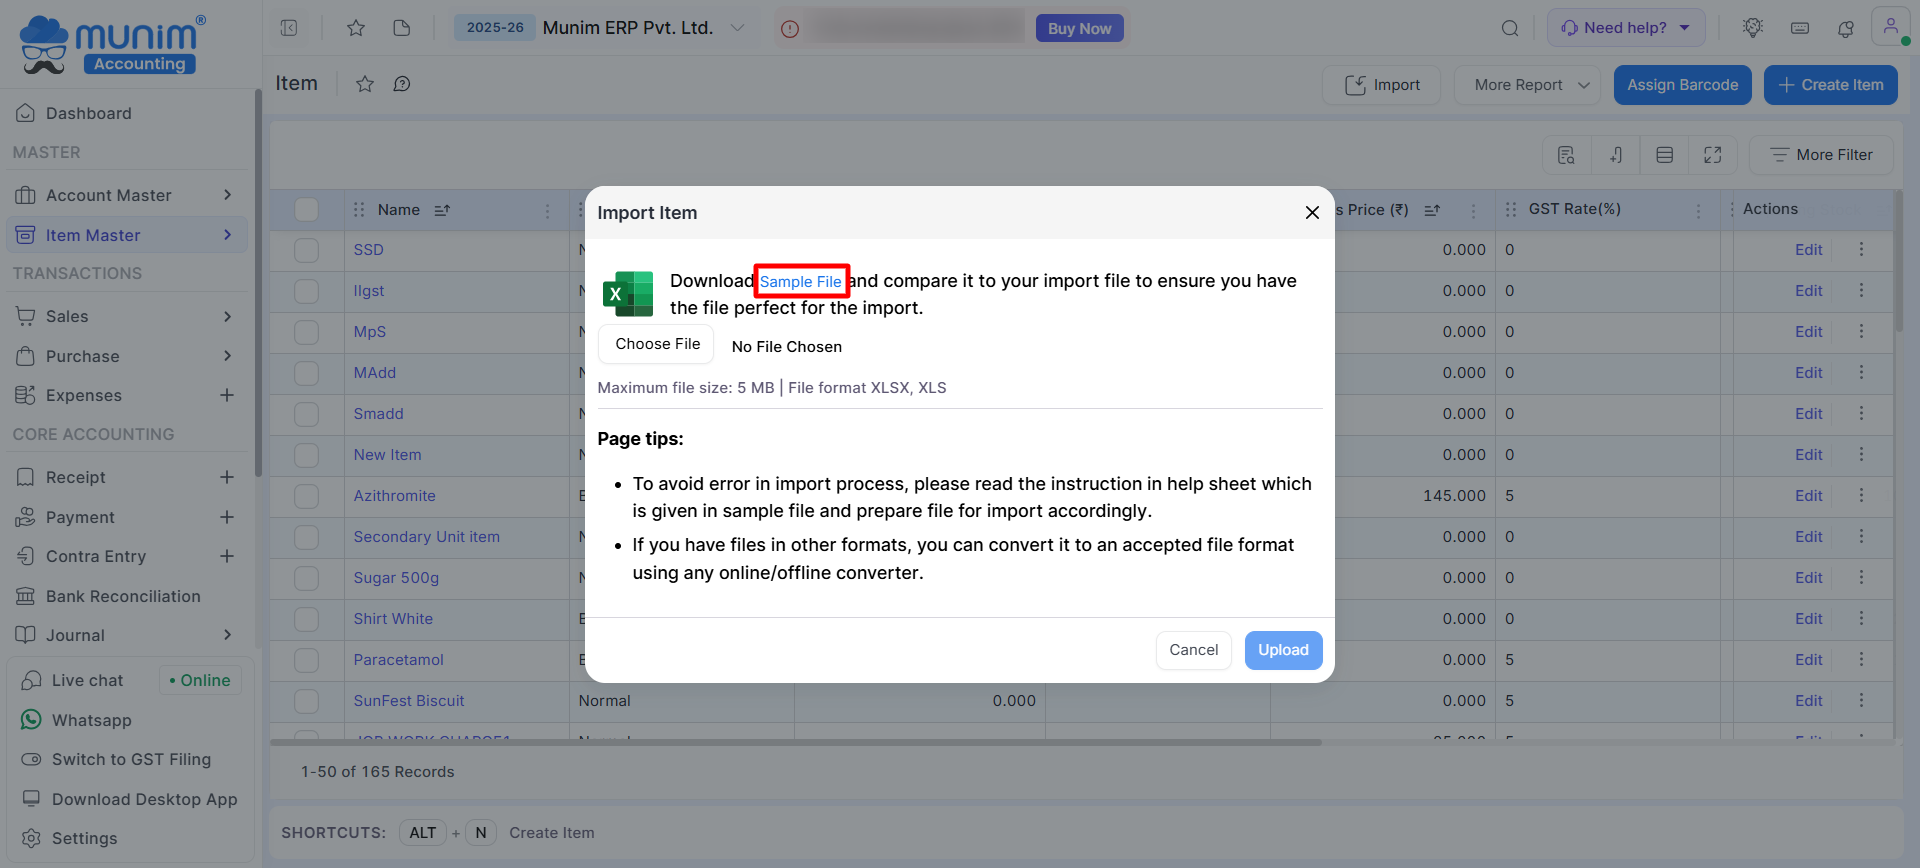
- Now the Import Item pop-up will be shown, from which you need to click on the Download sample file.
- In the downloaded Excel file, add the details properly according to the columns, save it and click the Choose File button to upload the file in that Import Item pop-up itself.
- Once you successfuly upload the file, items will be available on the Item List page.
Learn more: For more detailed help regarding the Import option, please check this Helpdesk link: Data Import Process
Need Assistance?
For any questions or further support with Munim Software, please contact our support team.


