 3712 views
 This module is used to create sales invoices. Here you are able to add new customers and new items.
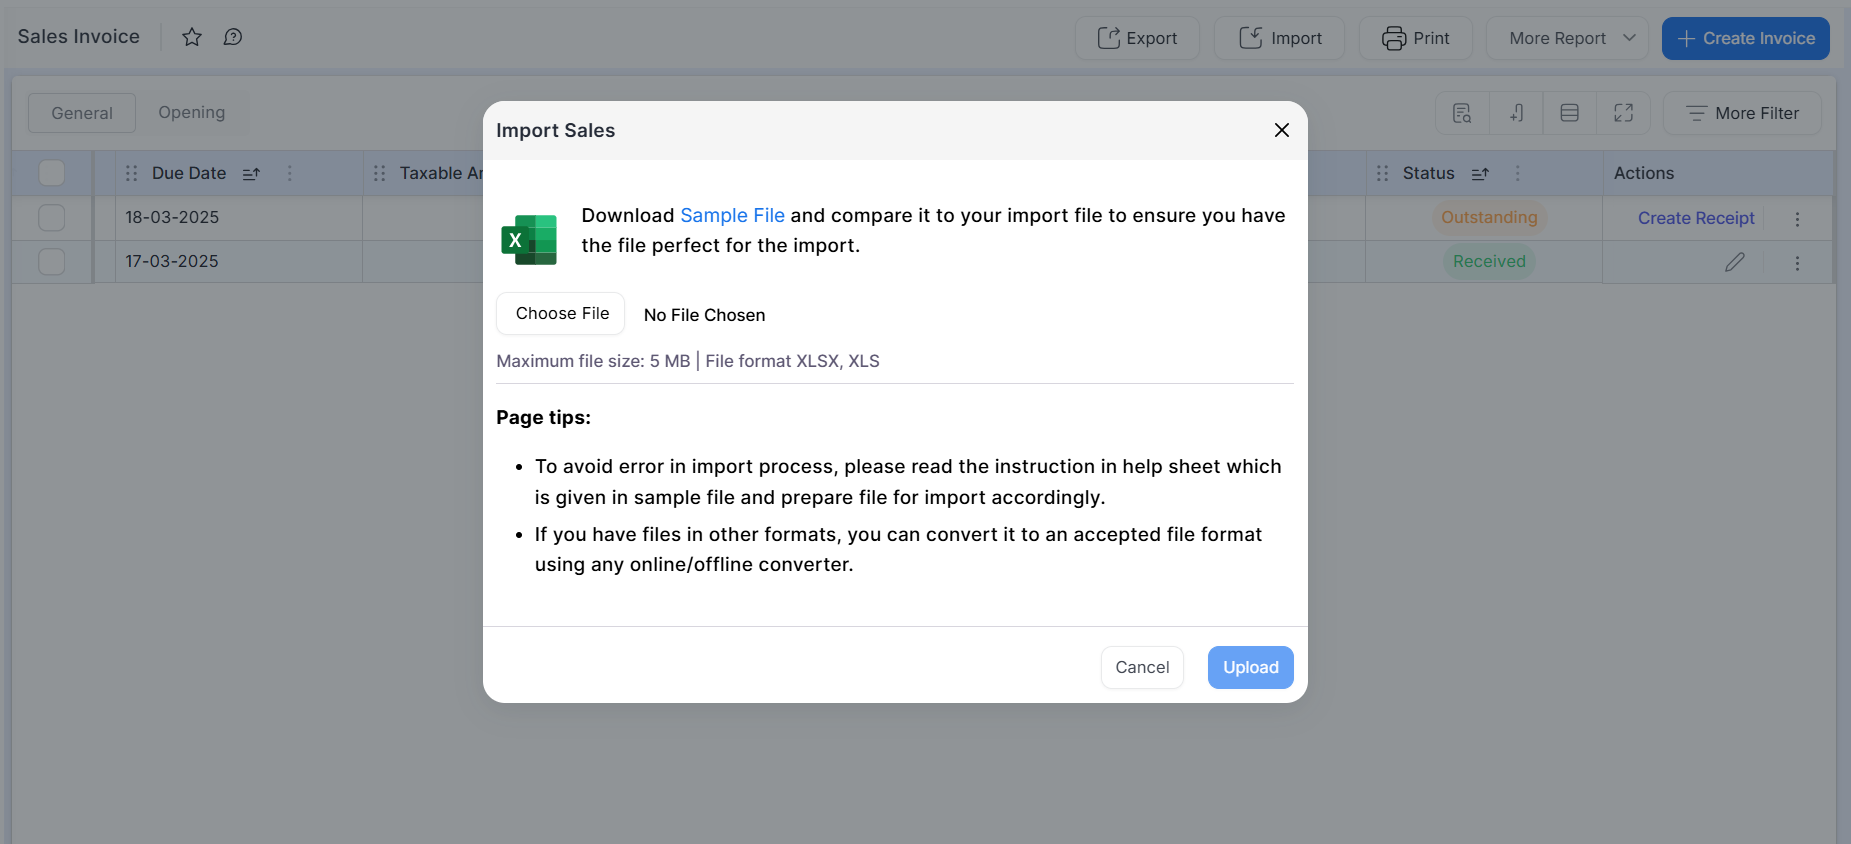
On this page, you are able to import the sales invoices. we are providing the sample Excel file which you can download, add the details and import the data.
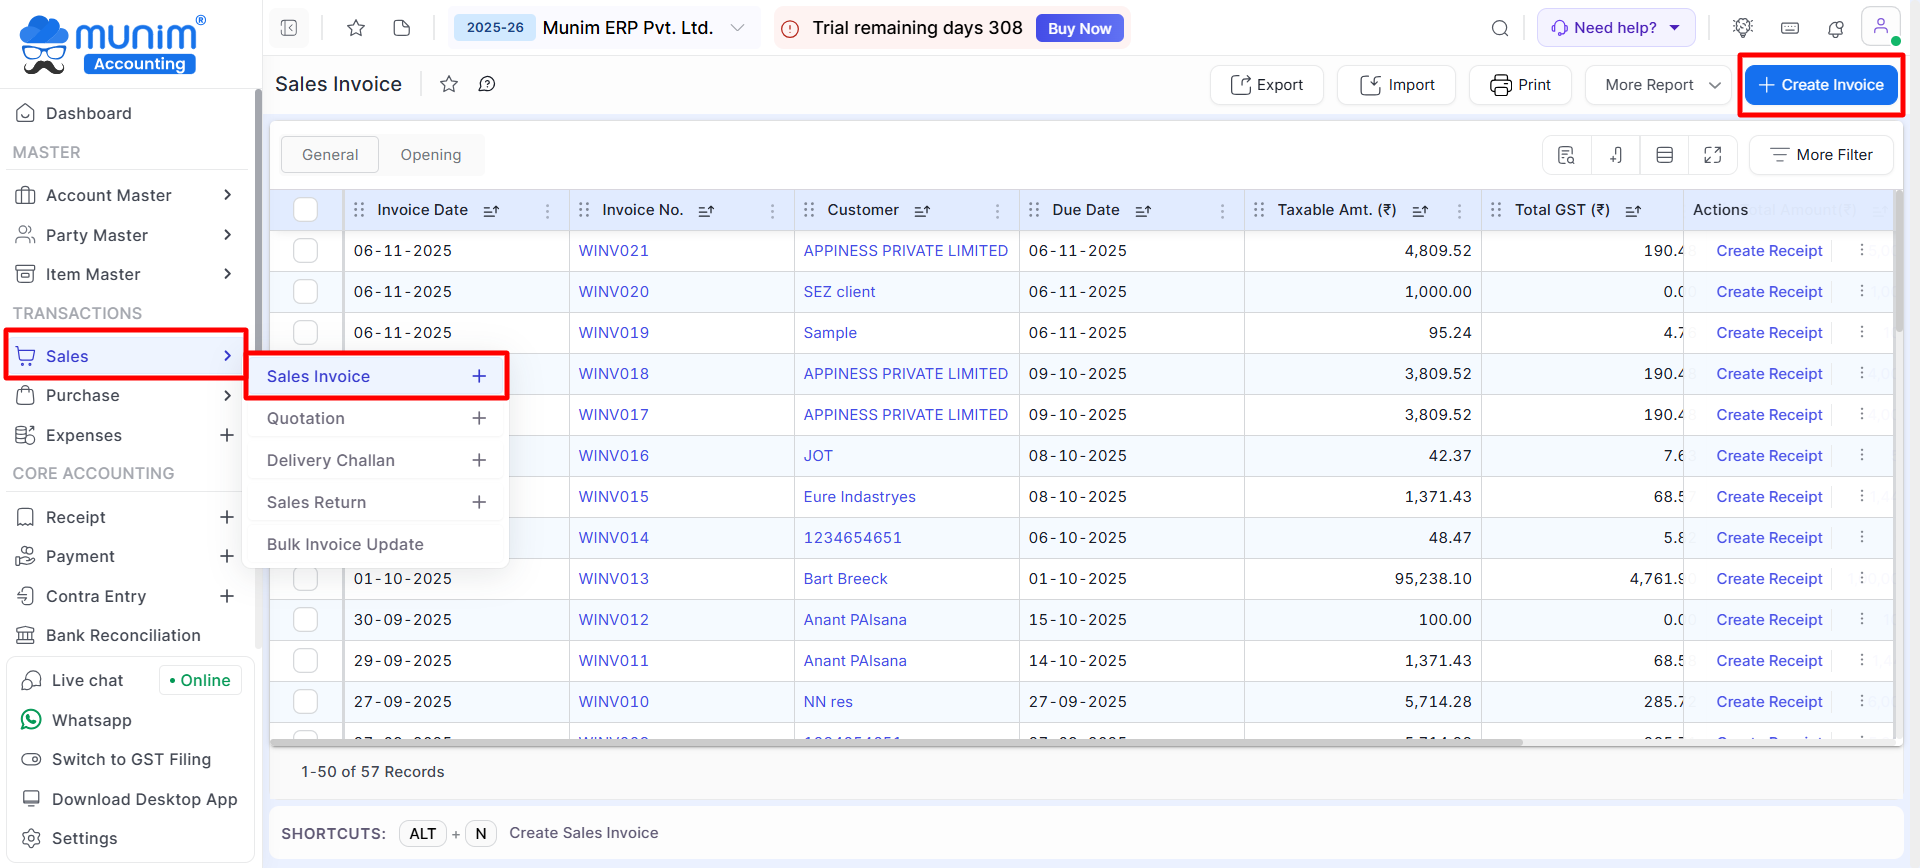
Create sales invoices:
- Go to the Transaction section on the left sidebar, click the Sales module, and then click Sales Invoice option from the dropdown menu or click the + icon to create.
- On the Sales Invoice list page, Click on the + Create Invoice button or press the Alt+N key.
+−⟲
+−⟲
| Field | Description | Note |
|---|---|---|
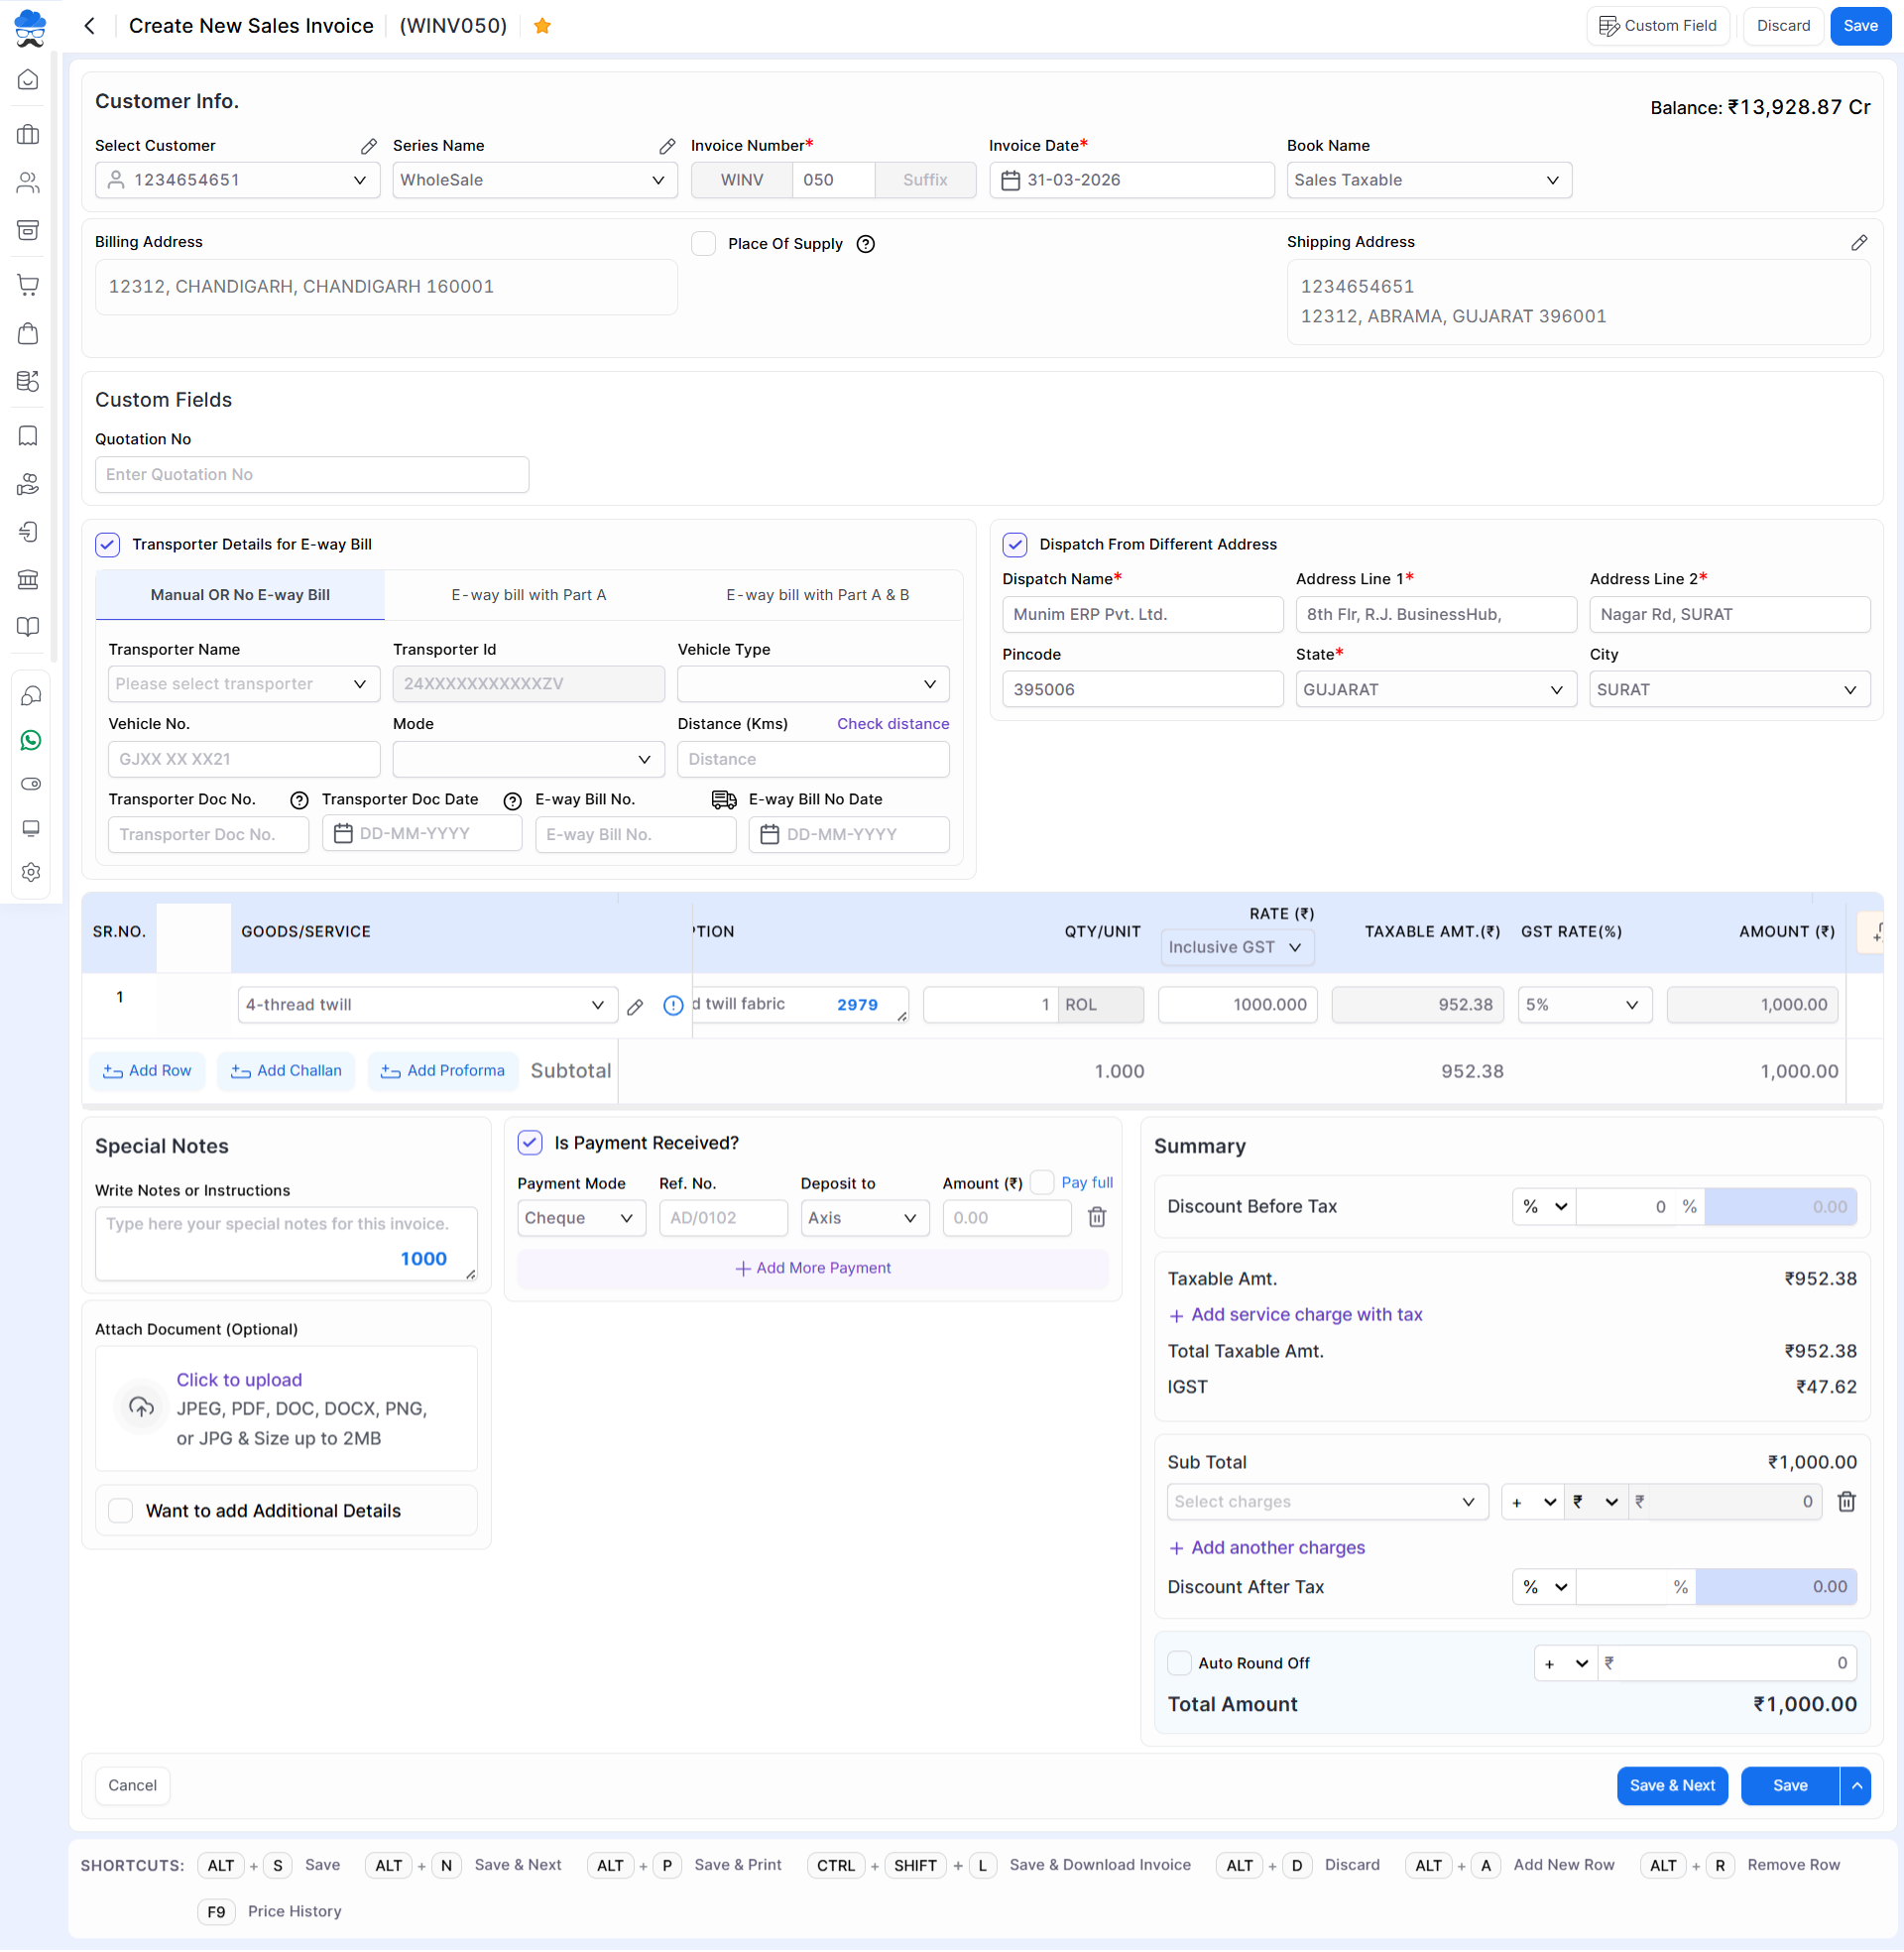
| Customer | Here select customer for creating sales invoices. here also you are able to add new customers. In new Design 2.0, we have hidden Mobile number and Email fields for better page view. | Mandatory field |
| Billing address | If you have written the address in the customer account then as you select customer, the Billing address will automatically come here. | |
| Place of supply | IGST will be applicable on the invoice. Suppose selected billing accounts province is different in comparison to the Place of supply province. | |
| Shipping address | If you have written the address in the customer account, then the shipping address will automatically come here as you select the customer. here you are able to edit the shipping address. | |
| Book Name | Here select the sales book for sales record. | |
| Series Name | Here select the invoice series. | |
| Invoice Number | The Invoice number is auto-generated regarding your invoice series. | Mandatory field |
| Invoice Date | The invoice date is auto-generated, also you are able to change the invoice date. | Mandatory field |
| Custom Field | Here you can enter details on the custom field you have set. You can edit custom fields from top right. | |
| Transporter Detail for E-way bill | If you require an e-way bill for this invoice, then click this checkbox and fill in all the required details in particular section for E-way Bill. | |
| Dispatch from Different Address | Click this checkbox and edit address if the goods are to be delivered from a different address. | |
| Goods/Service | Here select an item to sale, Here you are able to add an item or edit item. | Mandatory field |
| Batch No. | Here select the batch number if Goods is create with Batch number | |
| MRP | Here write the item MRP. if you add MRP on item master then MRP auto fill. | |
| Quantity | Here write the item quantity. | |
| Free quantity | Here customers get items without cost along with paid items. This free quantity is affected in the stock report but not in the invoice amount. | |
| Rate (₹) | As you select the item, Rate automatically comes here from item master. also you can add/change item rate. You can set Item rate as Inclusive GST or Exclusive GST using the dropdown under Rate. | Mandatory field |
| Disc.(%/₹) | Here write discount in two types, first percentage-wise and second amount-wise. this discount apply only for this item. | |
| Taxable amount | As you select the item, write the item quantity, write the item rate, add the discount then the the taxable amount will show here. | |
| CESS(%) | As you select the item, CESS automatically comes here from the item master.Here you are able to change CESS(%). | |
| GST Rate(%) | As you select the item, GST Rate automatically comes here from the item master. Here you are able to change GST rate. | |
| Amount (₹) | As you select the item, write item quantity, write the item rate, and discount then the amount will show here. | |
| Add Row | Click to add more item rows | |
| Add Challan | If the selected customer has a Delivery Challan created, then option enabled and you can add it here. | |
| Add Proforma | If the selected customer has a Proforma created, then option enabled and you can add it here. | |
| Special notes | Here write a special note for this invoice. | |
| Attach Document | Here you can able to upload files. | |
| Payment Received | Clicks on this checkbox to show the payment received entry option. If the user want to performs both operations (Sales & Receipt) at the same time then this option is most important. here the user adds payment received data like mode, deposit to, and amount then the receipt voucher is auto-generated. | |
| Mode | Select receipt methods like cheque, net banking, cash, and UPI. | |
| Ref.No | Here write the receipt reference number or reference details. | |
| Deposit to | Select receipt to deposit account. | |
| Amount | Here write the received amount. | |
| +Add Payment | This button is used to generate multiple payment entries. | |
| Want to add Additional Details | Click this option to add Addition information in Invoice like Term Days and Due Date. | |
| Terms (Days) | If you have written the terms(Days) in the customer account, then the terms(Days) will automatically come here as you select the customer. here you are able to change the terms(Days). | |
| Due date | As you write Terms days, The due date will automatically be set. | |
| Quotation No. | If you are creating a sales invoice using a quotation, then the quotation number will be shown here loated under Custom fields | |
| Discount Before Tax | Here, you can add a discount before GST tax calculation. The discount will be applied equally to each item. | |
| + Add service charge with tax | Here you are able to add an additional service charge for this invoice. here you are able to add multiple additional services. | |
| +Add another charge | Here you are able to add and remove another charge for this invoice. here you are able to add multiple other charges. | |
| Discount After Tax | Here, you can apply a discount to this invoice after tax, either as a percentage or a fixed amount. | |
| Auto round off | This checkbox is useful for rounding off the total amount, and also you are able to set a custom amount. | |
| Save & next | This button is used to save the sales invoice and page redirect on the same page. | |
| Save | This button saves the sales invoice and redirects to the Sales invoice listing page. In the New Design 2.0, a dropdown with “Save & Send” and “Save & Print” options has been added to this button. |
| Shortcut | Description |
|---|---|
| Alt+S | Save- This shortcut is used to save the sales invoice. |
| Alt+N | Save & Next- This shortcut is used to save the sales invoice and redirect on the same page. |
| Alt+P | Save & Print- This shortcut is used to print sales invoices. |
| Alt+D | Discard- This shortcut is used to discard the sales invoice. |
| Alt+A | New- This shortcut is used to add new row. |
| Alt+R | Remove- This shortcut is used to remove a row. |
| Alt+C | Cancel- This shortcut is used to cancel the sales entry. ( work as Back button) |
+−⟲
| Field | Description |
|---|---|
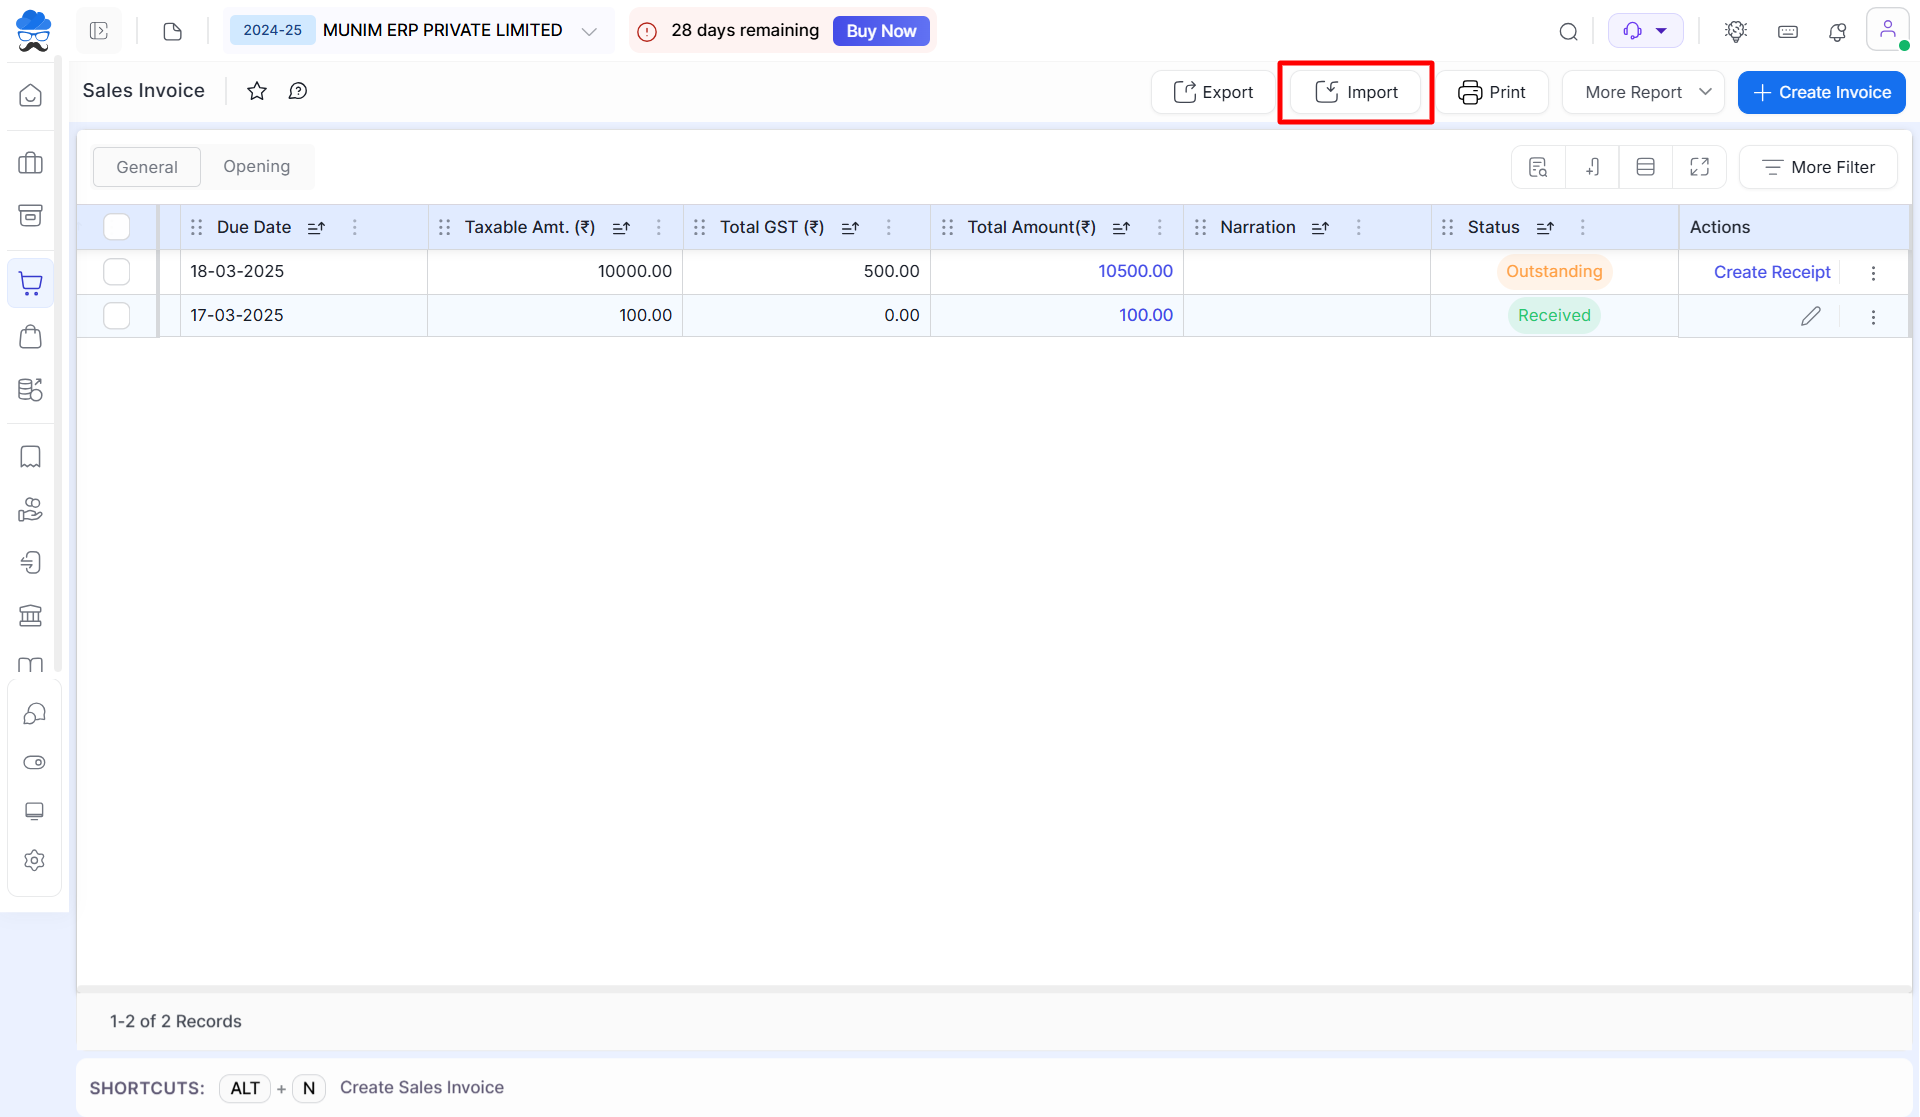
| Export | This button is used to export data. |
| Import | This button is used to import data. |
| Click here to edit Printing template settings of Sales Invoice | |
| More Report | Click here to use more predefined Filtered Reports |
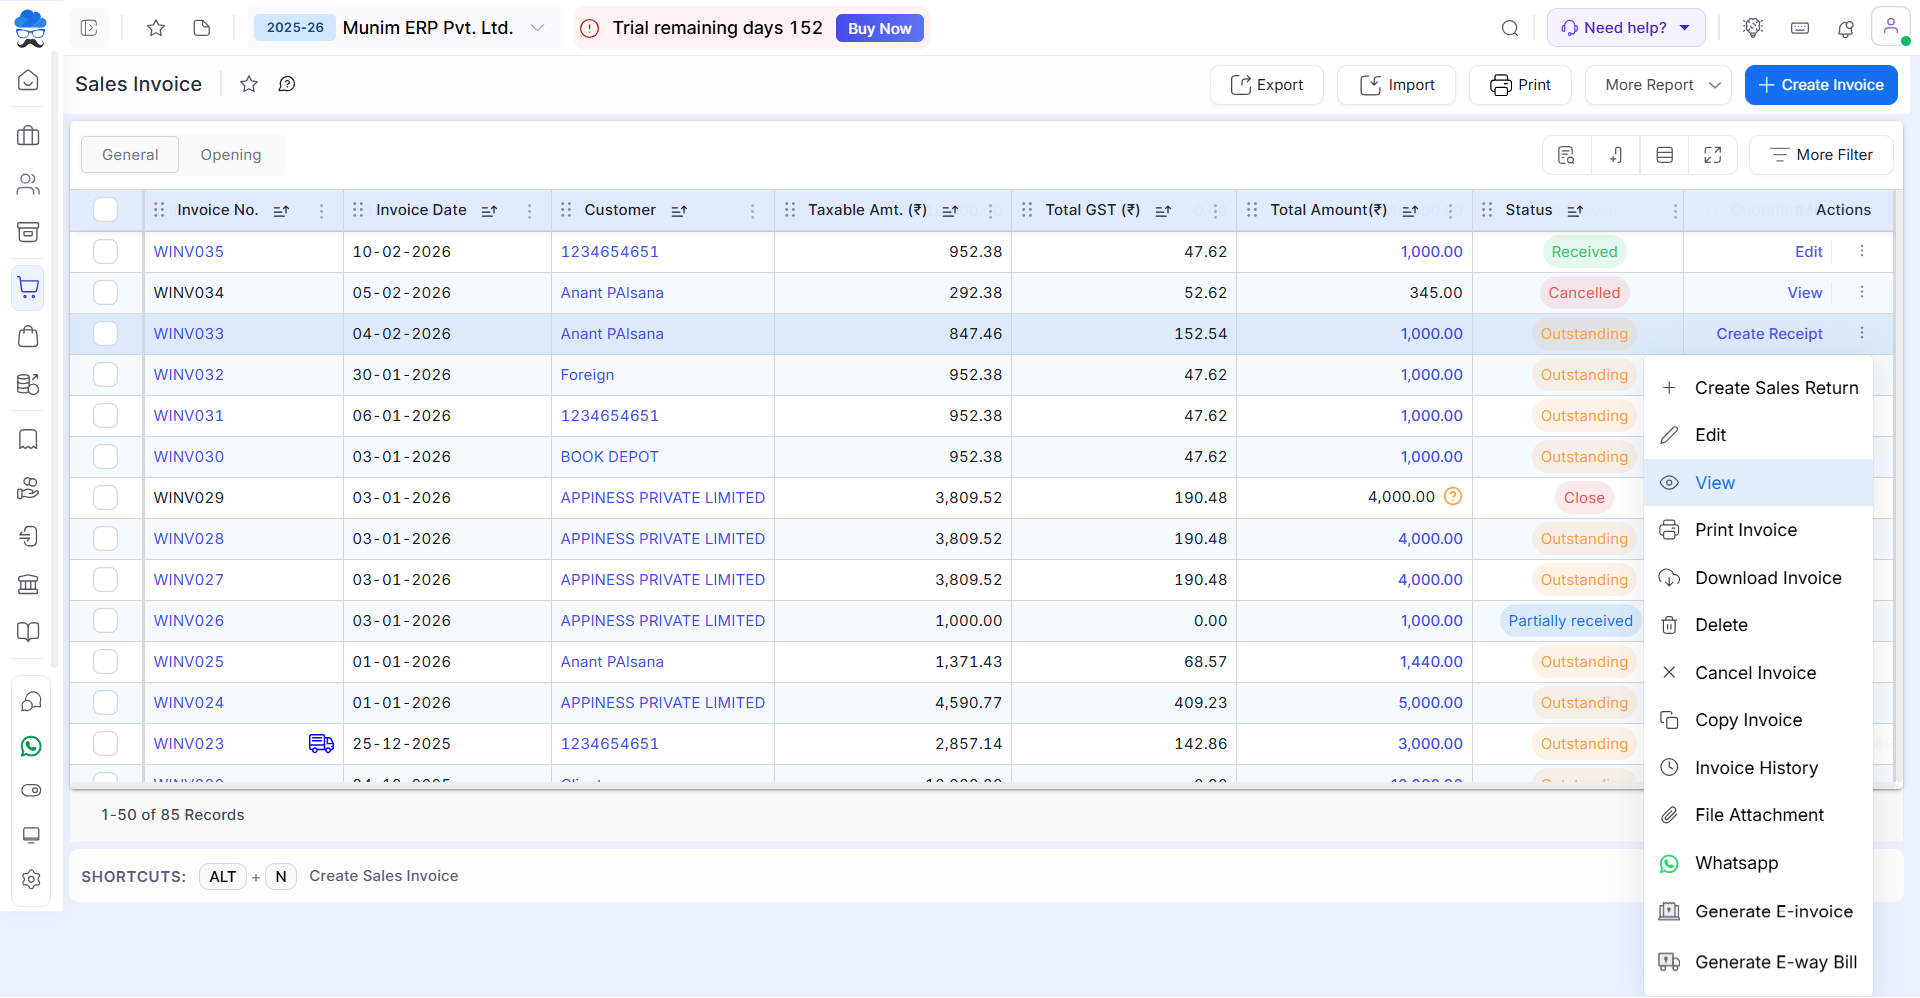
| Actions | Here you will get many useful options related to invoice. Click on three dots to open a multi option dropdown menu |
| Create Receipt | This action is used to create a receipt for the sales invoices. |
| Create Sales Return | This action is used to create sales returns (Credit Note). |
| Edit | This action is used to edit sales invoices. |
| View | This action is used to view sales invoices. |
| Print Invoice | This action is used to print sales invoices. |
| Download Invoice | This action is used to download sales invoice. |
| Delete | This action is used to delete sales invoices. |
| Cancel | This action is used to cancel sales invoices. |
| Copy Invoice | This action is used to copy invoices. this action is used to create a new invoice with the same data. |
| Invoice History | This action is used to view invoice history. |
| File Attachment | This action is used to attach a document for this invoice. |
| This action is used to send invoice copy through WhatsApp. By clicking on this option, you will be redirected to WhatsApp with invoice details. | |
| Generate E-Invoice | This action is used to generate e-invoice. |
| Generate E-Way bill | This action is used to generate e-way bill. |
| Status | Details |
|---|---|
| Outstanding | This status will identify the entry as Outstanding, As this Invoice payment has not been received yet or not adjusted with receipt entry. |
| Received | This status will identify the entry as Received, As this Invoice payment has been received and adjusted with the Receipt entry. |
| Partially received | This status will identify the entry as partially received, As a Half or Partial payment is received of the invoice. |
| Cancelled | This status will identify the entry as cancelled as if a user has cancelled it manually. |
| Closed | This status will identify the entry as closed if a user has created a Sales return against the invoice. |
Sales Invoice – Quick Conversion Flow
- Quotation → Proforma Invoice → Delivery Challan → Sales Invoice
- Quotation → Proforma Invoice → Sales Invoice
- Quotation → Sales Invoice
Note
- While creating a Sales Invoice, you can add multiple Quotations in it.
- You can create a Sales Invoice by adding multiple Proforma.
Print template
- We offer a distinct print template for Sales Invoice, accessible through the Settings module and the Sales Invoice list page Print button.
Import sales invoices:
- Go to the Sales module from the left sidebar and then select the Sales Invoice.
- Now on this page, click on the Import Sales button from the top right corner.
- Now the import sales popup will be shown from which you need to click on the Download sample file.
- Now open the downloaded Sample Excel file, add the details, save it and upload the file in that popup itself.
+−⟲
+−⟲
- Once you prepare and upload a file in the software, successfully uploaded entries can be seen in the list
Learn more: For more detailed help regarding the Import option please check this Helpdesk link: Data Import Process
Need Assistance?
For any questions or further support with Munim Software, please contact our support team.


