 356 views
 The Custom Fields feature in Munim allows you to add and manage additional fields as per your business requirements.
This helps you capture extra information that is not available by default, both at the Item level and Invoice (Document/Transaction) level.
Using Custom Fields, you can make your records more detailed, standardised, and aligned with your internal processes and reporting needs.
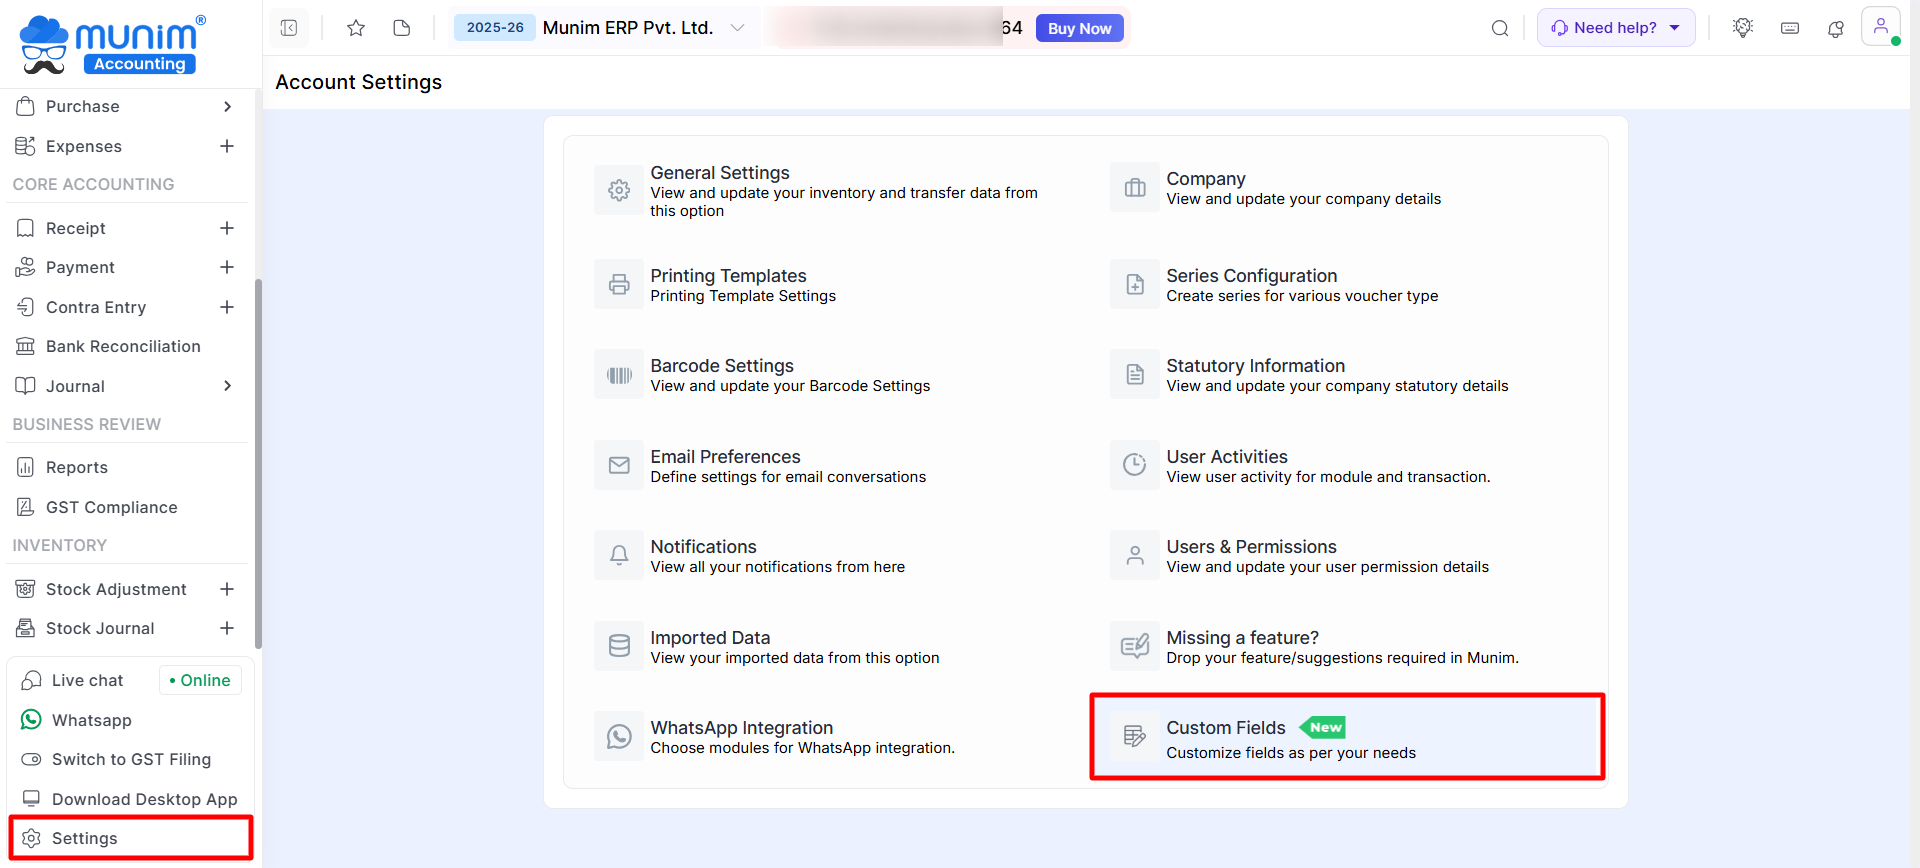
How to Access Custom Fields Settings
- Go to Settings from the left menu
- Click on Custom Fields from the list
Types of Custom Fields Available
Munim provides two types of custom fields:
- Item Level Custom Fields
- Customer
- Vendor
- Document/Transaction Level Custom Fields
Item Level Custom Fields
- Item-level custom fields are used to store additional details for each item.
- These fields appear while creating or editing items and can also be shown on printed documents.
Add New Custom Field For Item:
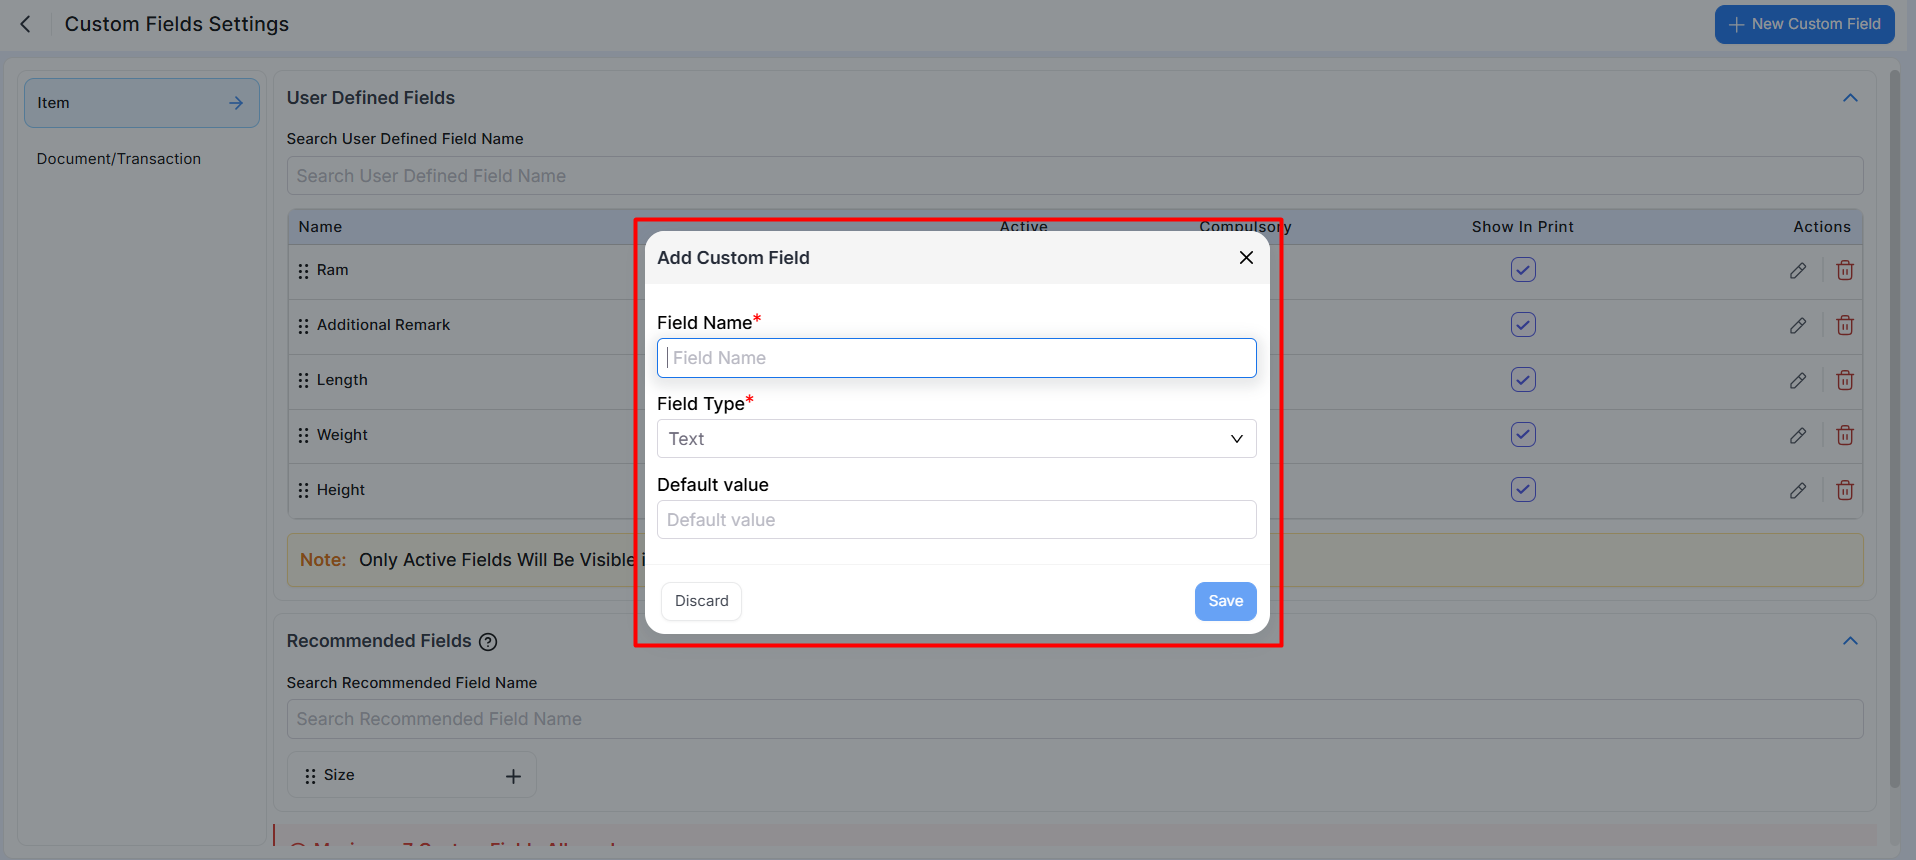
- New custom fields can be added via the “+New Custom Field” button located in the top right corner.
- When creating a new custom field, you will be prompted to fill in the following fields:
- Field Name (Custom Field Name), Field Type (e.g., Text, Number, Date, Dropdown), Default Value (if a default value is desired)
- When selecting the “Dropdown” in field type, you can input multiple selectable name tags, facilitating easier selection when configuring custom fields for items.
Recommended Fields
This section shows commonly used fields suggested by the system.
- Fields such as Size, Shade, Length, Weight, etc., can be added quickly.
- Click the “+” icon to add any recommended field to your transaction.

Available Options
- Enable or disable the field using Active toggle
- Make the field Compulsory while saving item details
- Show or hide the field in Print formats
- Edit or delete existing fields anytime
Note: Only active custom fields will be visible in Item Master and print layouts.
Common Use Cases
- Product specifications (Size, Shade, Length, Weight, etc.)
- Industry-specific attributes
- Internal classification or tracking fields
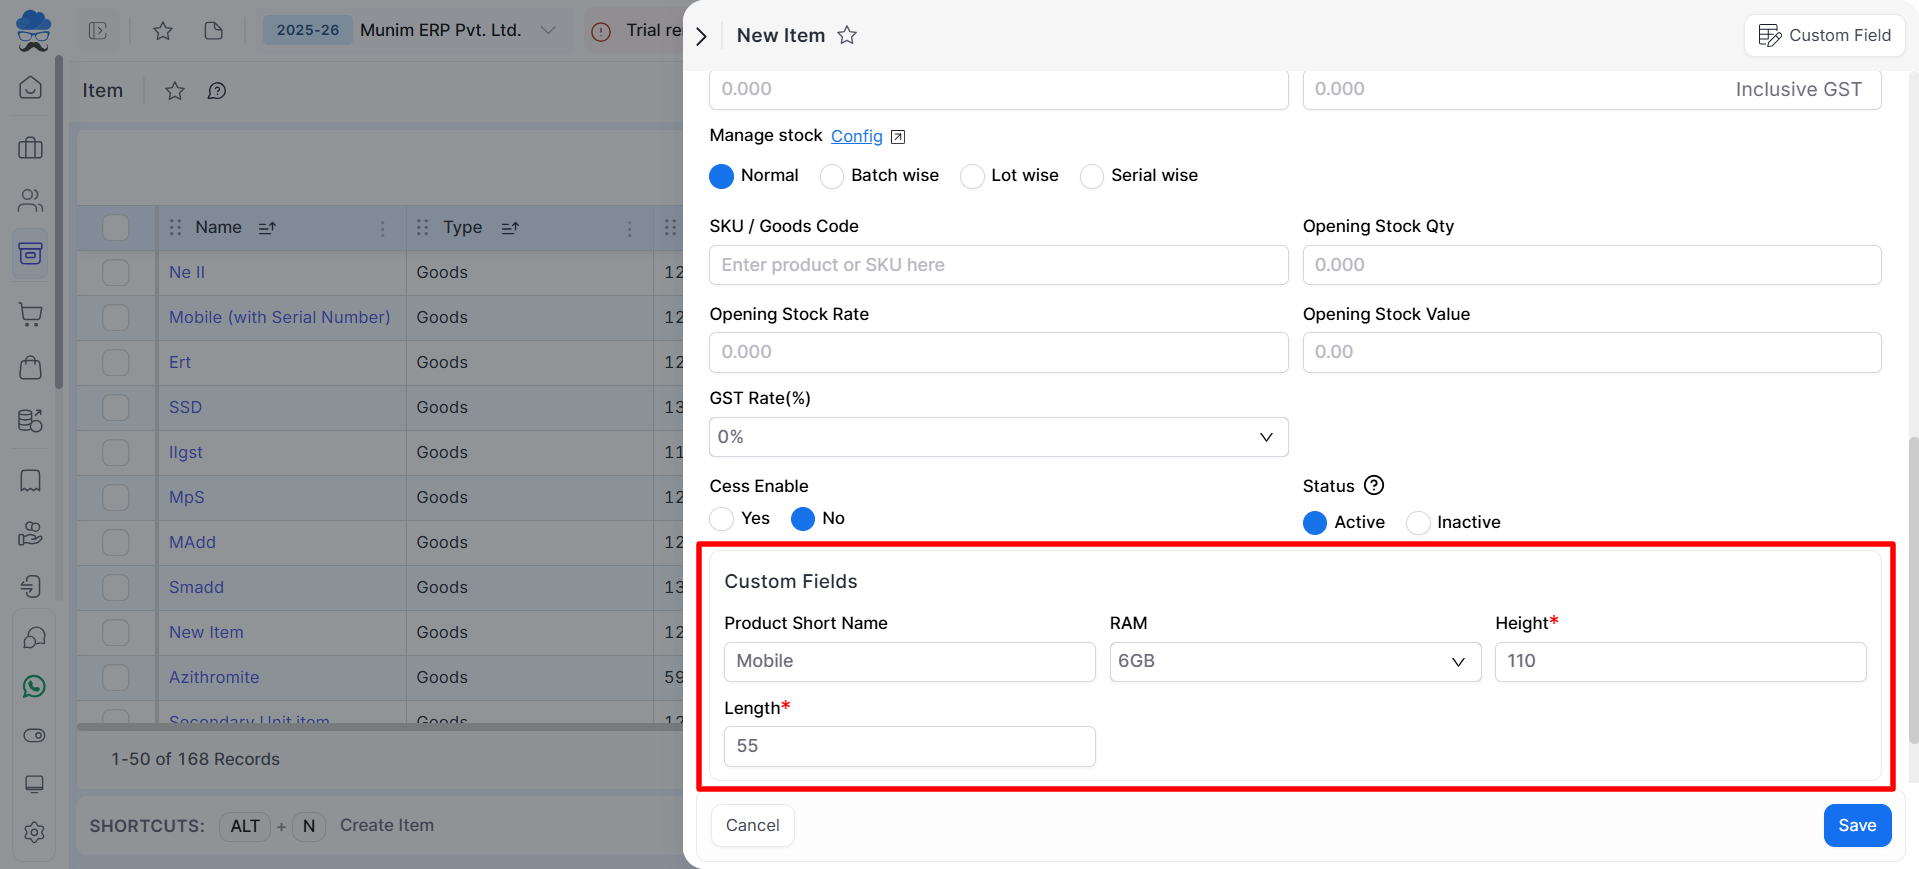
Customfield setup in Item master:
- You can locate Custom Fields when adding or editing an Item to configure them for printing.
Customer Level Custom Fields
- Customer-level custom fields are used to store additional details for each customer.
- These fields appear while creating or editing customers and can also be shown on printed documents.
Add New Custom Field For Customer:
- New custom fields can be added via the “+ New Custom Field” button located in the top right corner.
- When creating a new custom field, you will be prompted to fill in the following fields:
- Field Name (Custom Field Name), Field Type (e.g., Text, Number, Date, Dropdown), Default Value (if a default value is desired)
- When selecting the “Dropdown” in field type, you can input multiple selectable name tags, facilitating easier selection when configuring custom fields for customers.

Recommended Fields
- This section shows commonly used fields suggested by the system, along with newly created ones.
- Fields such as DL Number, FSSAI License, Factory License, IEC Number, CIN Number, etc., can be added quickly.
- Click the “+” icon to add any recommended field to your customer.

Available Options
- Enable or disable the field using Active toggle
- Make the field Compulsory while saving customer details
- Show or hide the field in Print formats
- Edit or delete existing fields anytime
- Note: Only active custom fields will be visible in Customer Master and print layouts.
Common Use Cases
- Customer identification or compliance details
- Industry or license-related information
- Internal classification or tracking fields
Custom field setup in Customer Master:
- You can locate Custom Fields when adding or editing a Customer to configure them for printing.
- Go to Master > Party Master > Customer > Edit. Here you can set up a custom field for that customer.

Vendor Level Custom Fields
- Vendor-level custom fields are used to store additional details for each vendor.
- These fields appear while creating or editing vendors and can also be shown on printed documents.
Add New Custom Field For Vendor:
- New custom fields can be added via the “+ New Custom Field” button located in the top right corner.
- When creating a new custom field, you will be prompted to fill in the following fields:
- Field Name (Custom Field Name), Field Type (e.g., Text, Number, Date, Dropdown), Default Value (if a default value is desired)
- When selecting the “Dropdown” in field type, you can input multiple selectable name tags, facilitating easier selection when configuring custom fields for vendors.

Recommended Fields
- This section shows commonly used fields suggested by the system.
- Fields such as GST Number, PAN Number, MSME Number, Bank Details, License Number, etc., can be added quickly.
- Click the “+” icon to add any recommended field to your vendor.

Available Options
- Enable or disable the field using Active toggle
- Make the field Compulsory while saving vendor details
- Show or hide the field in Print formats
- Edit or delete existing fields anytime
Note: Only active custom fields will be visible in Vendor Master and print layouts.
Common Use Cases
- Vendor compliance and statutory information
- Banking and payment-related details
- Internal vendor classification or tracking fields
Custom field setup in Vendor Master:
- You can locate Custom Fields when adding or editing a Vendor to configure them for printing.
- Go to Master > Party Master > Vendor > Edit. Here, you can set up a custom field for that Vendor.
Document / Transaction Level Custom Fields
- Document/Transaction-level custom fields are used to capture additional information at the transaction level.
- These fields are displayed during the creation of transaction entries. Currently, only Sales Invoices transactions are supported.
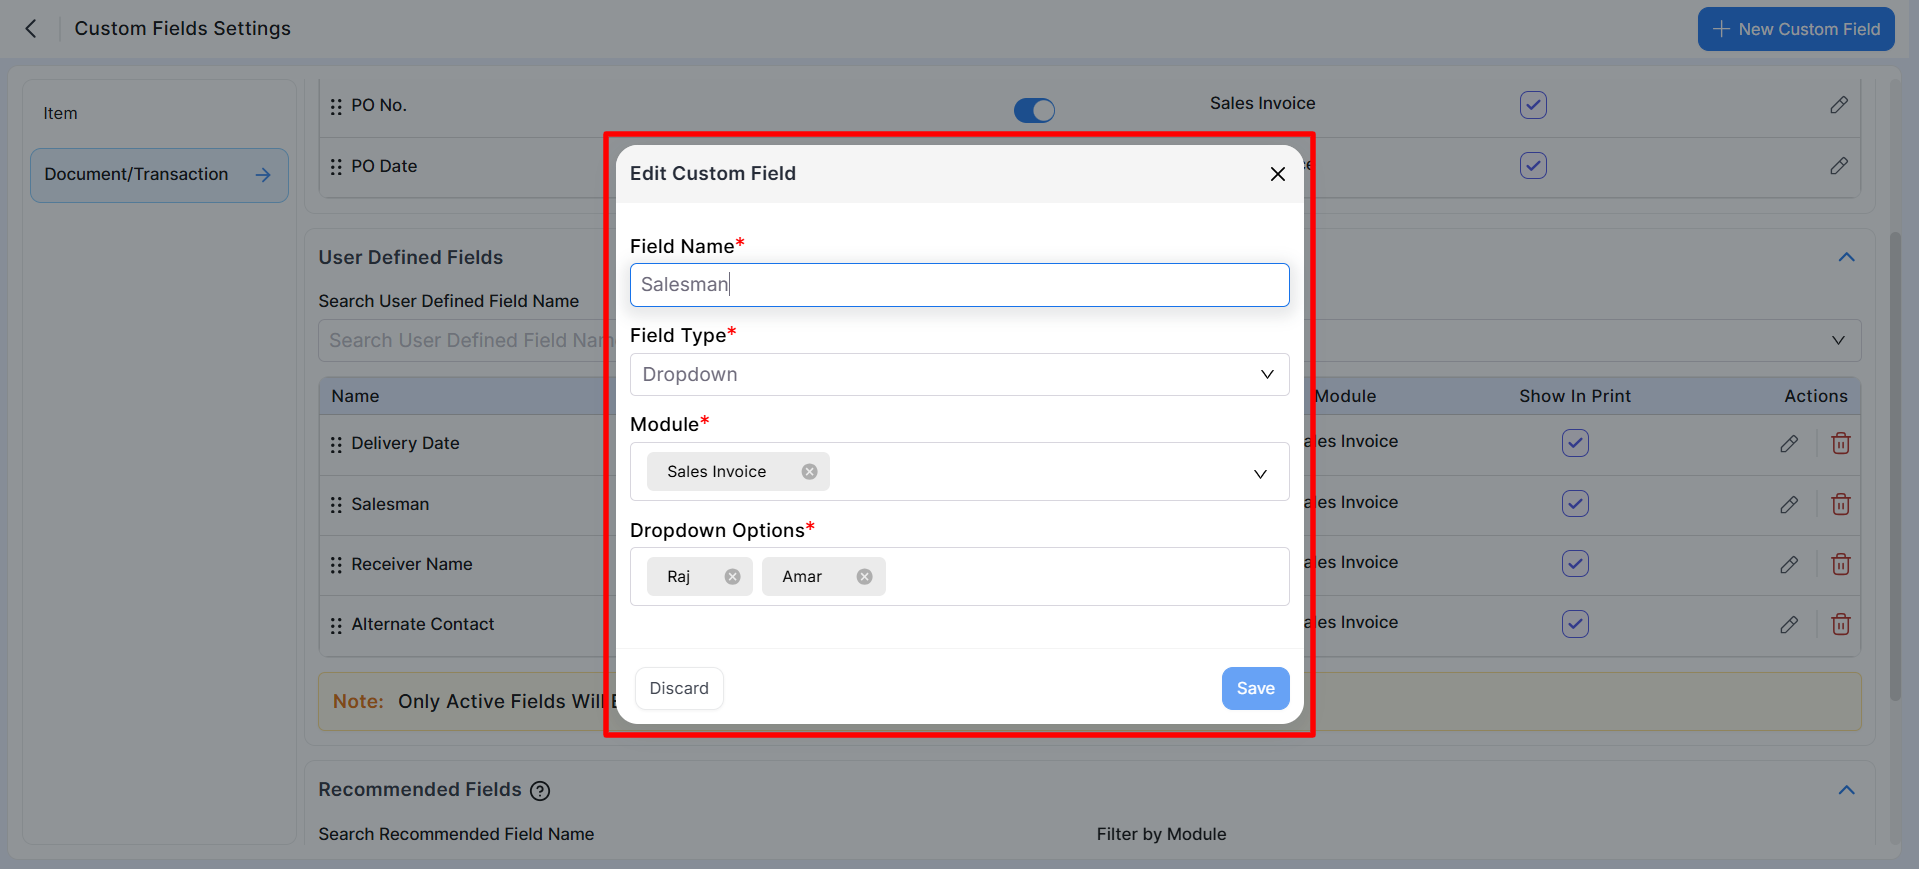
Add New Custom Field For Document/Transaction:
- New custom fields can be added via the “+New Custom Field” button located in the top right corner.
- When creating a new custom field, you will be prompted to fill in the following fields:
- Field Name (Custom Field Name), Field Type (e.g., Text, Number, Date, Dropdown), Default Value (if a default value is desired), Module (Set custom field for particular module type, currently for Sales module only)
- When selecting the “Dropdown” field type, you can input multiple selectable name tags, facilitating easier selection when configuring custom fields for invoice.
Predefined Fields
This section displays system-provided fields commonly used in transactions.
- Examples include Quotation Number, Purchase Order Number, and PO Date.
User Defined Fields
This section lists custom fields created by the user.
- Add a new custom field to display and configure it here.
Recommended Fields
This section shows commonly used fields suggested by the system.
- Fields such as Delivery Date, WhatsApp Number, Alternate Contact, Receiver Name, and Dispatch Date can be added quickly.
- Click the “+” icon to add any recommended field to your transaction.

Available Options
- Each field can be marked as Active (Except Quotation No.) to make it available during transaction entry.
- The Compulsory option ensures the field must be filled before saving the document. (Except predefined Fields)
- Enable Show in Print to display the field on printed invoices.
- Fields can be edited or deleted (Except predefined Fields) using the action icons.
Important Notes
- Only active fields will be visible during transaction entry and on printed documents.
- A maximum of 7 custom fields is allowed per module.
- If the limit is reached, remove an existing field before adding a new one.
- All changes apply to future transactions.
Common Use Cases
- Order reference numbers
- Transport details
- Internal remarks or approval codes
- Customer-specific or transaction-specific information
Customfield setup in Sales Invoice:
- You can locate Custom Fields when adding or editing a Sales Invoice to configure them for printing.
- To modify or establish custom fields for an item, it is necessary to edit each individual item master accordingly.
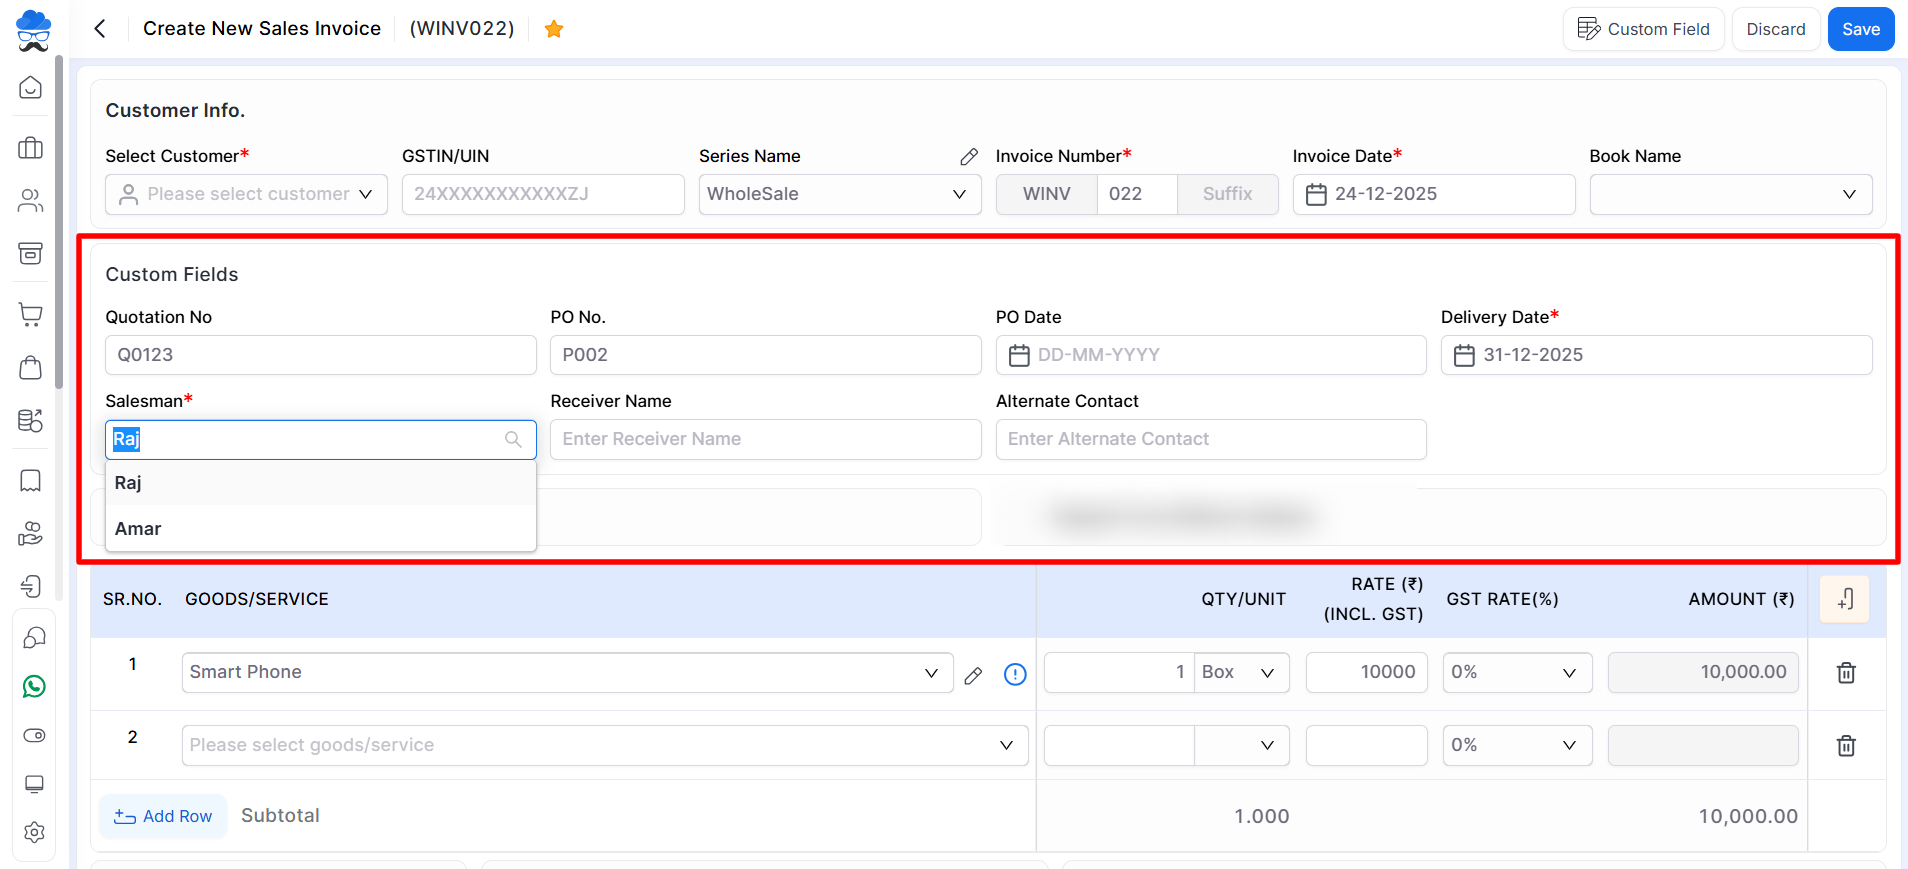
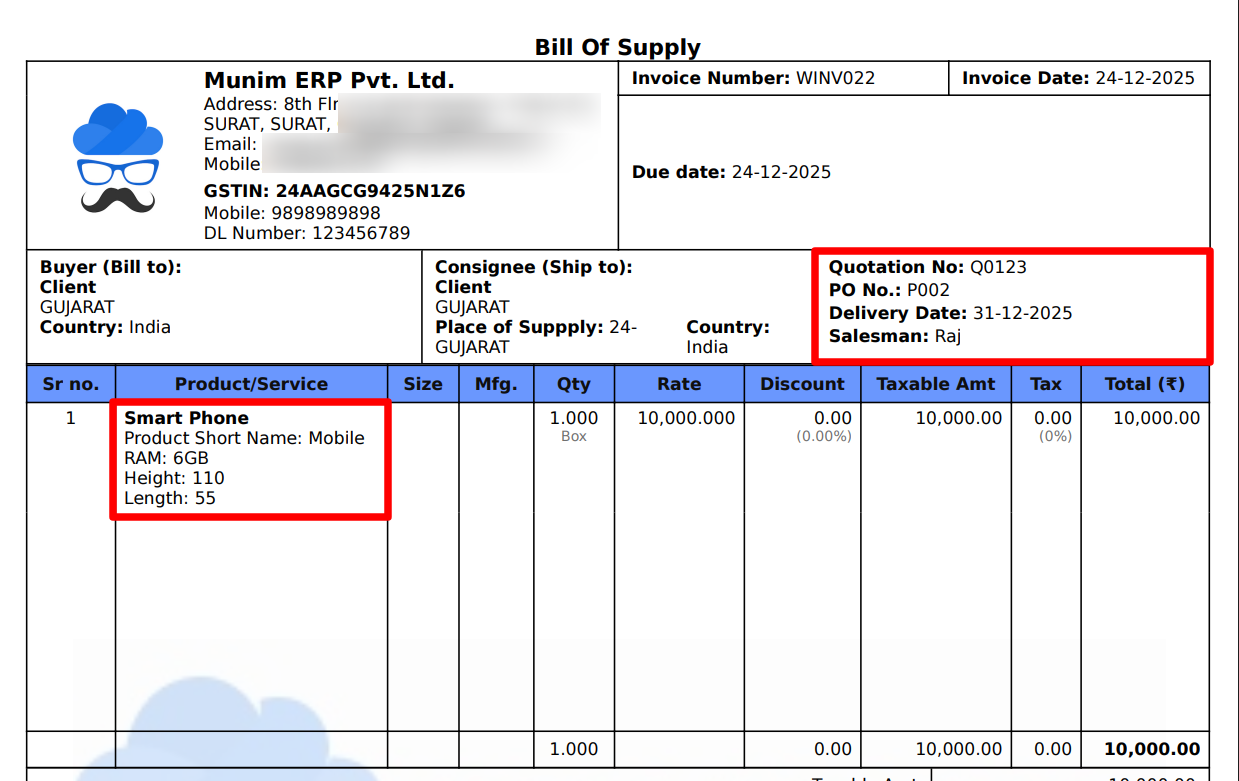
Custom Fields Display in Transaction Printouts:
- Following the addition and configuration of custom fields, users can add them while creating sales invoices.
- After invoice saving, users may review the sales invoice printout to evaluate the visual presentation.
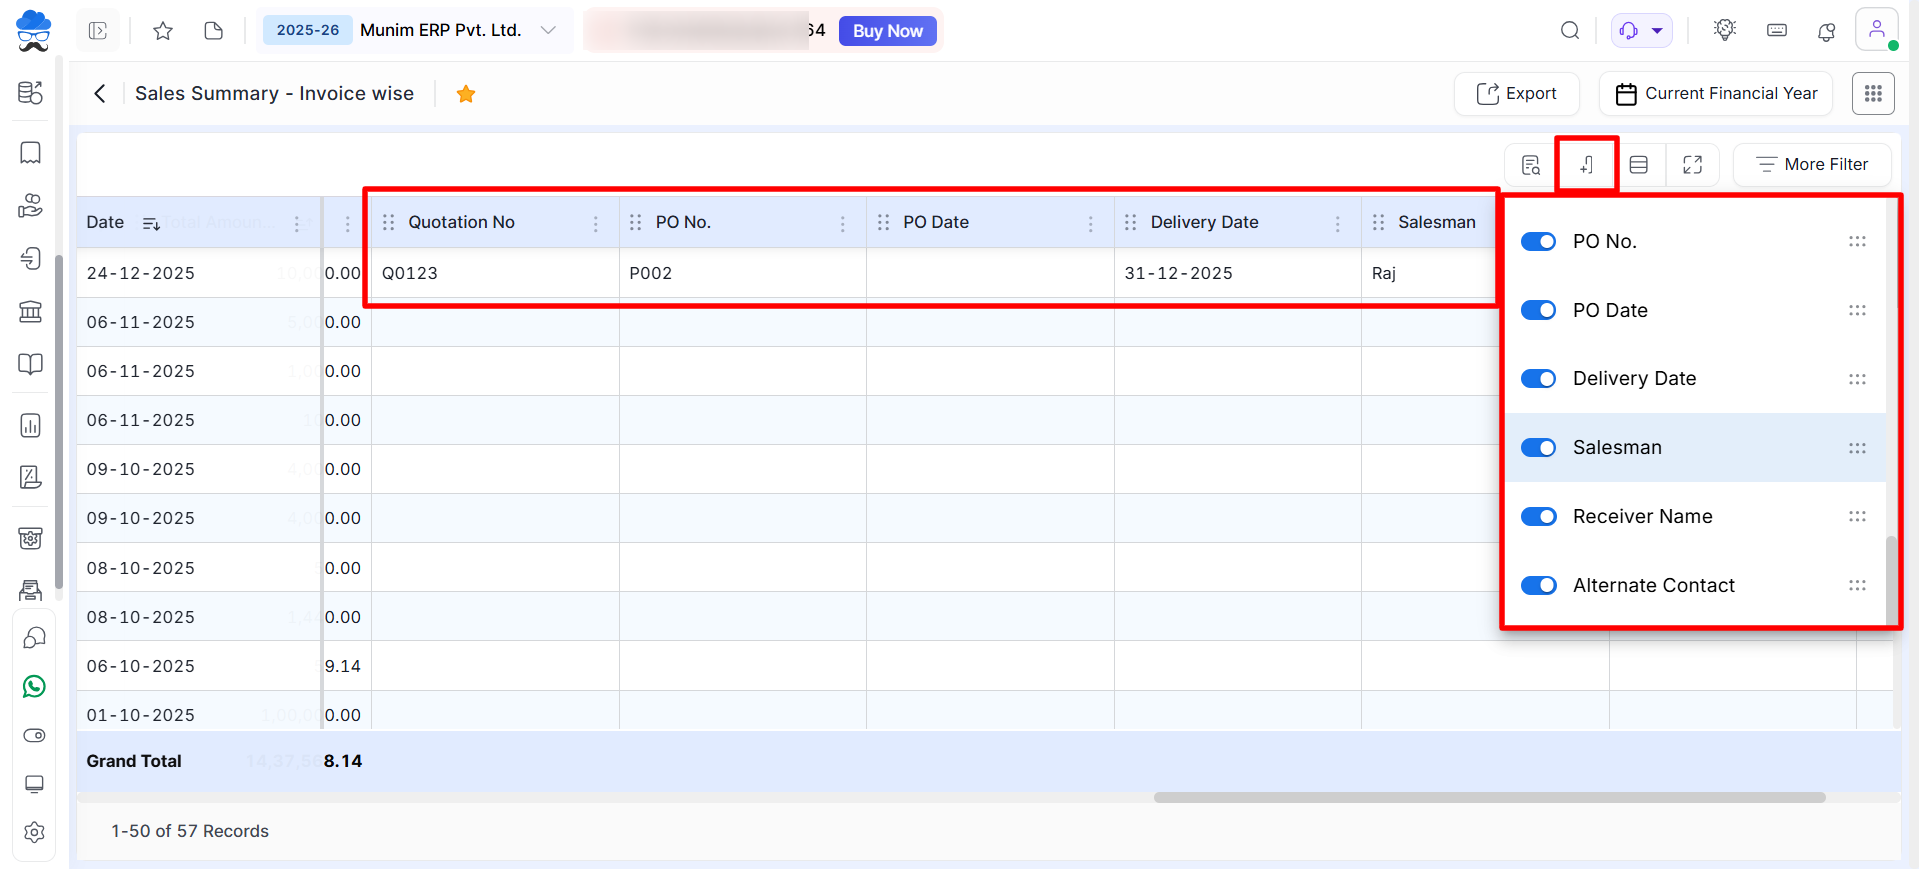
Custom Fields effect in Reports:
- Upon the creation of transactions using Custom Fields, they will be reflected in several relevant reports, such as:
- Sales Register, Sales Summary, Item Rate card, Item Sales Summary Report, etc.
- Within the reports, users can enable or disable custom field columns to display them as required in each report.
If you need help or guidance or encounter issues, contact our support team. We are available to answer questions and provide assistance for a smooth experience.


