 371 views
 The Party Master module in Munim Accounting Software allows users to efficiently manage all their business contacts — including both Customers and Vendors — in one place.
From this section, you can create, view, edit, and organise your clients and suppliers along with their GSTIN, contact information, and state details.
It serves as the foundation for all transactions, such as Sales, Purchase, Receipts, and Payments, ensuring that every entry is linked to the correct party record.
Create Customer (Sundry Debtors) or Vendor (Sundry Creditor) Account:
- Click on the Party Master from the Master section in the left main menu.
- Next, select either the Customer or Vendor module to proceed with the creation.
- Click on the Create Customer/Vendor button at the top right corner or press Alt+N key on the list page.
- The Under group field defaults to either “Sundry Debtors (Customer)” or “Sundry Creditor (Vendor)” based on whether a customer or vendor is selected.
+−⟲
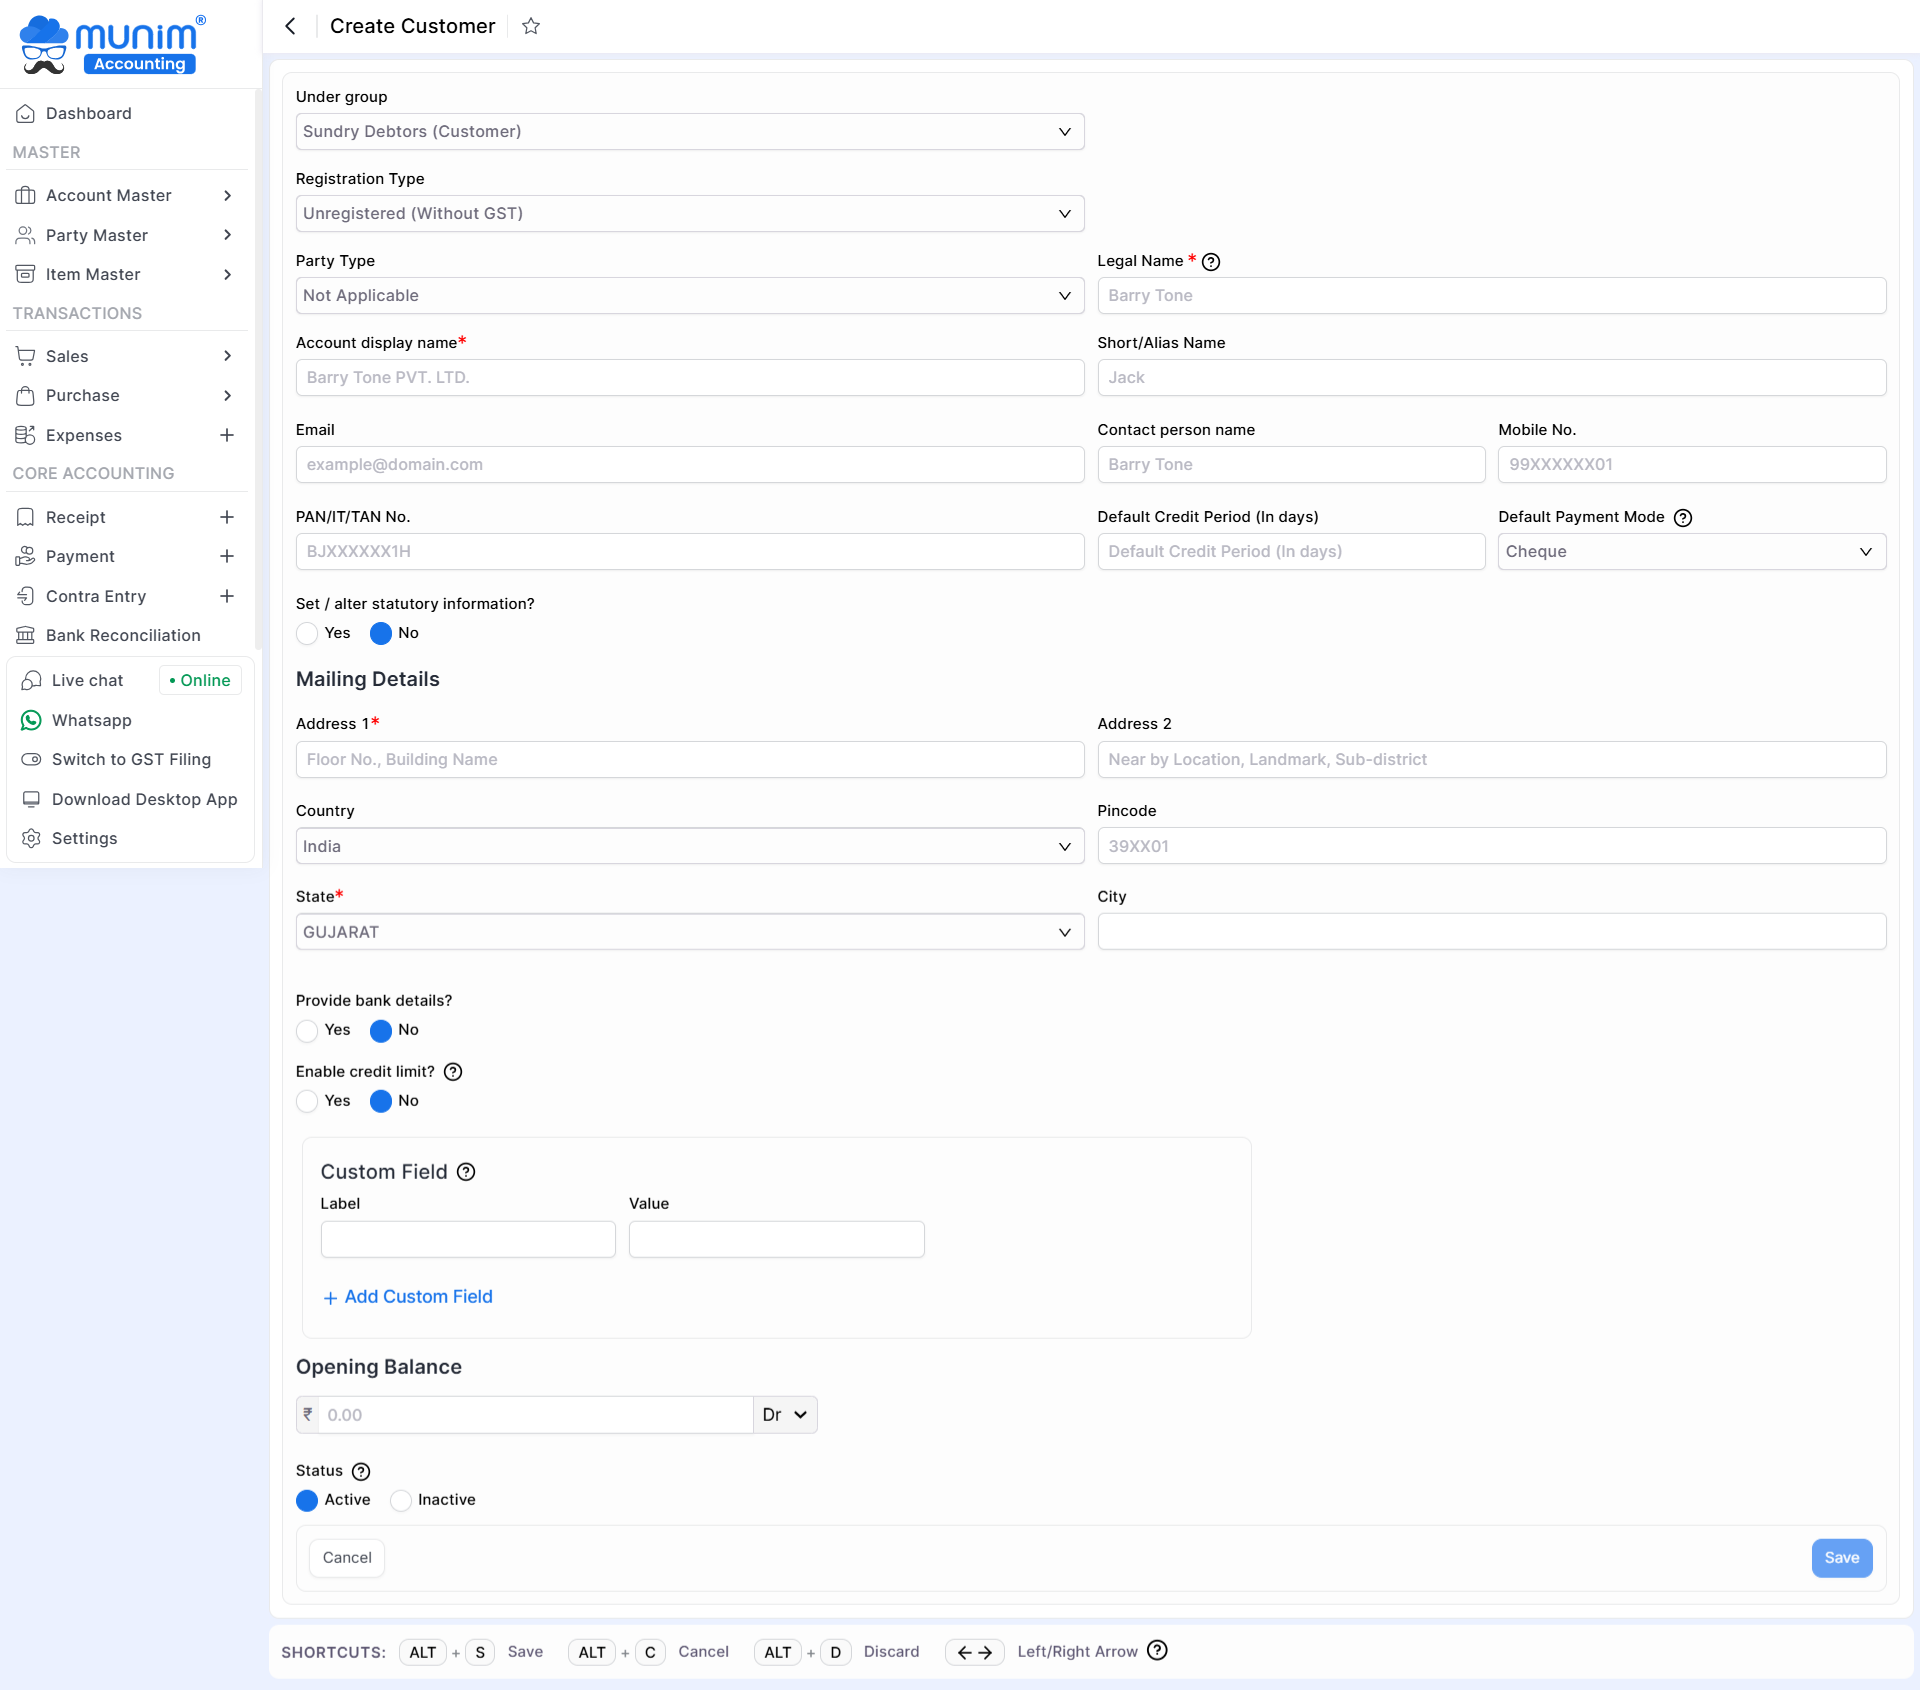
Field Information for Customer/Vendor ledger:
| Field | Description | Note |
|---|---|---|
| Under group | Here, account type will be auto-selected from Sundry Debtors/Creditors ledger accordingly | |
| Registration Type | Select your customer’s GST registration type here. | GST number auto-fills the data. |
| GSTIN/UIN | Here, enter the GSTIN / UIN number of your customer. If you enter a valid GSTIN number, the data from the field of Registration type, Ledger name, PAN / IT number, and Mailing details (Name, Address, Country, Pincode, State, City) will be automated. | Mandatory for Regular & Composition types. |
| Party type | Here, select your customer’s party type. | |
| Legal Name | Here write legal name. | |
| Account name | Here, write your customer account name. | GST number auto-fills the data. |
| Short name | Here, write your customer’s short name. | |
| Here, write your customer’s email address. | ||
| Mobile no | Here, write your customer’s mobile number. | |
| PAN/IT no | Here, write your customer’s pan number. | |
| Default credit period(days) | Here, write your customer’s credit period. | |
| Mode | Here, select the payment mode. | Here by default set payment mode is the cheque. |
| Address1 | Here, write your customer address 1 | GST number auto-fills the data. |
| Address 2 | Here, write your customer address 2 | GST number auto-fills the data. |
| Country | Here, select your customer country. | GST number auto-fills the data. |
| Pincode | Here, write your customer Pincode. | GST number auto-fills the data. |
| State | Here, select your customer state. | GST number auto-fills the data. |
| City | Here, select your customer city. | GST number auto-fills the data. |
| Custom Field | User can define fields as per their requirement and view on the sales invoice For example, in the medical industry, there is a Drug license multiple numbers requirement, so users can able to manage it | |
| Label | Here, write a custom field label. | |
| Value | Here, write a custom field value. | |
| Yes/No show in print | If the radio button is “Yes”, then this custom field is shown on the sales invoice print. | |
| Opening Balance | Here, write the opening balance for this customer. | |
| Is Active? | Here, if you select “Yes“, then this account is shown in all modules, and if you select “No“, then this account is not shown in all modules. |
Set/alter Statutory information: If you select Yes, then you are able to manage TDS and TCS transactions.
+−⟲
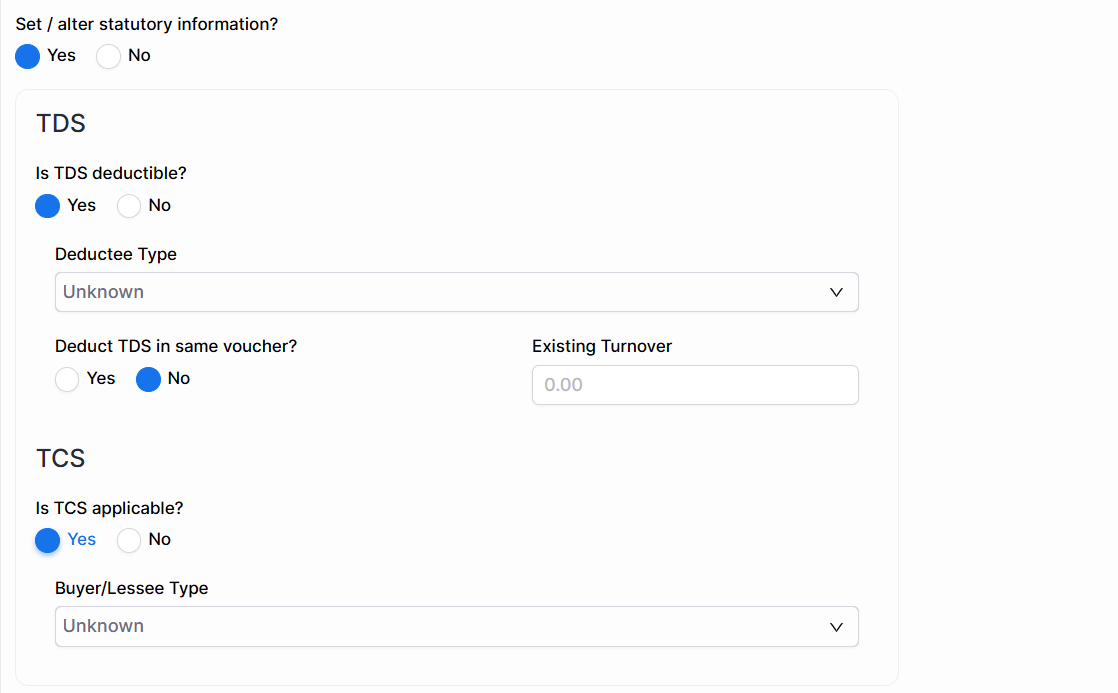
| Field | Description |
|---|---|
| Is TDS deductible? | If you select Yes, then you are able to manage TDS transactions for this ledger. |
| Deductee type | Here, select the Deductee type for this ledger. |
| Deduct TDS in same voucher? | If you select Yes, then the TDS value is paid with the same voucher. |
| Existing Turnover | Here you can add the existing turnover with this customer. |
| Is TCS applicable? | If you select Yes, then you are able to manage TCS transactions for this ledger. |
| Buyer/Lessee type | Here, select the Buyer/Lessee type for this ledger. |
Provide bank details & Set Credit Limit:
+−⟲
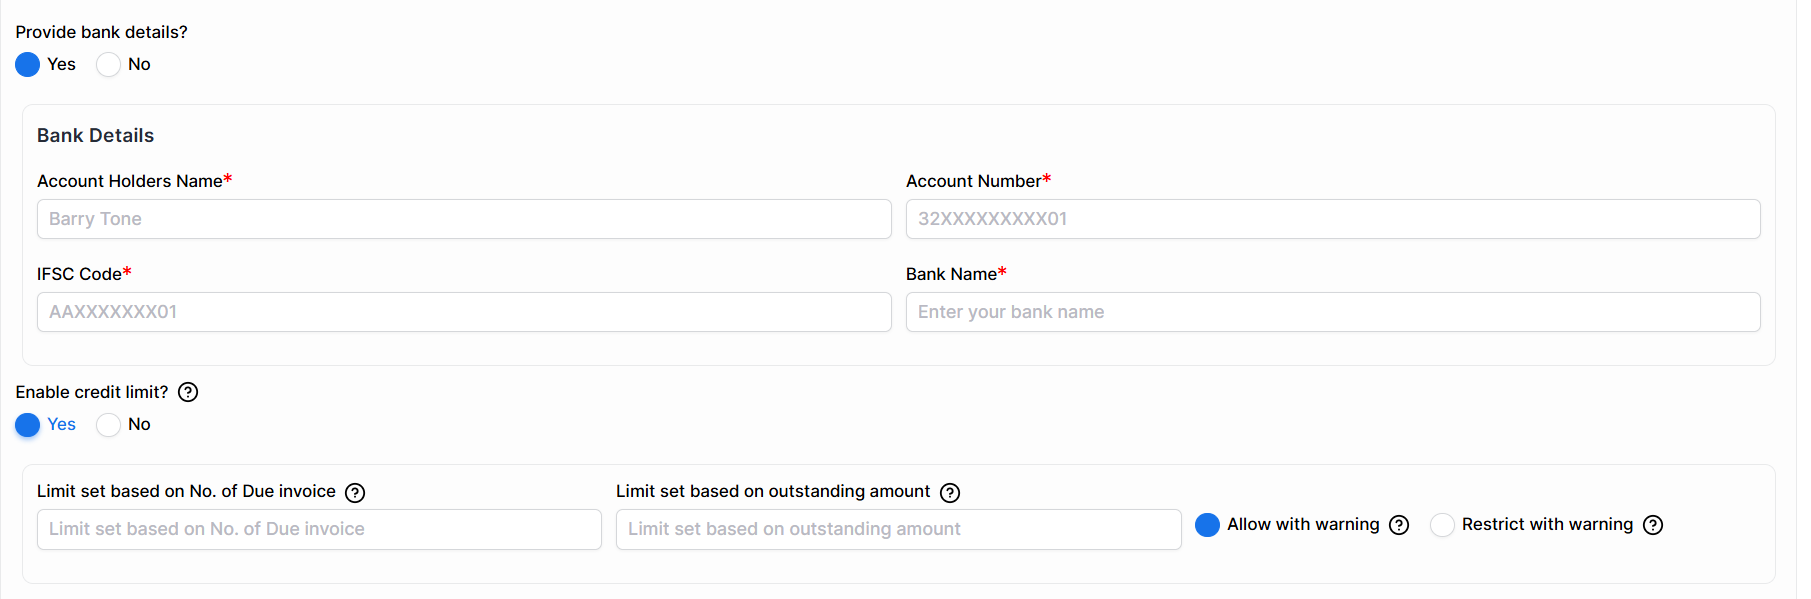
- If the “Provide Bank Details?” option is selected as “Yes“, you will be able to input your customer’s bank details.
| Field | Description | Note |
|---|---|---|
| Account-holders name | Here, write your ledger account holder’s name | Mandatory field |
| A/C no. | Here, write your customer Bank A/C no. | Mandatory field |
| IFSC code | Here, write your customer’s Bank IFSC code. | Mandatory field |
| Bank name | Here, select your customer Bank name. | Mandatory field |
- If the “Enable Credit Limit?” option is selected as “Yes“, you will be able to set limits based on the number of due invoices or outstanding amounts for the customer.
| Field | Description |
|---|---|
| Limit set based on No. of Due invoice | Users can set a limit based on the number of outstanding invoices. e.g., setting the value to 1 (one) indicates only one outstanding invoice allowed. |
| Limit set based on outstanding amount | Users can set a limit based on the outstanding amount; e.g., setting the value to 1 (one) indicates that this amount of outstanding is allowed. |
| Allow with warning | If the user desires to issue a warning notification while still permitting invoice creation, this option should be selected. |
| Restrict with warning | If the user intends to issue a warning notification and prevent invoice creation, this option should be selected. |


